Email spoofing allows attackers to send messages that appear to come from your domain. A DMARC record tells receiving mail servers how to handle emails that fail authentication checks, protecting your domain’s reputation and preventing unauthorised use.
You will create a DMARC record in cPanel’s DNS Zone Editor, configure authentication policies and verify the record is active. Once published, mail servers can validate emails claiming to be from your domain.
Before you begin
- You need access to cPanel for your domain.
- We recommend setting up SPF and DKIM records before configuring DMARC.
- You need an email address to receive DMARC reports.
Access the DNS Zone Editor
The DNS Zone Editor manages all DNS records for your domain, including the TXT record that stores your DMARC policy. You need to access this tool before creating the record.
- Log in to cPanel.
Access your cPanel account using the credentials provided by your hosting provider. - Open the Domains section.
Scroll down to find the Domains section on the cPanel home page.
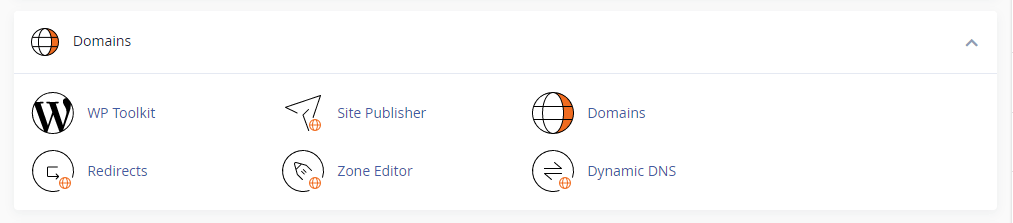
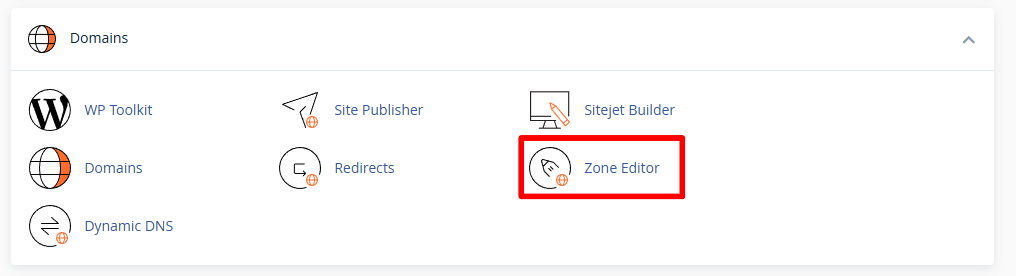
- Click Zone Editor.
This opens the DNS management interface where you can add and modify DNS records.
- Select your domain.
Find the domain you want to configure and click Manage next to it. This displays all existing DNS records for that domain.
Create the DMARC record
DMARC records use the TXT record type and follow a specific format. The record tells receiving servers what to do with emails that fail SPF or DKIM checks and where to send authentication reports.
- Add a new TXT record.
Click Add Record and select TXT from the record type dropdown menu. - Enter the record name.
In the Name field, type_dmarc.yourdomain.co.ukreplacing yourdomain.co.uk with your actual domain name. The underscore prefix is required for DMARC records. - Add the DMARC policy.
In the Value field, enter your DMARC policy string. Start with this example:v=DMARC1; p=none; rua=mailto:reports@yourdomain.co.uk; ruf=mailto:reports@yourdomain.co.uk; fo=1 - Replace the email addresses.
Change email addresses to an address you control. Theruafield receives aggregate reports, whilerufreceives forensic reports about individual failures. - Leave TTL as default.
The TTL (Time To Live) value controls how long DNS servers cache the record. The default value works for most configurations. - Save the record.
Click Add Record to publish your DMARC policy. The record becomes active once DNS propagation completes, typically within a few hours.
The p=none policy monitors authentication without affecting mail delivery. This allows you to review reports before enforcing stricter policies. Change this to p=quarantine to move failed emails to spam folders, or p=reject to block them entirely.
Verify the DMARC record
DNS changes take time to propagate across the internet. You should verify the record is published correctly before relying on it for email authentication.
- Wait for DNS propagation.
Allow 1-4 hours for the record to propagate to DNS servers worldwide. Propagation times vary depending on your DNS provider and TTL settings. - Check the record with an online tool.
Visit MXToolbox’s DMARC lookup and enter your domain name. The tool displays your published DMARC record and highlights any syntax errors. - Review the results.
Confirm the policy matches what you entered in cPanel. If the tool shows no record found, wait longer for propagation or check for typos in the record name.
Wrapping up
Your DMARC record is now active and protecting your domain from email spoofing. You configured the DNS record in cPanel, set an authentication policy and verified publication. Mail servers receiving emails from your domain can now check authentication and send you reports about failures.
Monitor the reports sent to your configured email address over the next few weeks. These show which sources send email on your behalf and whether messages pass authentication checks. Once you understand your email traffic, consider changing the policy from p=none to p=quarantine or p=reject for stronger protection. Our SPF setup guide covers another email authentication method that works alongside DMARC.
Did this guide solve your problem?
Still stuck?
Our UK support team answers tickets and live chat every day. Send us the guide you were following and where it stopped working.
Keep learning
Find a guide
Related guides

Hosting that keeps up
cPanel hosting with the tools these guides use, backed by UK support.
Get cPanel Hosting
Keep your site secure
Protect your visitors with SSL certificates – from budget DV to premium EV certificates.
Get SSL Certificate