Email spoofing allows spammers to forge sender addresses and impersonate legitimate domains. An SPF record prevents this by publishing a list of authorised mail servers for your domain. When receiving mail servers check your SPF record, they can verify whether incoming messages genuinely came from your domain or should be rejected as spam.
You will add an SPF record through cPanel using either the email deliverability tool or the zone editor. Both methods publish the same DNS record that authenticates your outbound mail and improves deliverability.
Before you begin
- You need access to cPanel for your hosting account.
- Your domain’s DNS must be managed through cPanel (not an external provider).
- We recommend using the email deliverability tool for automatic configuration.
Add an SPF record using the email deliverability tool
The email deliverability tool generates and installs an SPF record automatically. This method requires no manual DNS editing and configures the record based on your current mail server settings.
- Open the email deliverability tool.
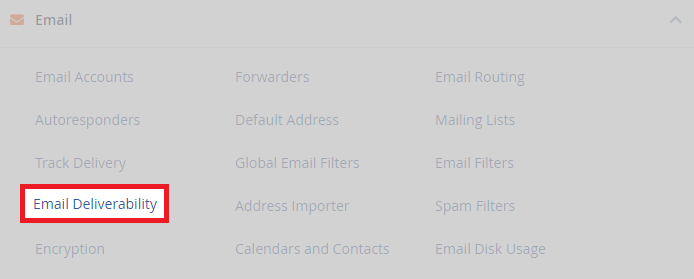
Log in to cPanel and locate the Email section. Click Email Deliverability. The section layout varies depending on your cPanel theme.
- Select your domain.
The tool displays all domains on your account. Click Manage next to the domain where you want to add an SPF record.

- Install the suggested SPF record.
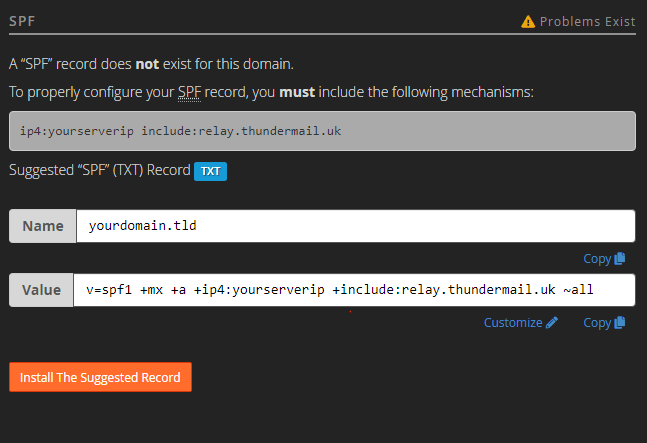
Scroll to the SPF section. The tool displays a suggested record based on your mail server configuration. Click Install the suggested record to add it to your DNS zone.
The SPF record is now active. DNS changes typically propagate within a few hours, after which receiving mail servers will authenticate your outbound messages against the published record.
Add an SPF record using the zone editor
The zone editor allows manual SPF record creation. Use this method when you need to customise the record beyond the suggested configuration or when managing DNS records directly.
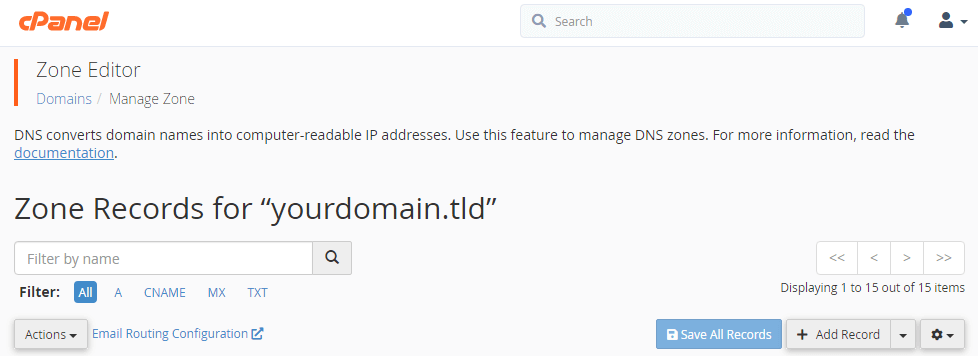
- Open the zone editor.
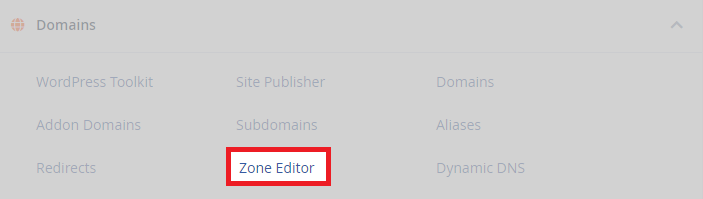
In cPanel, scroll to the Domains section and click Zone Editor.
- Select your domain.
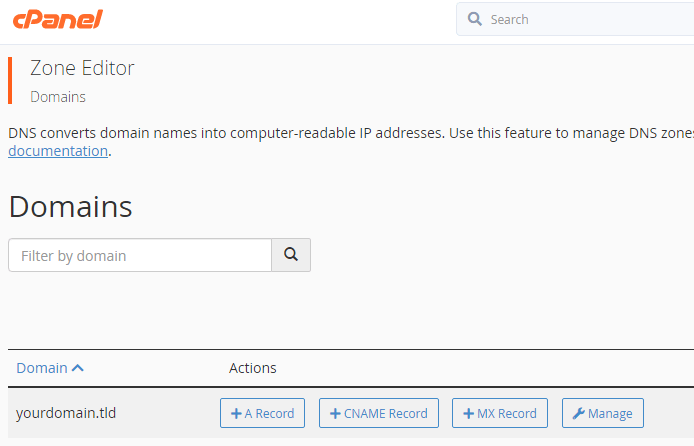
Click Manage next to the domain where you want to add the SPF record.
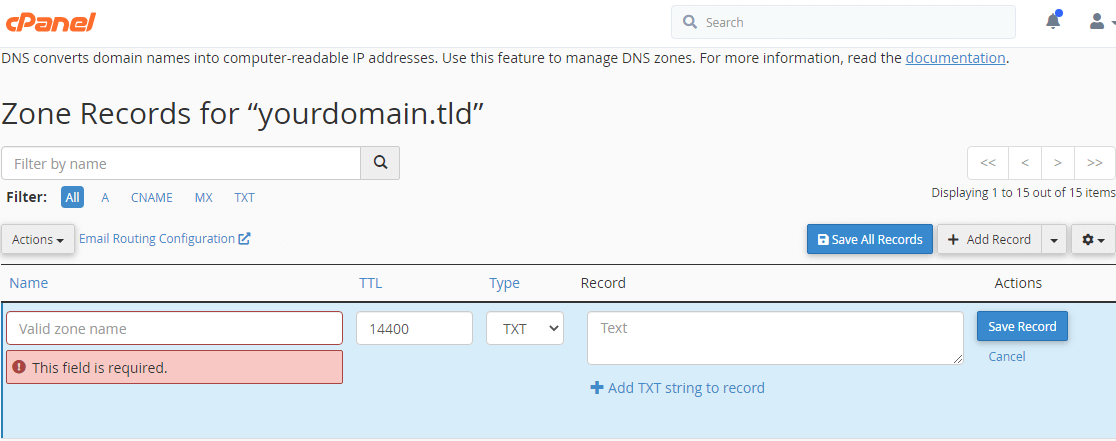
- Create a new TXT record.
On the zone records page, click Add Record. Change the record type to TXT using the dropdown menu. SPF records use the TXT record type because DNS zones can contain multiple text-based records.
- Enter the domain name.
In the Name field, type your domain followed by a period. For example, if your domain is yourdomain.co.uk, enteryourdomain.co.uk.The trailing period indicates the fully qualified domain name. - Add the SPF record value.
In the Record field, enter your SPF record. A basic record looks likev=spf1 +a +mx ~all. This authorises your domain’s A record and MX records to send mail. Click Save Record to publish the change.
Your SPF record is now published in your DNS zone. Mail servers will begin checking this record when processing emails from your domain.
Understanding SPF record syntax
SPF records follow a specific format that defines which mail servers can send email for your domain. Learning the basic syntax helps you troubleshoot deliverability issues or customise your configuration.
A typical SPF record looks like this:
v=spf1 ip4:192.168.0.1 +a +mx include:servers.mail.net ~allThe record begins with v=spf1, which identifies this TXT record as an SPF record. This prefix is required because domains can have multiple TXT records serving different purposes. The remaining components consist of qualifiers and mechanisms that define authorised senders.
SPF qualifiers
Qualifiers determine how receiving mail servers should treat messages from specific sources:
+(Pass): Messages from this source pass SPF checks. This is the default qualifier.-(Fail): Messages from this source fail SPF checks and should be rejected.~(Soft Fail): Messages from this source are marked as failing SPF but may still be delivered.?(Neutral): SPF check produces no result, neither passing nor failing.
SPF mechanisms
Mechanisms specify which mail servers are authorised to send email for your domain:
ip4: Authorises a specific IPv4 address. Example:ip4:192.168.0.1a: Authorises the IP address in your domain’s A record.mx: Authorises the IP addresses in your domain’s MX records.include: References another domain’s SPF record. Example:include:servers.mail.netall: Matches all IP addresses. This appears at the end of the record with a qualifier that defines the default policy.
Most SPF records end with ~all, which soft-fails messages from unauthorised sources. This prevents legitimate mail from being rejected due to configuration errors whilst still flagging suspicious messages.
Further reading on email authentication
SPF works alongside other email authentication protocols to verify sender identity and prevent spoofing. DKIM (DomainKeys Identified Mail) adds a digital signature to outbound messages, allowing receiving servers to verify that the message content has not been altered in transit. DMARC (Domain-based Message Authentication, Reporting and Conformance) builds on SPF and DKIM by defining how receiving servers should handle authentication failures and providing reporting on email activity.
Implementing all three protocols provides the strongest protection against email spoofing and improves deliverability to major mail providers. Gmail, Outlook and other services increasingly require proper authentication before accepting mail from custom domains.
For complete protection, review our article on configuring DMARC records after implementing SPF and DKIM.
Wrapping up
Your domain now has an SPF record that authenticates outbound mail and prevents spoofing. You configured the record using either the email deliverability tool for automatic setup or the zone editor for manual control. Receiving mail servers will check this record when processing messages from your domain.
Monitor your email deliverability over the next few days. Check that messages reach recipients’ inboxes rather than spam folders. Consider adding DKIM and DMARC records for complete email authentication..

Ready to get started?
Launch your website with our reliable cPanel hosting with unlimited bandwidth and expert support.
Get cPanel Hosting