Microsoft Outlook lets you manage your email without logging into webmail each time. You can set up your account automatically or configure IMAP and SMTP settings manually to send and receive messages through your custom domain email address.
This guide covers both automatic and manual setup methods. Manual configuration gives you control over protocol selection and server settings, which is useful when automatic setup fails or you need specific IMAP or POP3 behaviour.
Before you begin
- You need your email address and password.
- We recommend reading our guide on POP3 vs IMAP to choose the right protocol for your needs.
Try automatic setup first
Outlook can detect your email settings automatically. This method works for most accounts and saves time compared to manual configuration.
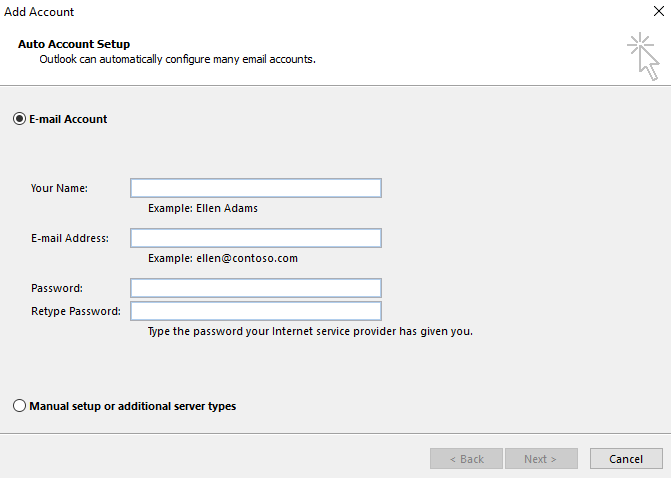
- Open the account setup wizard.
In Outlook, go to File > Add Account. The automatic setup screen appears. - Enter your email address.
Type your full email address in the field provided and click Connect. Outlook attempts to detect your server settings automatically. - Enter your password when prompted.
If Outlook finds your settings, it asks for your password. Enter it and click Connect to complete setup.
If automatic setup fails, Outlook displays an error message. You will need to configure your account manually using the steps below.
Configure your account manually
Manual setup lets you specify IMAP or POP3 protocol and enter server details directly. This method works when automatic detection fails or you need specific protocol settings.
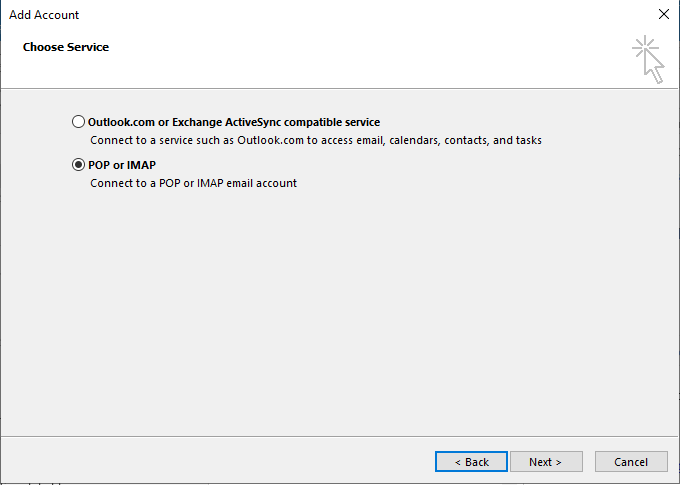
- Select manual setup.
When automatic setup fails, click Change account settings or Manual setup. Choose POP or IMAP from the account type options. - Enter your details.
In the User Information section, enter your name (this appears to recipients) and your full email address. - Choose your account type.
Select either IMAP or POP3 from the Account Type dropdown. IMAP keeps messages on the server and syncs across devices. POP3 downloads messages to your computer and optionally removes them from the server. - Configure incoming mail server.
In the Server Information section, enter your domain name in the Incoming mail server field. For example, if your email is name@yourdomain.co.uk, enteryourdomain.co.uk. - Configure outgoing mail server.
Enter the same domain name in the Outgoing mail server (SMTP) field. This ensures your sent messages route through your domain’s mail server. - Enter login credentials.
In the Logon Information section, enter your full email address as the username and your email password.
Your basic account settings are now configured. You need to set authentication and port settings before testing the connection.
Configure outgoing server authentication
Your outgoing mail server requires authentication to prevent unauthorised use. You need to enable this setting and specify which credentials to use.
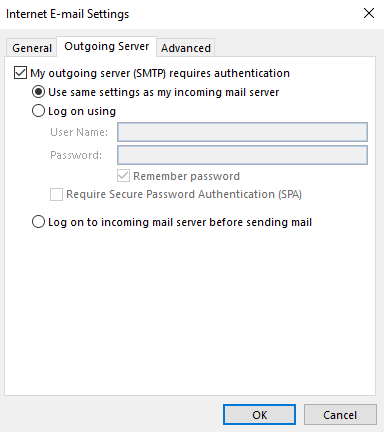
- Open advanced settings.
Click More Settings at the bottom of the account setup window. A new dialogue box opens. - Enable SMTP authentication.
Click the Outgoing Server tab. Tick the checkbox labelled My outgoing server (SMTP) requires authentication. - Use the same credentials.
Select Use same settings as my incoming mail server. This prevents you entering your username and password again.
Authentication is now enabled. You need to verify port numbers before completing setup.
Set port numbers
Port numbers tell Outlook which network ports to use for incoming and outgoing connections. Different ports apply depending on whether you use SSL encryption.
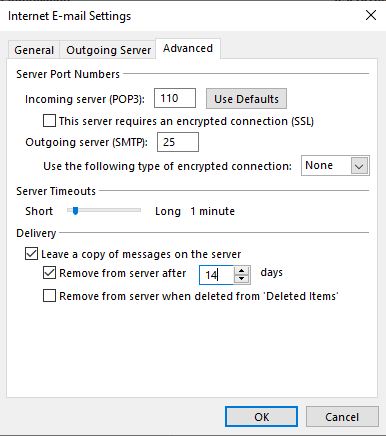
- Open the Advanced tab.
In the More Settings dialogue, click the Advanced tab. Port number fields appear for incoming and outgoing servers. - Set incoming server port.
For IMAP without SSL, use port143. For IMAP with SSL, use port993. For POP3 without SSL, use port110. For POP3 with SSL, use port995. - Set outgoing server port.
For SMTP without SSL, use port25. For SMTP with SSL, use port465. - Save your settings.
Click OK to close the More Settings dialogue. You return to the main account setup window.
Your account is now fully configured. Test the connection to confirm everything works correctly.
Test your connection
Outlook includes a testing tool that verifies your settings by attempting to send and receive test messages. This confirms your configuration works before you start using the account.
- Start the test.
Click Next in the account setup window. Outlook opens the test account settings dialogue and begins checking your configuration. - Review the results.
Green ticks indicate successful tests. Red crosses indicate failures. If any tests fail, review your server settings, port numbers and authentication configuration. - Complete setup.
If all tests pass, click Close and then Finish. Your account is ready to use.
Wrapping up
Your email account is now configured in Microsoft Outlook. You set up either automatic or manual configuration, enabled SMTP authentication and verified port settings. You can now send and receive messages through your custom domain email address without accessing webmail.
Test your setup by sending a message to another email address and checking it arrives correctly. If you need to access your messages from multiple devices, read our guide on choosing between POP3 and IMAP. Our domain name services include email hosting with your custom domain.
If you run into any trouble, get in touch and our team will be happy to help.

Ready to get started?
Launch your website with our reliable cPanel hosting with unlimited bandwidth and expert support.
Get cPanel Hosting