The LAMP stack (Linux, Apache, MySQL, PHP) provides a complete foundation for hosting websites and web applications. Installing it on AlmaLinux gives you a stable, enterprise-grade platform that powers everything from personal blogs to high-traffic business sites.
You will install and configure each component of the LAMP stack, open the necessary firewall ports and verify that all services work together correctly. Once complete, your server will be ready to host websites and run PHP applications with MySQL database support.
Before you begin
- You need root access to an AlmaLinux VPS.
- Your server should have a fresh AlmaLinux installation.
- We recommend updating all system packages before installing new software.
Prepare your AlmaLinux server
Before installing the LAMP stack components, you need to update existing packages and configure firewall rules. This ensures your server has the latest security patches and allows web traffic to reach Apache.
- Connect to your server via SSH.
Use PuTTY on Windows or Terminal on macOS and Linux. Enter the IP address or hostname from your welcome email and log in with your root credentials. - Update all installed packages.
Run the following command to check for and install available updates. This prevents compatibility issues with new software installations.
dnf updateType y and press Enter when prompted to confirm the updates.
- Check current firewall rules.
View which services are currently allowed through the firewall. This shows whether HTTP and HTTPS traffic can reach your server.
firewall-cmd --zone=public --list-services
- Open HTTP and HTTPS ports.
Add firewall rules to allow web traffic on ports 80 and 443. The--permanentflag ensures these rules persist after server restarts.
firewall-cmd --permanent --zone=public --add-service=http
firewall-cmd --permanent --zone=public --add-service=https
firewall-cmd --reload- Verify the firewall changes.
Run the list command again to confirm HTTP and HTTPS now appear in the allowed services.
firewall-cmd --zone=public --list-services
Your server now accepts incoming web traffic. You can proceed with installing Apache.
Install and configure Apache
Apache handles incoming HTTP requests and serves web pages to visitors. You will install the httpd package (Apache’s name on Red Hat-based systems) and configure it to start automatically when your server boots.
- Install the Apache web server.
The httpd package contains Apache and its core modules. Typeywhen prompted to confirm the installation.
dnf install httpd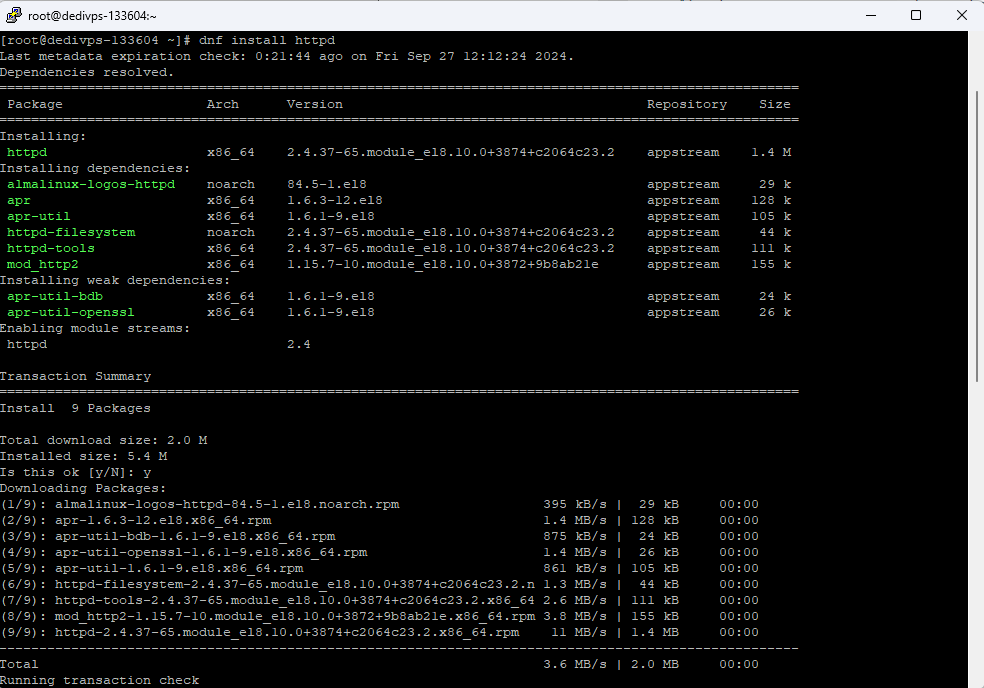
- Start Apache and enable automatic startup.
The first command starts Apache immediately. The second ensures Apache starts automatically after server reboots.
systemctl start httpd
systemctl enable httpd- Test Apache is running.
Open a web browser and navigate to your server’s IP address. You should see the default Apache test page confirming the web server is active.
Apache is now serving web pages. Next you will install MySQL to provide database functionality.
Install and configure MySQL
MySQL stores and manages data for your web applications. You will install the MySQL server, secure the installation by setting a root password and test the database connection.
- Install MySQL packages.
Install the MySQL client and server components. The client lets you interact with databases, while the server handles data storage and queries.
dnf install mysql mysql-serverType y when prompted to proceed with the installation.
- Start MySQL and enable automatic startup.
These commands start the MySQL service immediately and configure it to launch on boot.
systemctl start mysqld
systemctl enable mysqld- Run the security script.
This interactive script removes insecure default settings. You will set a root password, remove anonymous users and disable remote root login.
mysql_secure_installationFollow the prompts to configure your security preferences. We recommend answering yes to all questions for maximum security.
- Test the MySQL connection.
Log in to MySQL using the root account and the password you just created. This confirms MySQL is running and accepting connections.
mysql -u root -pEnter your password when prompted. You will see the MySQL command prompt if the connection succeeds. Press Ctrl+D to exit.
Your database server is now secured and ready to store application data. The final component is PHP.
Install PHP on AlmaLinux
PHP processes dynamic content and connects your web applications to MySQL. You will enable a specific PHP version, install important extensions and verify PHP works with Apache.
- Check available PHP versions.
AlmaLinux offers multiple PHP versions as modules. This command lists all available versions so you can choose the one your applications require.
dnf module list php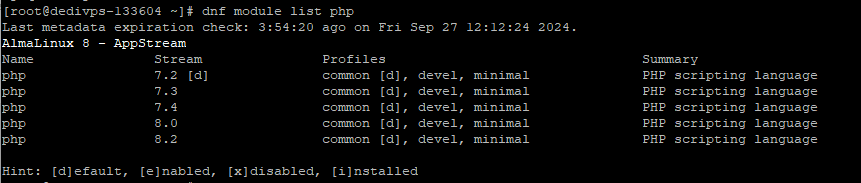
- Enable your chosen PHP version.
This example enables PHP 8.2. Replace8.2with your preferred version if different. Enabling a module makes that version available for installation.
dnf module enable php:8.2- Install PHP and important extensions.
These packages provide core PHP functionality and common extensions that most web applications need. The extensions handle tasks like image processing, database connections and XML parsing.
dnf install php php-fpm php-zip php-intl php-opcache php-gd php-mbstring php-xml php-mysqlnd- Create a PHP test file.
This file displays PHP configuration information. Creating it in Apache’s document root lets you verify PHP processes correctly through the web server.
nano /var/www/html/index.phpAdd the following content to the file:
<?php phpinfo();?>Press Ctrl+X, then Y, then Enter to save and exit.
- Restart Apache to load PHP.
Apache needs to restart to recognise the newly installed PHP module and begin processing PHP files.
systemctl restart httpd- Test PHP in your browser.
Navigate tohttp://your-server-ip/index.phpreplacing your-server-ip with your actual server address. You should see a detailed PHP information page listing all installed modules and configuration settings.
Your LAMP stack is now fully installed and operational. All components work together to serve dynamic web content.
Further reading on the LAMP stack
The LAMP stack remains one of the most widely deployed web hosting environments due to its maturity, extensive documentation and broad software compatibility. Each component has evolved significantly over the years while maintaining backwards compatibility with existing applications.
Apache’s modular architecture allows you to extend functionality through hundreds of available modules. Common additions include mod_rewrite for URL manipulation, mod_security for web application firewall capabilities and mod_ssl for HTTPS support. The Apache HTTP Server documentation provides complete guides for configuring these modules and optimising server performance.
MySQL and its community fork MariaDB offer reliable database management with support for complex queries, transactions and replication. Understanding database optimisation becomes important as your applications grow. The MySQL documentation covers indexing strategies, query optimisation and backup procedures that help maintain database performance under load.
PHP continues to evolve with regular releases that improve performance and add new features. Each major version introduces changes that may affect existing code, so testing applications before upgrading PHP versions prevents compatibility issues.
Wrapping up
You have installed and configured a complete LAMP stack on AlmaLinux. Your server now runs Apache to handle web requests, MySQL to manage databases and PHP to process dynamic content. The firewall allows web traffic while maintaining security.
Test your setup by creating a simple PHP application that connects to MySQL. Monitor server logs in /var/log/httpd/ to identify any issues. Our VPS hosting provides the foundation for running custom LAMP configurations with full root access.

Need more power?
Get scalable resources with our VPS hosting with root access and optional software.
Get VPS Hosting
Starting something new?
Perfect for websites and small businesses unlimited bandwidth with cPanel hosting.
Get cPanel Hosting