Forcing HTTPS ensures all visitors connect to your website over an encrypted connection. Without HTTPS enabled, browsers flag your site as insecure and visitors see warnings that damage trust. This prevents data interception and confirms your SSL/TLS certificate is protecting every page.
You will configure server-level redirects to force HTTPS connections. This works by automatically redirecting HTTP requests to their HTTPS equivalents, ensuring no visitor accidentally loads an insecure version of your site.
Before you begin
- An SSL/TLS certificate must be installed on your domain.
- You need access to your hosting control panel or FTP client.
Force HTTPS using .htaccess
The .htaccess file controls server behaviour for your website. Adding redirect rules here forces all HTTP traffic to HTTPS at the server level, which works across all pages automatically.
- Enable viewing of hidden files.
In cPanel, click the Settings icon in the top right corner of File Manager. Tick the box labelled Show Hidden Files (dotfiles) and click Save. This makes the .htaccess file visible.
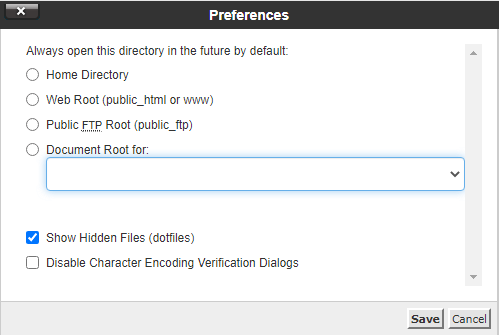
Enable hidden files in cPanel File Manager settings.
- Locate your .htaccess file.
Navigate to your website’s document root directory, typically named public_html or www. Find the .htaccess file in this directory.
- Add the redirect code.
Right-click the .htaccess file and select Edit. Add the following code at the top of the file:
RewriteEngine On RewriteCond %{HTTPS} off RewriteRule ^(.*)$ https://%{HTTP_HOST}%{REQUEST_URI} [L,R=301]
This code checks if HTTPS is off and redirects the request to the HTTPS version using a permanent 301 redirect.
- Save the file.
Click Save Changes in the top right corner of the editor. The redirect rules are now active.
- Test the redirect.
Open your browser and visit http://yourdomain.co.uk (replacing yourdomain.co.uk with your actual domain). The URL should automatically change to https://yourdomain.co.uk.
Force HTTPS in cPanel
In cPanel, AutoSSL installs a free SSL certificate and the Force HTTPS Redirect switch sends every visitor to the secure address. Install the certificate first, because cPanel only lets you turn on the redirect for a domain with a valid certificate.
- Access SSL/TLS Status.
Log in to cPanel and locate the Security section. Click SSL/TLS Status.
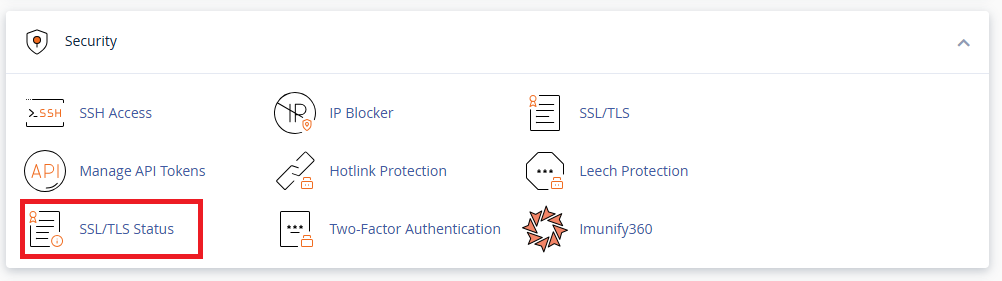
SSL/TLS Status in the cPanel Security section.
- Select your domain.
Tick the checkbox next to the domain you want to secure. If multiple domains are listed, select only the one you are configuring.
- Run AutoSSL.
Click Run AutoSSL at the top of the page. cPanel requests a certificate from the issuing authority and installs it automatically. Wait for the success notification to appear.
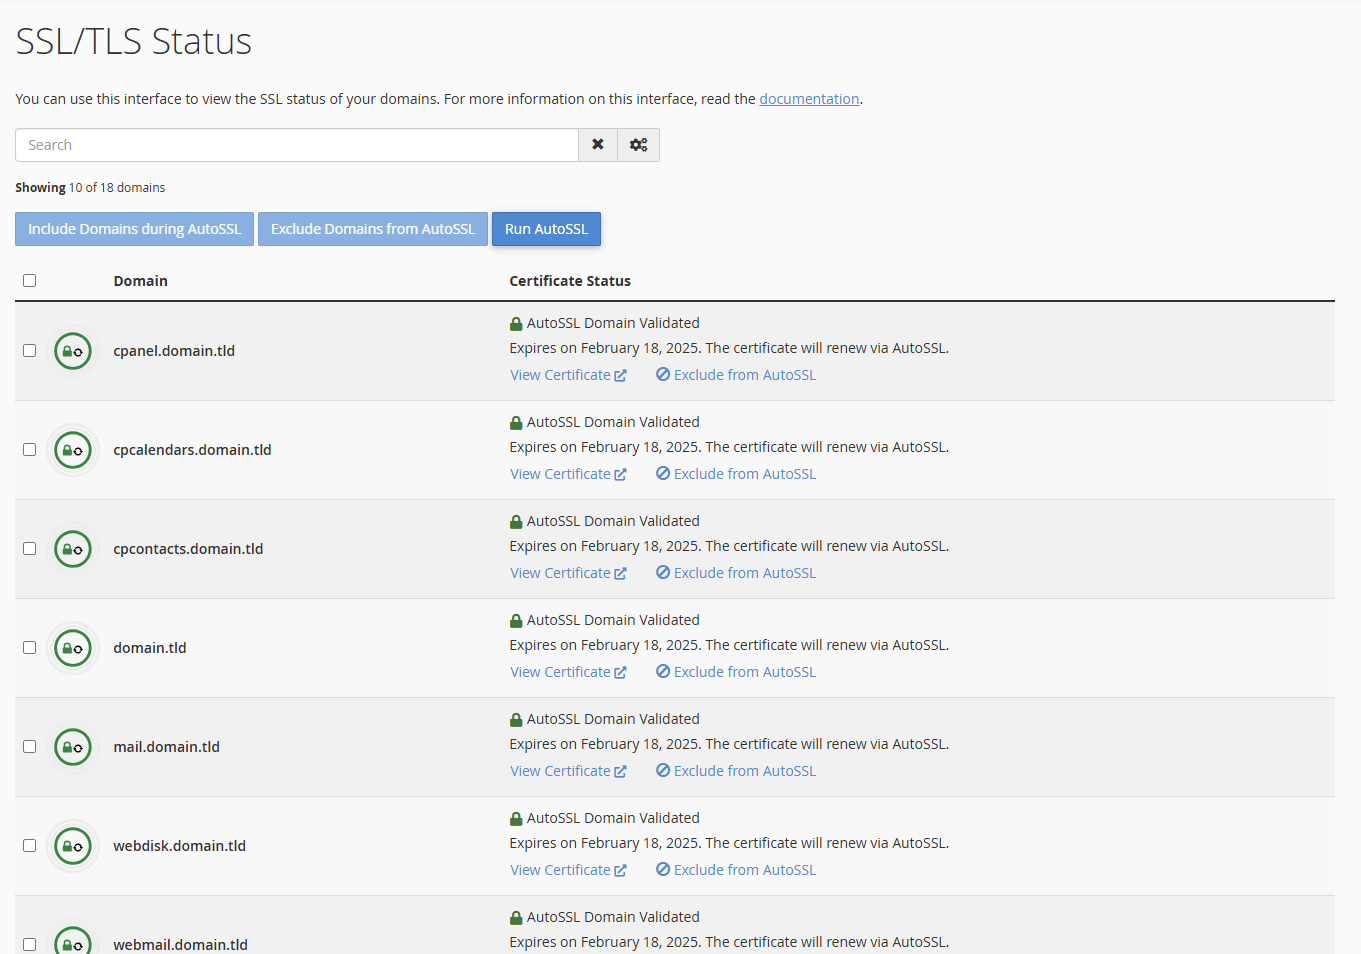
Run AutoSSL to install and configure SSL certificates.
- Turn on Force HTTPS Redirect.
In the Domains section, click Domains. Find your domain in the list and set its Force HTTPS Redirect switch to On.
- Verify HTTPS is active.
Visit your website using https://yourdomain.co.uk. The padlock icon should appear in your browser’s address bar, confirming the secure connection.
Force HTTPS in Plesk
Plesk includes built-in SSL management and redirect options. You will enable SSL support and configure a permanent redirect in the hosting settings for your domain.
- Open Websites & Domains.
Log in to Plesk and click Websites & Domains in the left sidebar. This displays all domains on your hosting account.
- Access Hosting Settings.
Find the domain you want to configure and click Hosting Settings from the options menu.
- Enable SSL and redirects.
Scroll to the Security section. Tick the boxes for SSL/TLS support and Permanent SEO-safe 301 redirect from HTTP to HTTPS. This forces all HTTP traffic to redirect to HTTPS using a search engine friendly redirect.
- Select your SSL certificate.
Use the dropdown menu to select the correct SSL certificate for your domain. If you have installed a certificate through Plesk, it appears in this list.
- Save the configuration.
Click OK at the bottom of the page. Plesk applies the settings and your site now forces HTTPS connections.
Wrapping up
Your website now forces HTTPS connections for all visitors. You configured server-level redirects using .htaccess, cPanel’s Force HTTPS Redirect switch or Plesk hosting settings. Browsers display the padlock icon, confirming your SSL/TLS certificate is protecting visitor data.
Test your site by visiting different pages and checking that the URL always shows https://. Our web hosting plans include free SSL certificates and automatic HTTPS configuration.
Plans and tools mentioned in this guide
Did this guide solve your problem?
Still stuck?
Our UK support team answers tickets and live chat every day. Send us the guide you were following and where it stopped working.
Keep learning
Find a guide
Related guides

Hosting that keeps up
cPanel hosting with the tools these guides use, backed by UK support.
Get cPanel Hosting
Keep your site secure
Protect your visitors with SSL certificates – from budget DV to premium EV certificates.
Get SSL Certificate