JetBackup 5 gives you direct access to your hosting account backups through cPanel. You can restore individual files, complete directories or entire databases without contacting support. This prevents data loss from accidental deletions, failed updates or site compromises.
You will learn how to navigate JetBackup 5’s interface, select the correct backup date and restore specific content to your hosting account. The guide covers three restore types: full account restores, directory restores and database restores.
Before you begin
- You need access to your cPanel control panel.
- JetBackup 5 is available on all cPanel hosting and reseller hosting accounts.
- Backups are retained for up to 14 days. We recommend maintaining your own backup copies for longer retention periods.
- Full account restores overwrite all existing data. Use directory or database restores when possible to avoid unintended changes.
Restore a full account backup
Full account restores replace all files, databases and email accounts with versions from your selected backup date. This option suits complete site recovery after major failures but will overwrite any changes made since the backup was created.
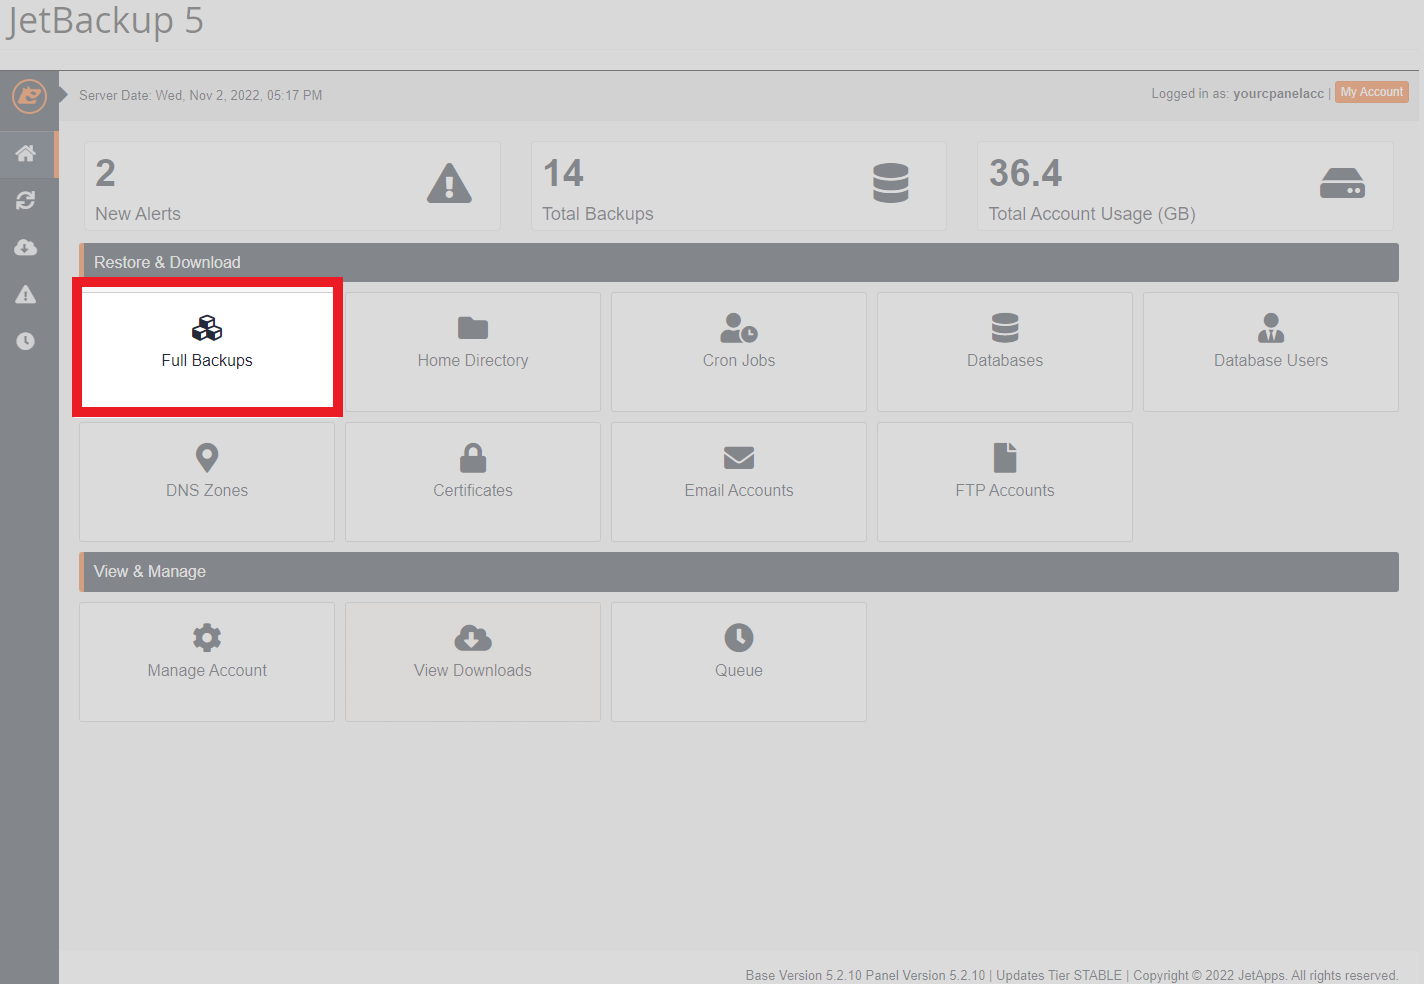
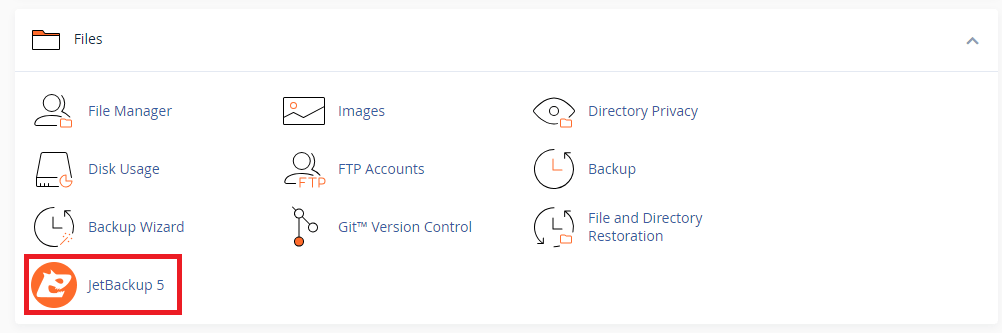
- Open JetBackup 5 in cPanel.
Log into your cPanel control panel, scroll to the Files section and click JetBackup 5.

- Navigate to full backups.
Click Full Backups in the JetBackup 5 dashboard. This displays all available complete account backups organised by date.
- Select your backup date.
Review the list of available backups and click the date you want to restore from. The backup row will highlight to confirm your selection.
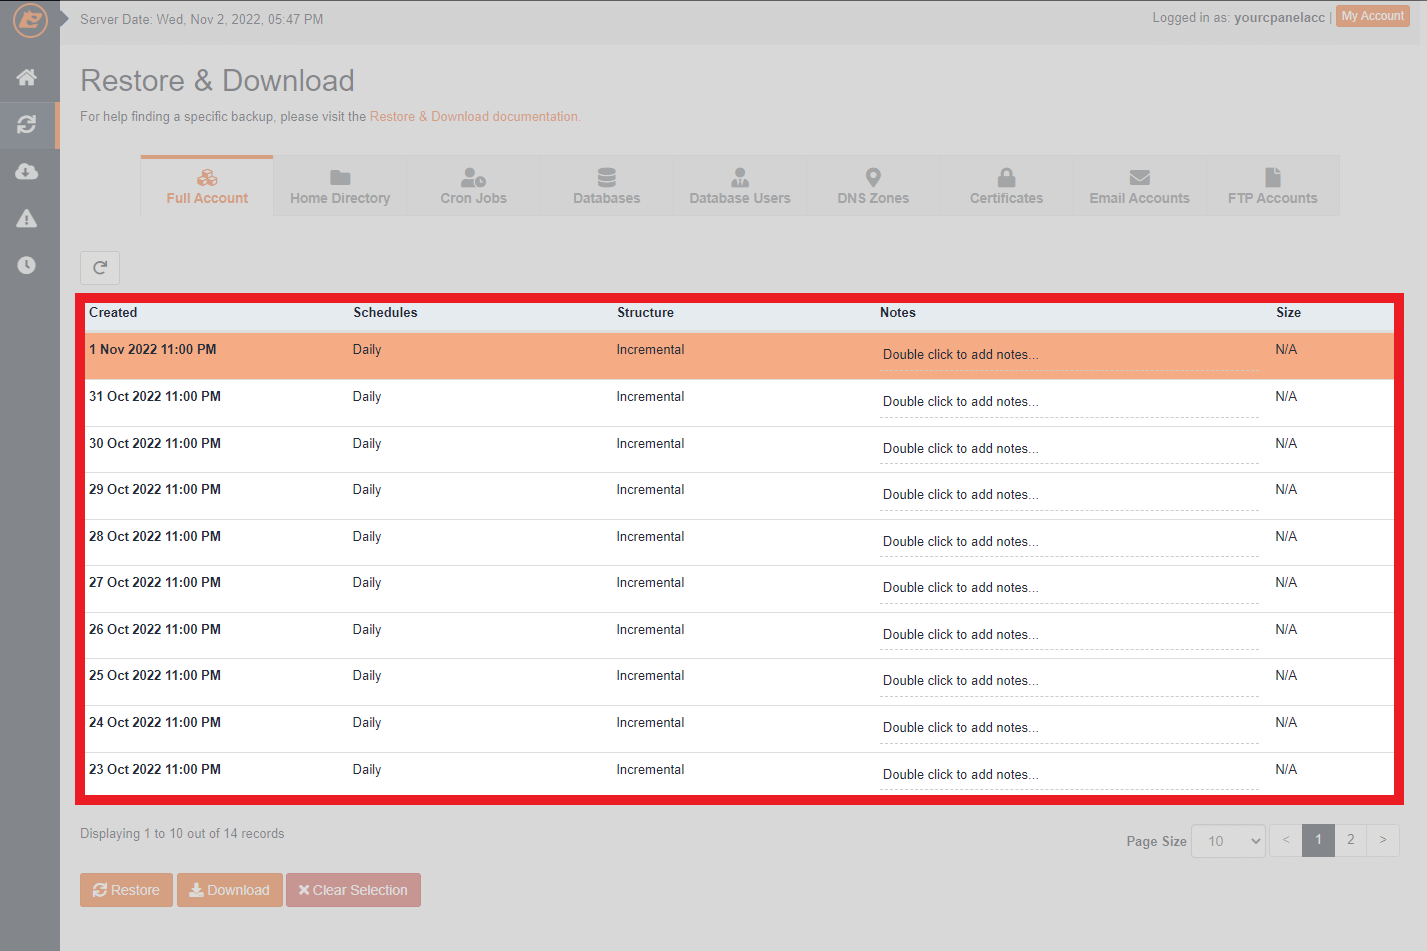
- Initiate the restore.
Click the Restore button that appears after selecting your backup. JetBackup 5 will begin replacing your current account data with the backup version.
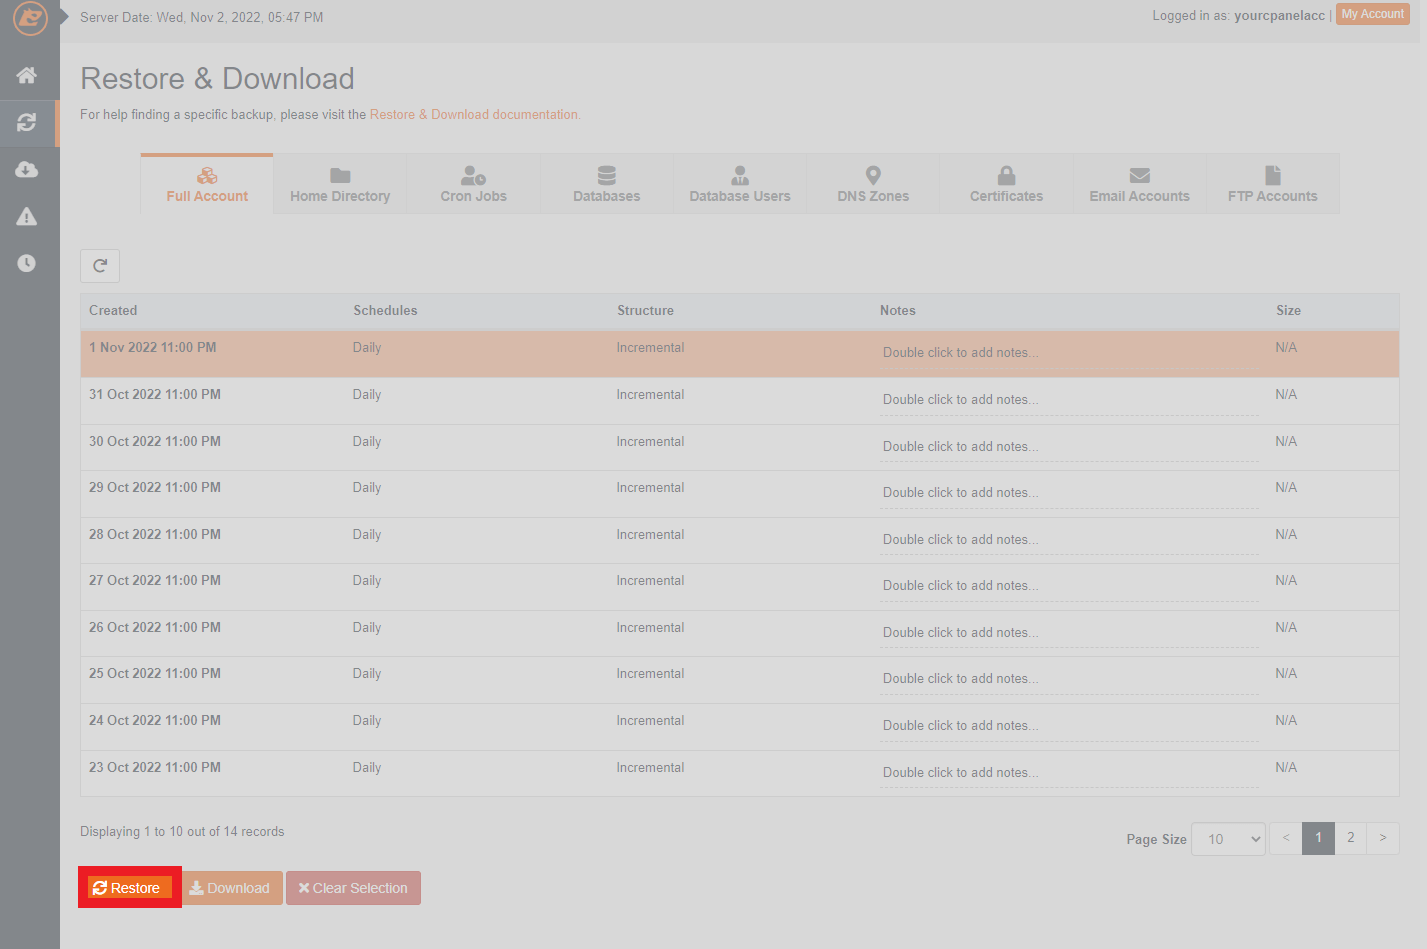
The restore process runs in the background. You can monitor progress through the JetBackup 5 queue page. Your account will return to its state from the selected backup date once the restore completes.
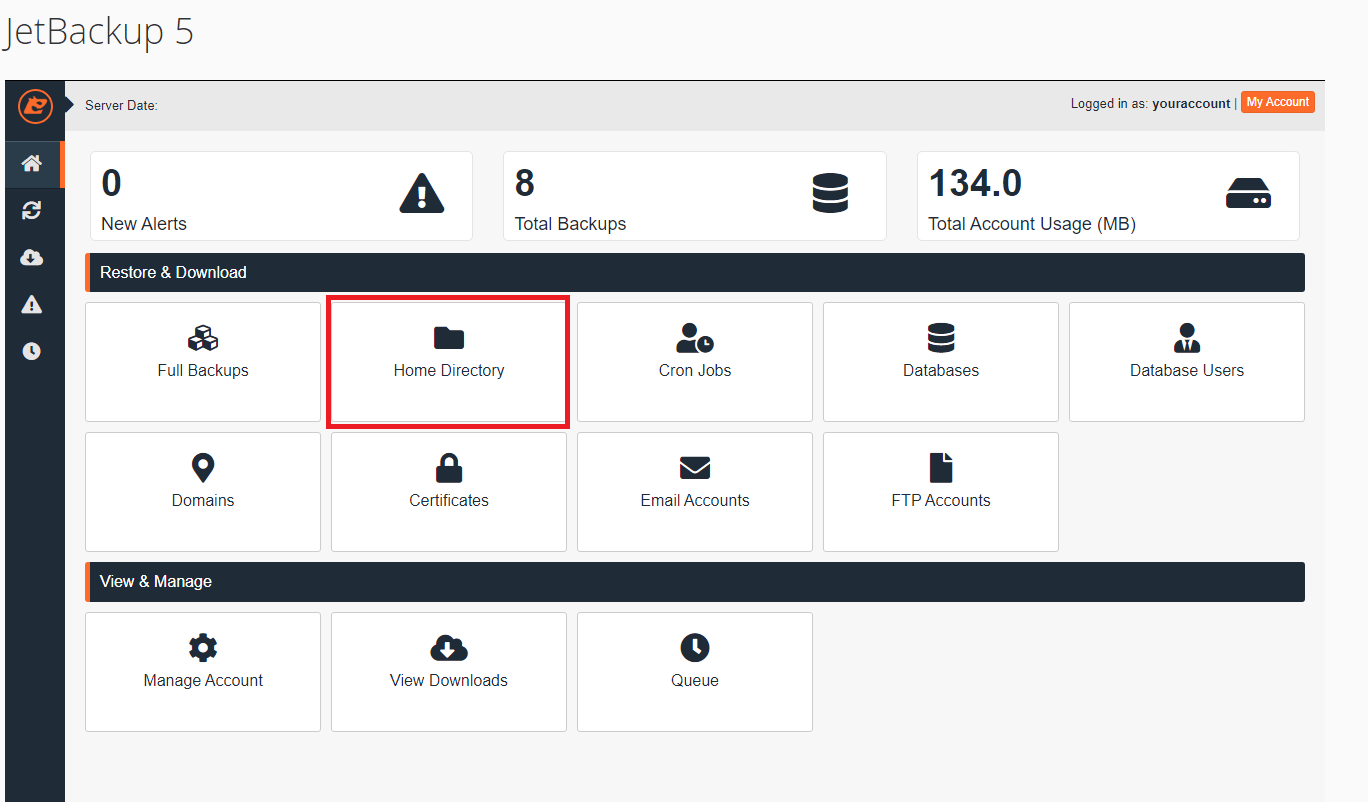
Restore specific directories
Directory restores let you recover individual folders or files without affecting other parts of your account. This approach prevents overwriting recent changes in unrelated areas of your site.
- Access JetBackup 5.
From your cPanel control panel, locate the Files section and click JetBackup 5.
- Open directory backups.
Click Home Directory on the JetBackup 5 dashboard. This displays all available backups of your account’s file structure.
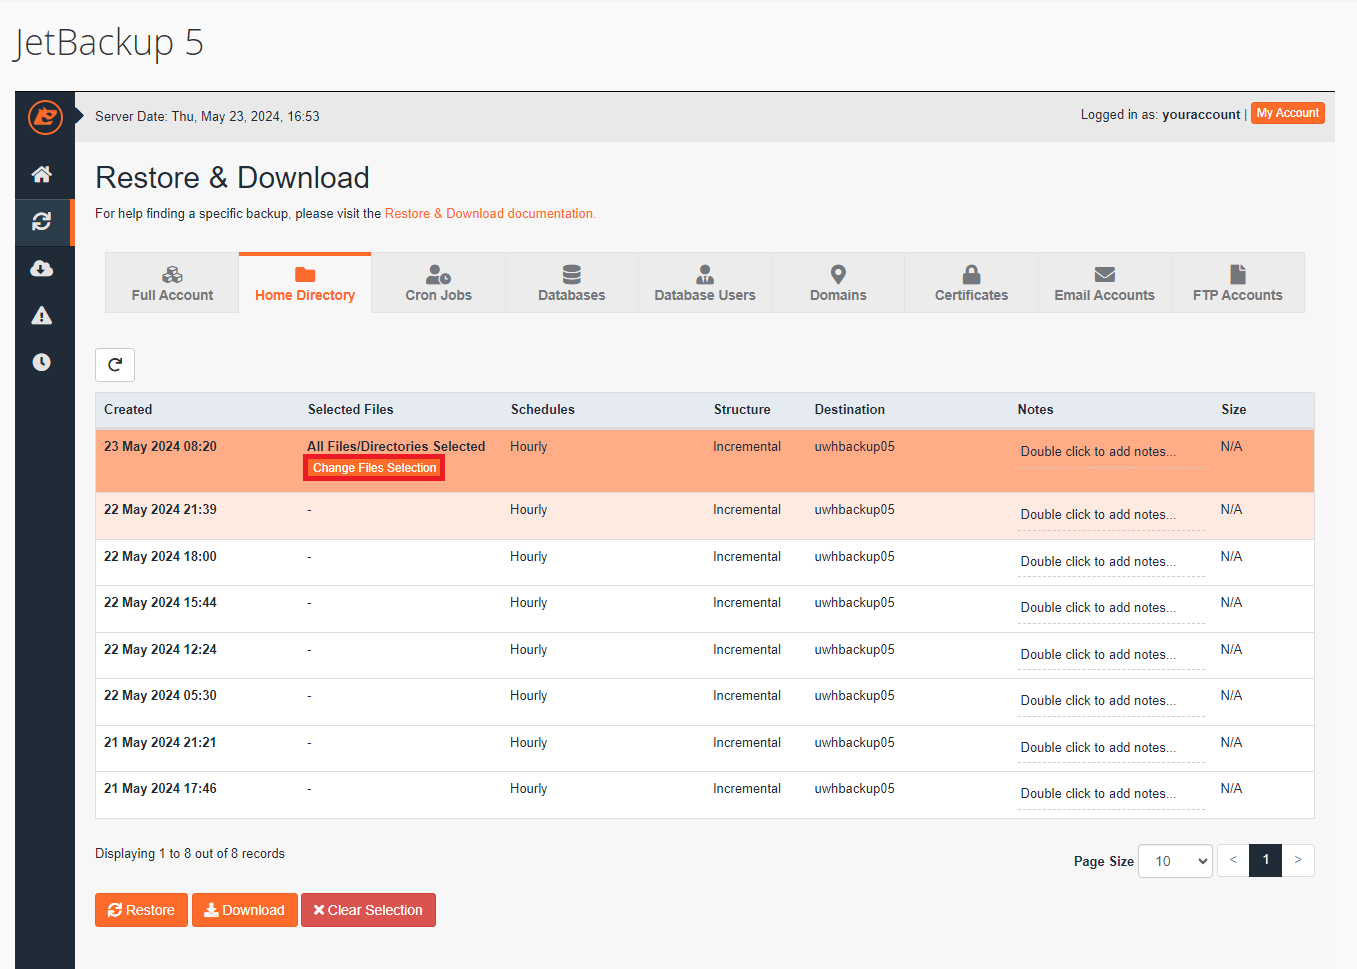
- Select a backup date.
Click on a backup from the list. The selected row will highlight and display restore options below it.

- Choose specific files (optional).
To restore only certain files or folders, click Change File Selection. This opens a file browser showing the contents of your selected backup.
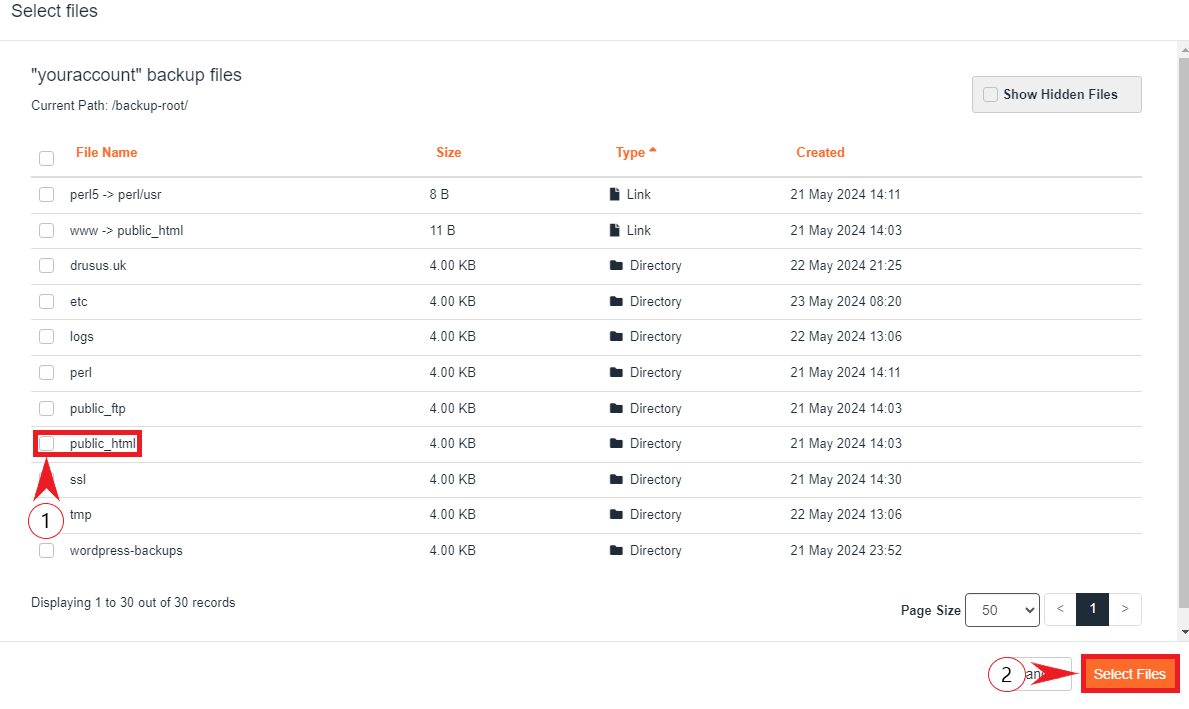
- Select your files.
Tick the checkboxes next to the files or folders you want to restore, then click Select Files. This confirms your selection and returns you to the restore options screen.
- Choose your action.
Click Restore to add the files to your restore queue, or click Download to save them to your local device. The Clear Selection button removes all current selections if you need to start again.
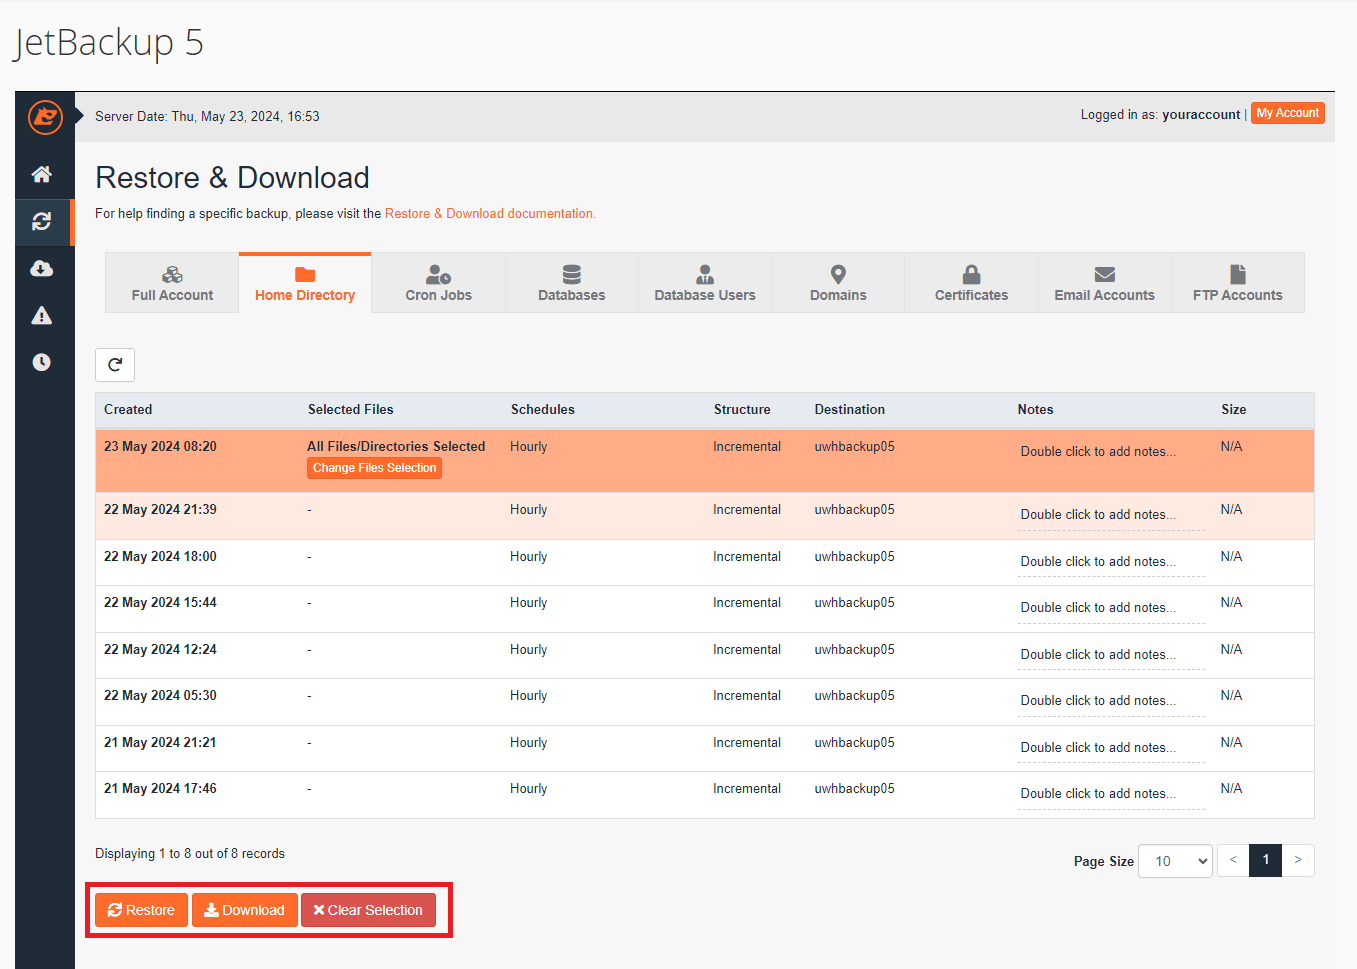
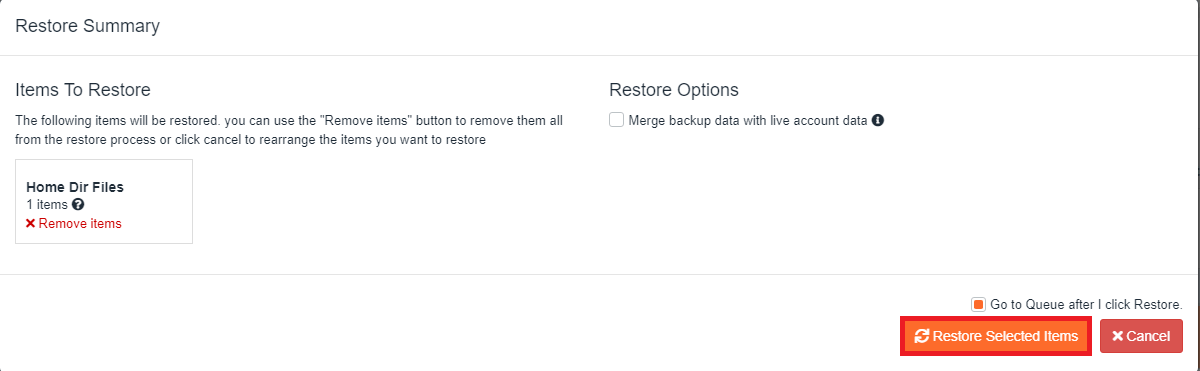
- Confirm your restore.
Review the summary window showing which items will be restored. Remove any unwanted items by clicking the X next to them, then click Restore Selected Items to proceed.
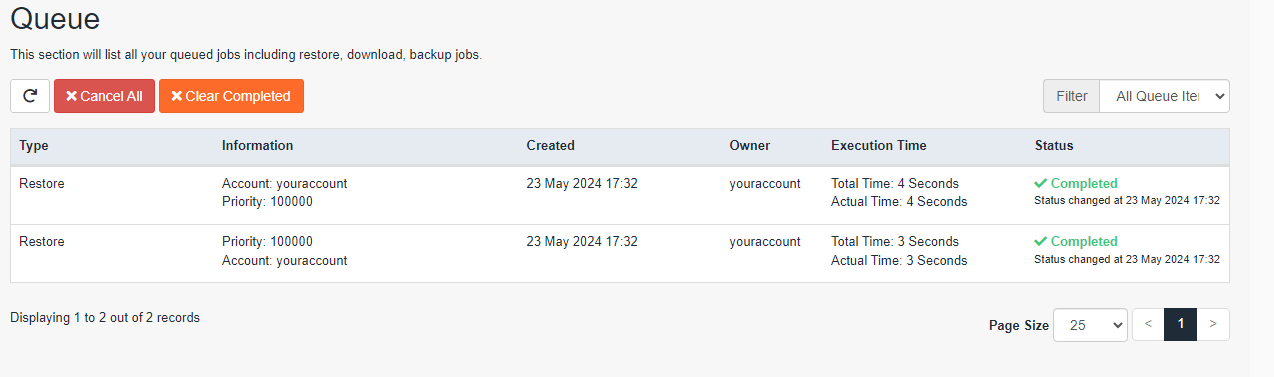
- Monitor the restore progress.
JetBackup 5 redirects you to the queue page showing the status of your restore. The page updates automatically as the restore progresses.
Your selected files will appear in their original locations once the restore completes. Any existing files with the same names will be overwritten by the backup versions.
Restore database backups
Database restores recover your MySQL or MariaDB databases to previous states. This fixes corrupted tables, recovers deleted records or reverses problematic database changes without affecting your files.
- Launch JetBackup 5.
In your cPanel control panel, find the Files section and click JetBackup 5.
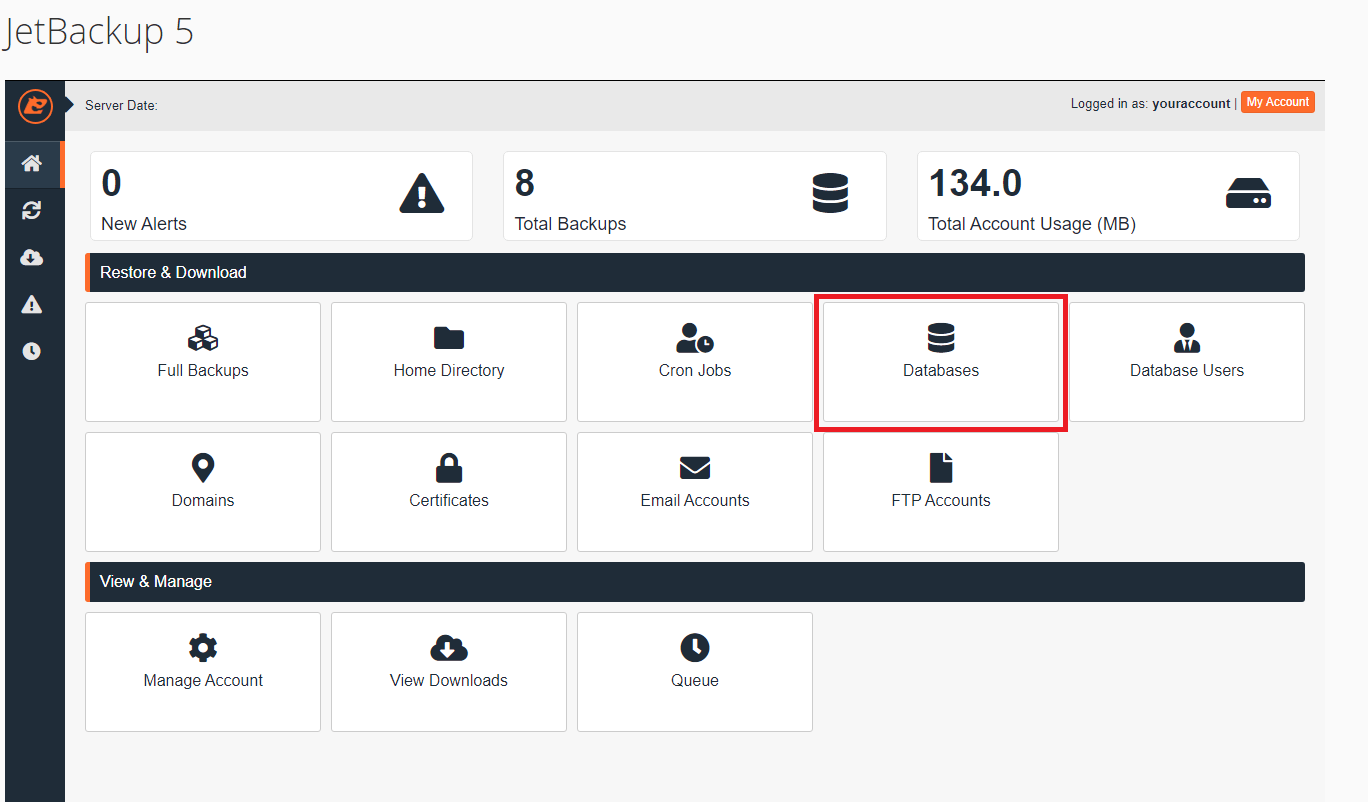
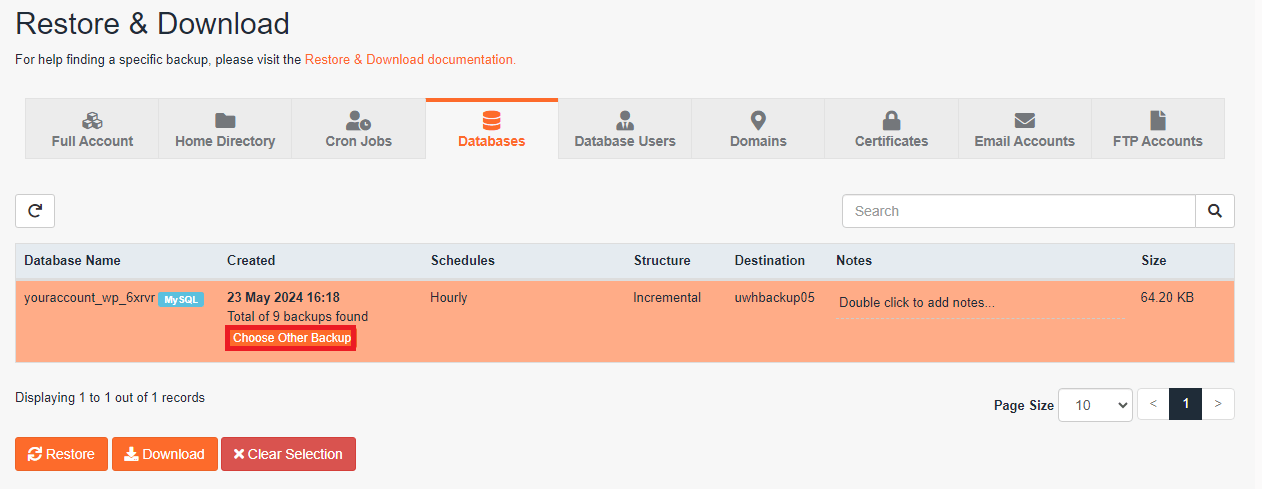
- Navigate to database backups.
Click Databases on the JetBackup 5 home page. This shows all available database backups for your account.
- Select a database backup.
Click on a database from the list. The row will highlight and display restore options beneath it.
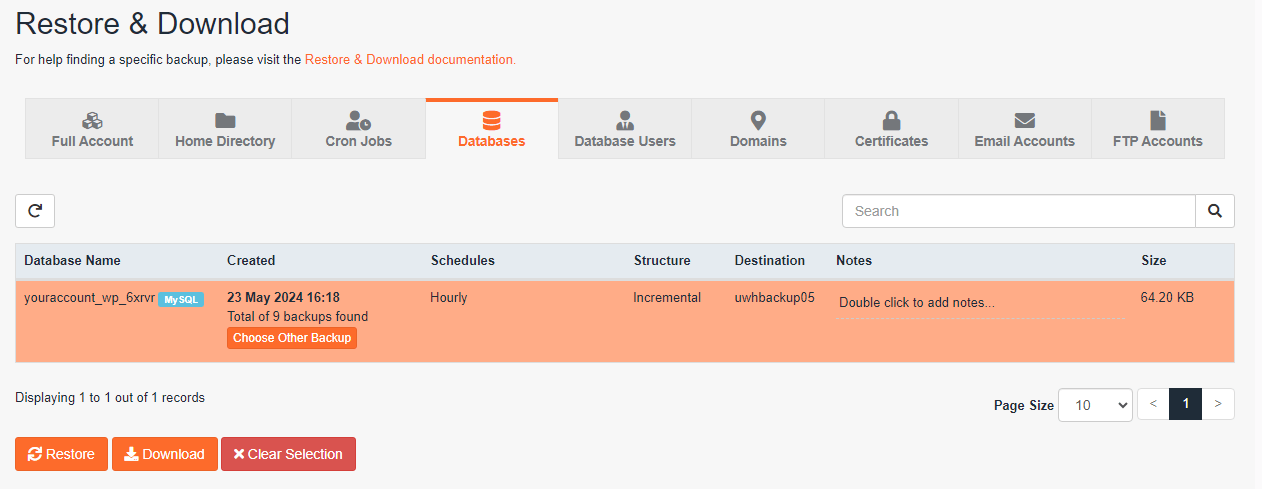
- Change the backup date (optional).
To select a different backup date, click Choose Other Backup. A dropdown menu appears showing all available backup dates for the selected database.
- Choose your restore action.
Click Restore to replace your current database with the backup version, or click Download to save the database file to your device. The restore option overwrites your existing database completely.
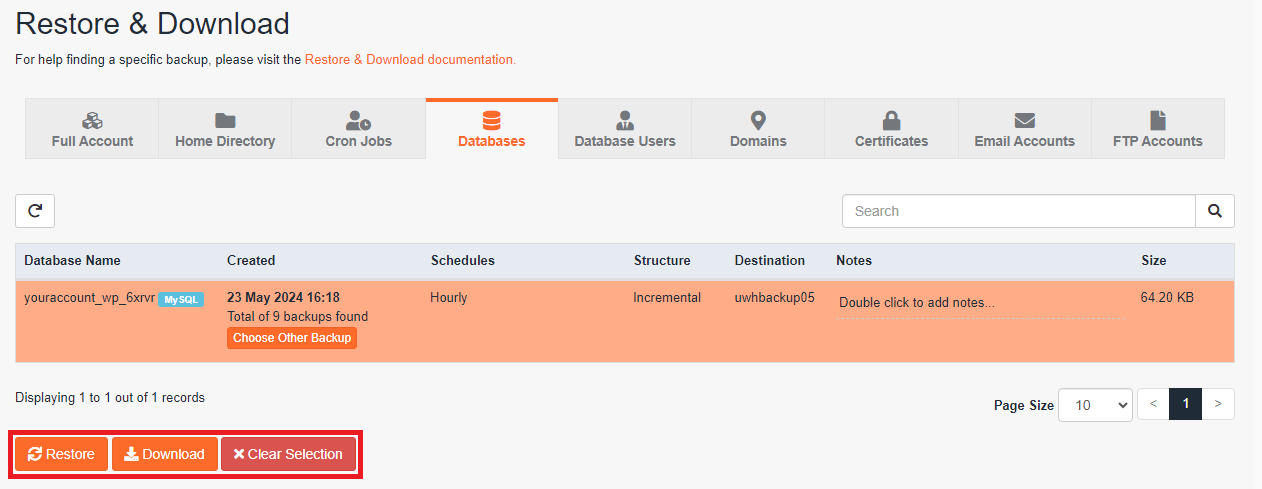
- Confirm and monitor the restore.
Review the restore summary, remove any unwanted items and click Restore Selected Items. JetBackup 5 redirects you to the queue page where you can track the restore progress.
Your database returns to its state from the selected backup date once the restore finishes. Any changes made after that backup date will be lost.
Understanding JetBackup 5 restore behaviour
JetBackup 5 handles different restore types with distinct behaviours that affect how your data changes. Understanding these differences helps you choose the right restore method and avoid unintended data loss.
Full account restores replace everything
Full account restores overwrite your entire hosting account including all files, databases, email accounts and configurations. This means any changes made after the backup date disappear completely. Use full restores only when you need to recover from catastrophic failures or when you are certain you want to discard all recent changes.
Directory restores merge with existing files
Directory restores place backup files into your current file structure. Files with matching names get overwritten by the backup versions, but files created after the backup date remain untouched. This behaviour lets you recover specific deleted files without losing recent work in other directories.
Database restores completely replace tables
Database restores replace your entire database with the backup version. All tables, records and data revert to their state at the backup time. Recent database changes including new posts, user accounts or form submissions created after the backup will be lost. Consider exporting your current database before restoring if you need to preserve any recent data.
Backup retention and availability
JetBackup 5 retains backups for up to 14 days on our servers. Older backups are automatically deleted to manage storage space. This retention period covers most recovery scenarios, but you should maintain your own backup copies for longer-term protection. Download important backups to your local device or external storage to ensure availability beyond the 14-day window.
Further reading on backup strategies
JetBackup 5 provides reliable short-term backup coverage, but a complete backup strategy includes multiple layers of protection. The 3-2-1 backup rule recommends keeping three copies of your data on two different media types with one copy stored off-site. This approach protects against hardware failures, accidental deletions and catastrophic events.
Database backups require special attention because they contain your site’s dynamic content. Regular database exports through phpMyAdmin or WP-CLI ensure you can recover posts, pages and user data even if automated backups fail. The WordPress CLI database export command simplifies this process for command-line users.
Testing your backups regularly confirms they work when needed. Restore a backup to a staging environment or local development site every few months to verify file integrity and restoration procedures. This practice reveals potential issues before an emergency occurs and helps you refine your recovery process.
Wrapping up
You now know how to restore backups using JetBackup 5 in cPanel. You can recover complete accounts, specific directories or individual databases depending on your needs. The interface provides up to 14 days of backup history with options to restore or download your data.
Test your restore process with non-critical files before you need it in an emergency. Maintain your own backup copies beyond the 14-day retention period for additional protection.
If you run into any trouble, get in touch and our team will be happy to help.

Ready to get started?
Launch your website with our reliable cPanel hosting with unlimited bandwidth and expert support.
Get cPanel Hosting