When you update content, change a theme or modify settings in WordPress, visitors may still see an older cached version of your site. Clearing the LiteSpeed Cache forces WordPress to serve fresh pages so your changes appear immediately.
This article covers three ways to clear the cache: a one-click shortcut from the admin toolbar, the LiteSpeed Cache dashboard and targeted purge options for specific content types.
Before you begin
- The LiteSpeed Cache plugin must be installed and active on your WordPress site.
- You need access to your WordPress admin area.
- We recommend clearing your browser cache after purging to confirm you are viewing the latest version of your site.
Clear LiteSpeed Cache from the admin toolbar
The admin toolbar shortcut is the fastest way to purge all cached pages in one action. Use this when you have made widespread changes and want to clear everything at once without navigating through plugin settings.
- Log in to your WordPress admin area.
Go toyourdomain.co.uk/wp-admin, replacing the domain with your own. - Locate the LiteSpeed Cache menu in the toolbar.
At the top of the screen, find the LiteSpeed Cache item in the admin toolbar. - Purge all cached content.
Hover over LiteSpeed Cache and click Purge All. The cache clears immediately and a confirmation message appears at the top of the screen.
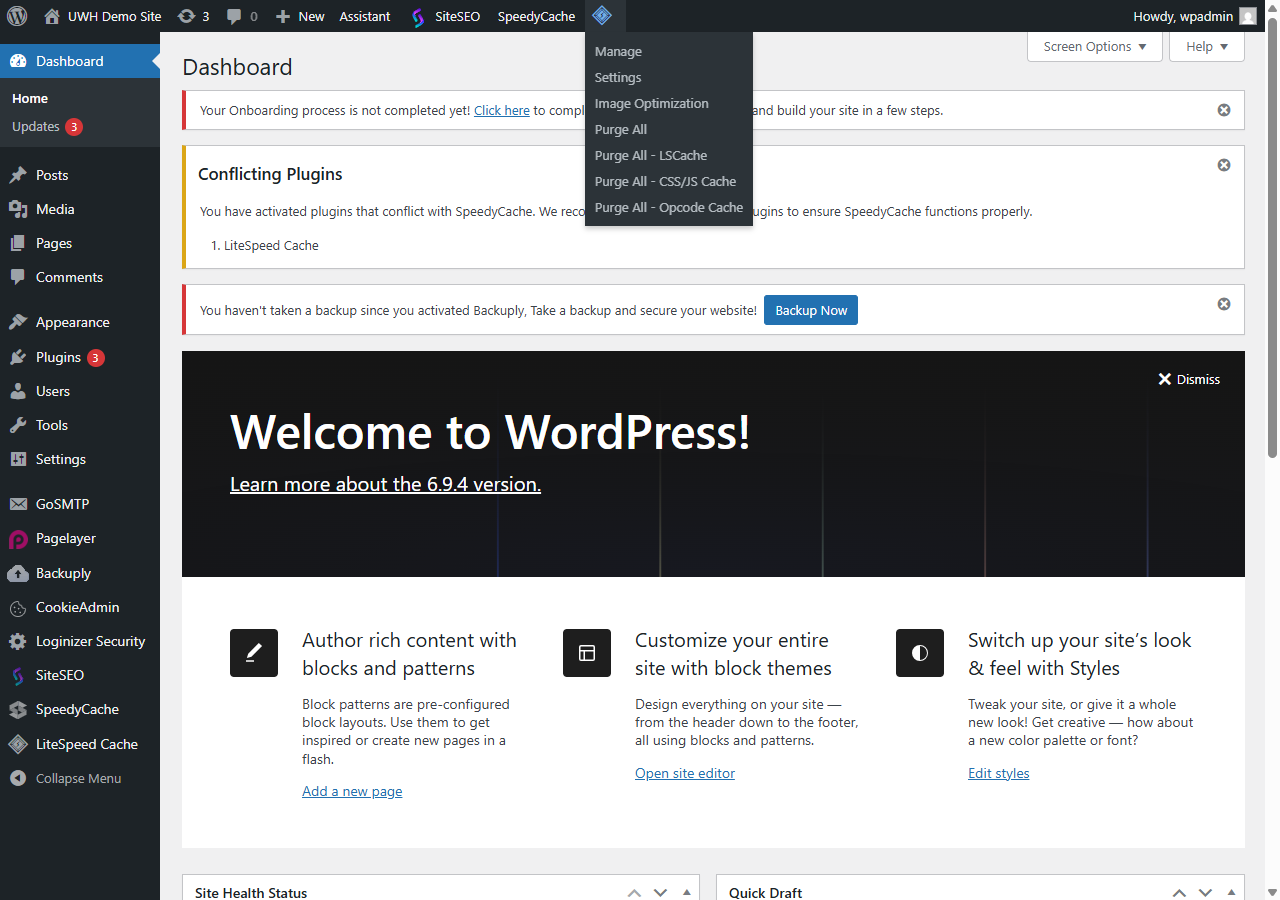
All cached pages are now cleared. Visitors will receive freshly generated pages on their next request.
Clear LiteSpeed Cache from the plugin dashboard
The plugin dashboard gives you the same full purge option in a more prominent interface. This is useful if you prefer to work within the plugin settings rather than the toolbar.
- Open the LiteSpeed Cache dashboard.
In the left sidebar, go to LiteSpeed Cache and click Dashboard. - Purge all cached content.
Click Purge All. This clears the entire cache in the same way as the toolbar shortcut.
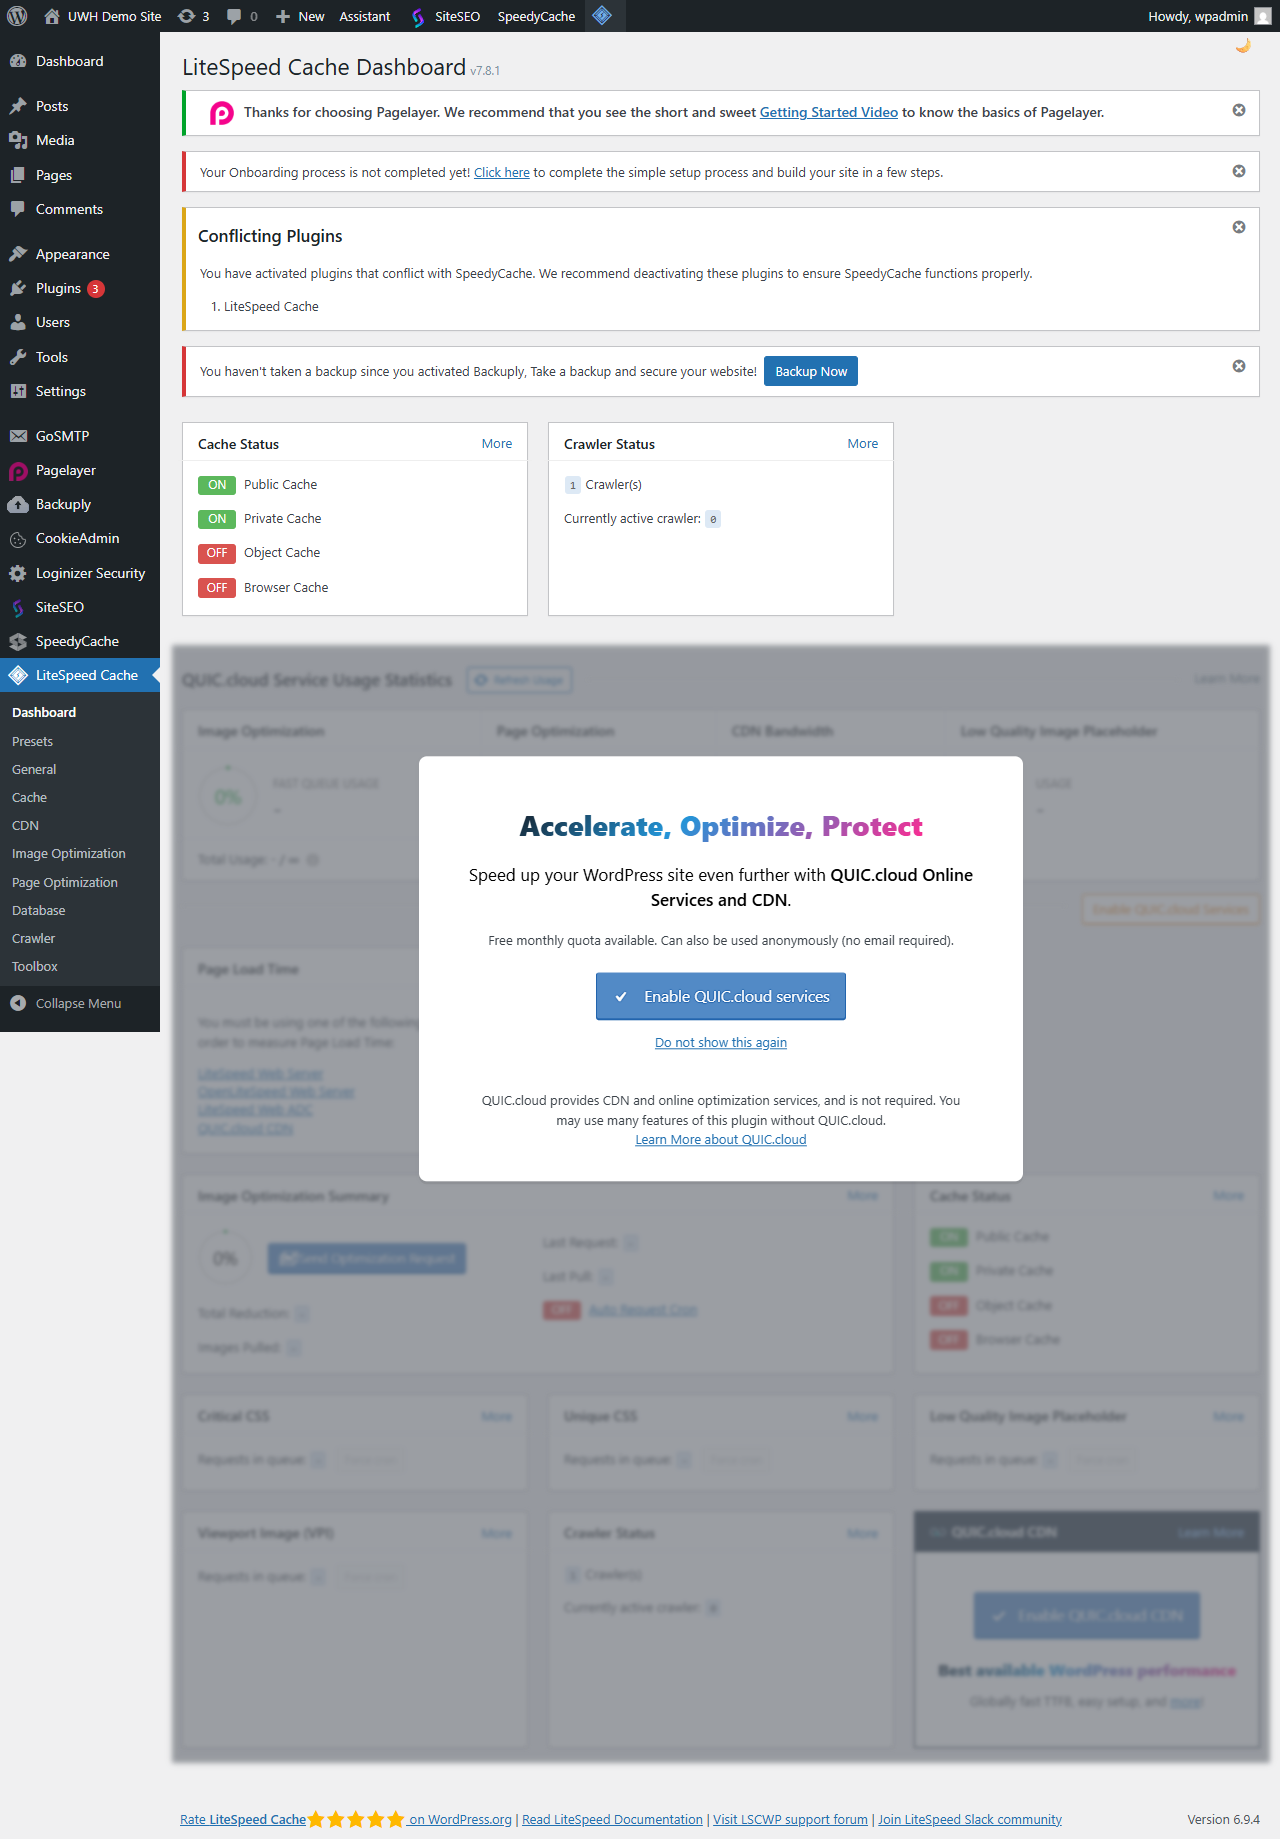
Purge specific cache types
A full purge clears everything, which means WordPress must rebuild every cached page from scratch. When you have only changed a stylesheet, a single post or a specific URL, targeting just that cache type reduces the rebuild workload and keeps the rest of your cache intact.
- Open the Toolbox purge options.
In the left sidebar, go to LiteSpeed Cache > Toolbox, then click the Purge tab. - Select what to purge.
Choose from the available options. Common selections include CSS/JS Cache after updating stylesheets or scripts, Cache by URL to target a single page and Private Cache to clear user-specific cached data. - Run the purge.
Click the relevant purge button for your selection. Only the targeted cache type is cleared, leaving the rest of your cache untouched.
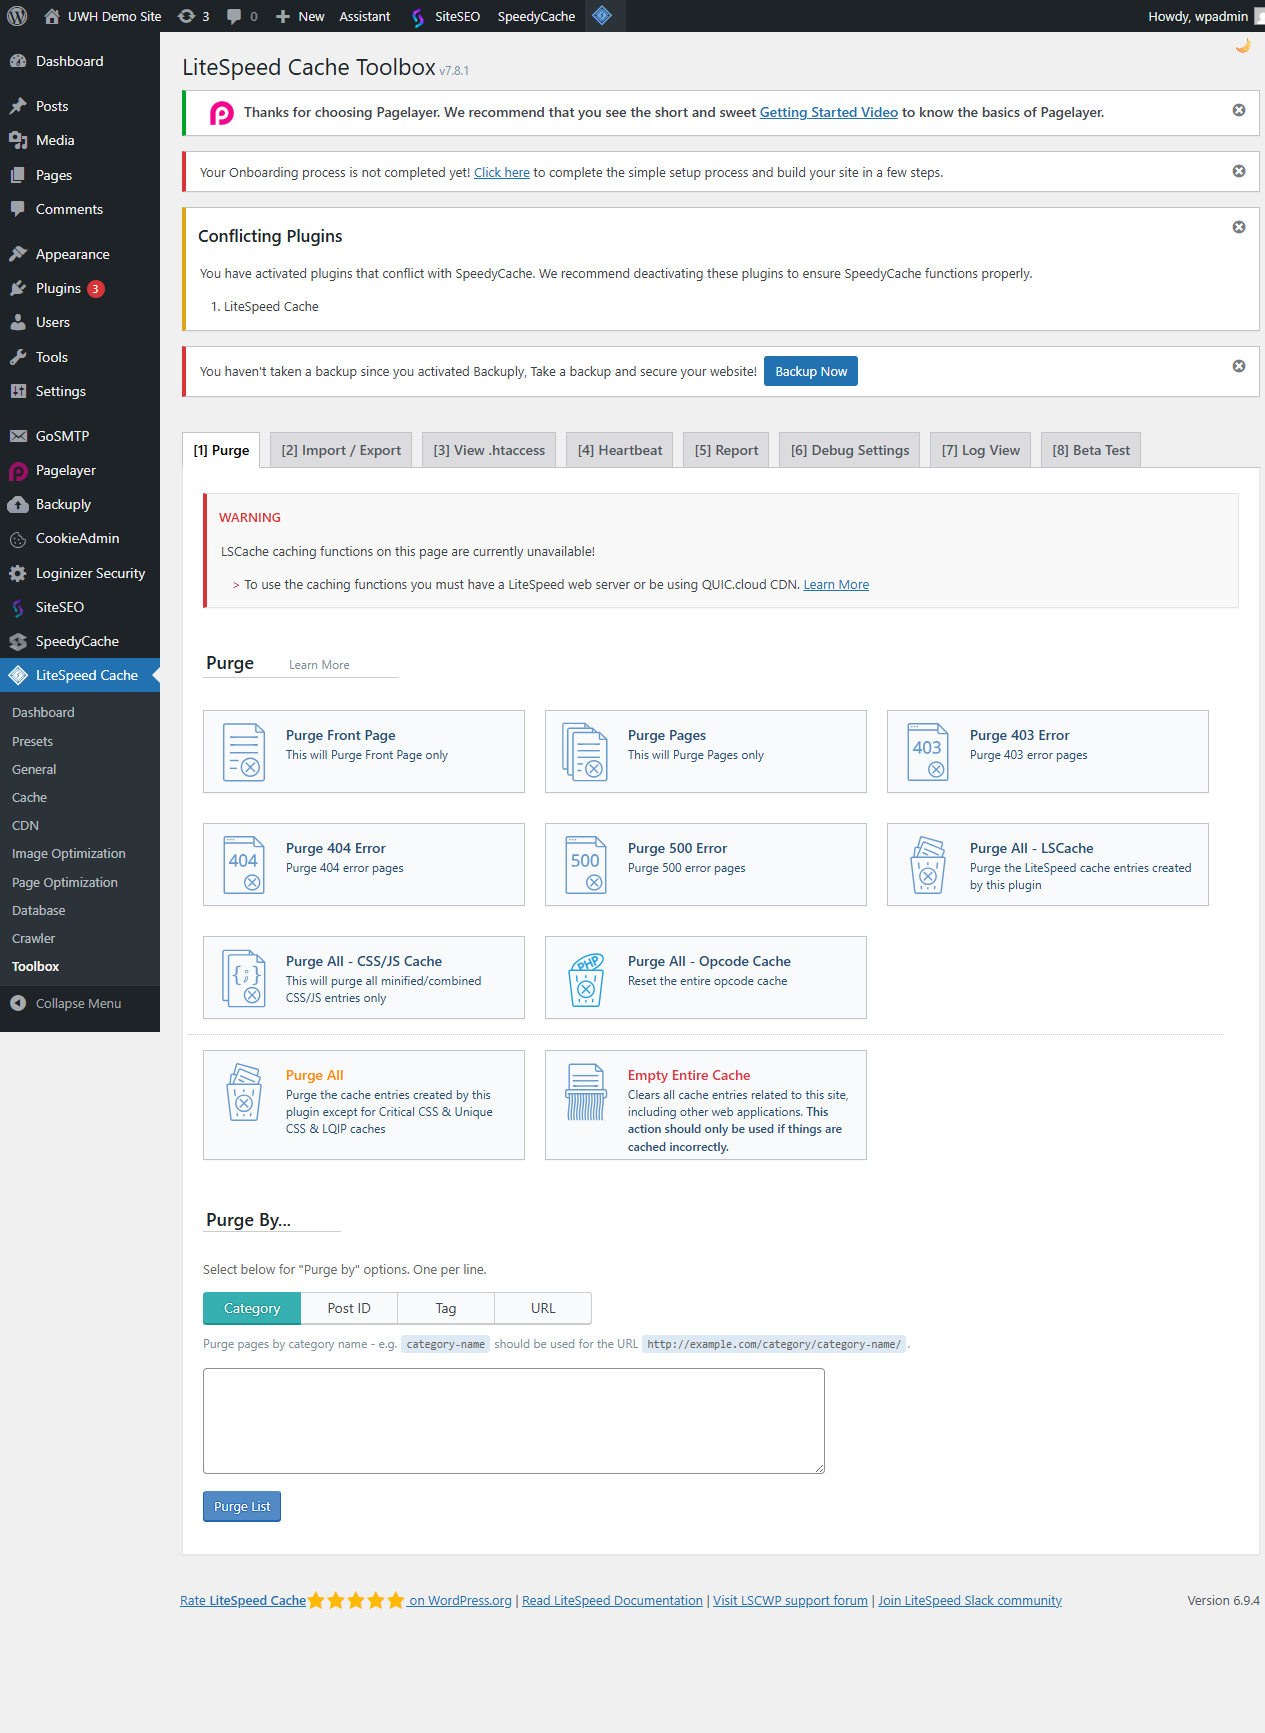
Only the selected cache type has been cleared. Your remaining cached content continues to serve visitors without interruption.
Enable automatic cache purging
Manual purging works well for one-off changes, but automatic purging removes the need to clear the cache every time you publish or update a post. LiteSpeed Cache can detect content changes and clear the relevant cache entries without any manual action.
- Open the purge settings.
Go to LiteSpeed Cache > Settings, then click the Purge tab. - Enable auto-purge on updates.
Toggle on the options for automatic purging when posts or pages are published or updated. Save your changes by clicking Save Changes.
LiteSpeed Cache will now clear the relevant cached pages automatically whenever you publish or update content.
Verify the cache has cleared
After purging, confirm visitors see your updated content by loading a recently changed page outside your normal browser session.
- Open an incognito window or use a different browser to avoid serving content from your own browser cache.
- Load the page and check that your changes appear.
- If you still see outdated content, clear your local DNS resolver cache and try again.
Troubleshooting
Changes are still not appearing after purging
Your browser may be serving a locally cached version of the page even after the server cache has been cleared. This is separate from the LiteSpeed Cache and is stored on your device.
- Clear your browser cache and cookies, then reload the page.
- Open the page in a private or incognito window to bypass the browser cache entirely.
- Test on a different device or network to rule out a local caching issue.
The Purge All button is not visible in the toolbar
The admin toolbar shortcut only appears when the LiteSpeed Cache plugin is active and your user account has sufficient permissions to manage it.
- Confirm the LiteSpeed Cache plugin is active under Plugins > Installed Plugins.
- Check that your WordPress user role is Administrator. Editor and lower roles do not have access to cache management.
- If the toolbar itself is hidden, go to Users > Profile and confirm Show Toolbar when viewing site is ticked.
Wrapping up
You can now clear LiteSpeed Cache in WordPress using the admin toolbar shortcut, the plugin dashboard or the targeted purge options in the Toolbox. Enabling automatic purging on content updates reduces the need for manual cache management going forward.
For broader performance improvements, see our guide on optimising WordPress with AVIF images and our article on enabling AccelerateWP. Our guide to boosting WordPress speed with caching covers how different caching layers work together.
Our WordPress hosting plans include LiteSpeed web server technology, giving your site access to LiteSpeed Cache as standard.