SSH (Secure Shell) allows you to manage your hosting account through a command line interface. This gives you direct access to your server environment for running scripts, managing files and executing administrative tasks that would take longer through a control panel.
You will generate an SSH key pair on your local machine, upload the public key to cPanel and configure your SSH client to connect. Once complete, you can access your account securely without entering passwords each time.
Before you begin
- SSH access is available on Premium cPanel, Premium Reseller, Agency and VPS plans.
- We support key pair authentication only. Password-based SSH access is disabled for security.
- Windows users need PuTTY installed. Linux and macOS include SSH clients by default.
Generate an SSH key pair on Linux or macOS
SSH key pairs consist of a private key that stays on your computer and a public key that you upload to the server. The terminal on Linux and macOS includes the ssh-keygen command for generating these keys.
- Open a terminal window.
On macOS, open Terminal from Applications > Utilities. On Linux, use your distribution’s terminal application. - Run the key generation command.
Enterssh-keygen -t rsaand press Enter. This creates an RSA key pair suitable for SSH authentication. - Accept the default file location.
When prompted for a file location, press Enter to save your keys in/user/.ssh/with the filenameid_rsa. This is the standard location SSH clients check automatically. - Set a passphrase.
Enter a passphrase when prompted, then repeat it. This adds an extra layer of security by encrypting your private key. Press Enter twice to skip this step if you prefer no passphrase. - Confirm successful generation.
You will see a key fingerprint and randomart image. Your private key is saved asid_rsaand your public key asid_rsa.pubin the.sshdirectory.
Your key pair is now ready. Keep your private key secure on your local machine and never share it. You will upload the public key to cPanel in a later step.
Note: (.)dot files are hidden files on macOS – to Copy your public key to cPanel run the following from the terminal window which will copy the entire key file to your clipboard ready to paste with CMD + V.
pbcopy < ~/.ssh/id_rsa.pubGenerate an SSH key pair on Windows
Windows requires PuTTY’s key generation tool called PuTTYgen. This creates key pairs in the PPK format that PuTTY uses for authentication.
- Download and install PuTTY.
Visit the PuTTY download page and download the Windows installer package. This includes PuTTYgen, Pageant and the main PuTTY client. Run the installer and follow the prompts. - Open PuTTYgen.
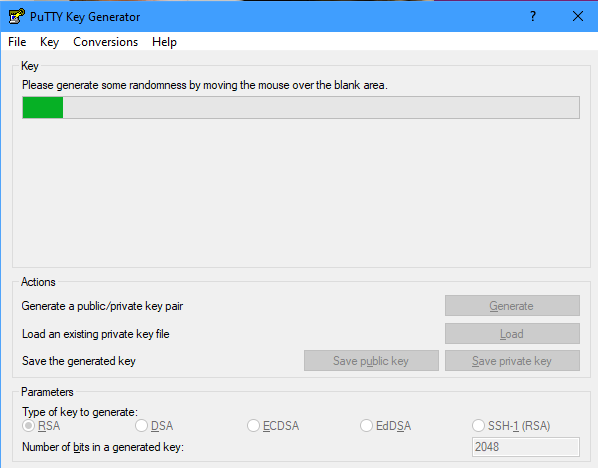
Launch PuTTYgen from your Start menu. The default settings show RSA as the key type and 2048 as the key size, which are appropriate for SSH access. - Generate your key pair.
Click Generate and move your mouse cursor randomly around the PuTTYgen window. This creates randomness for key generation. Wait until the progress bar completes.
- Add a passphrase.
Enter a passphrase in the Key passphrase field and repeat it in Confirm passphrase. This encrypts your private key so it cannot be used if someone gains access to your computer. - Save your private key.
Click Save private key and choose a location you will remember, such as your Documents folder. Name the file something descriptive likehosting-ssh-key.ppk.
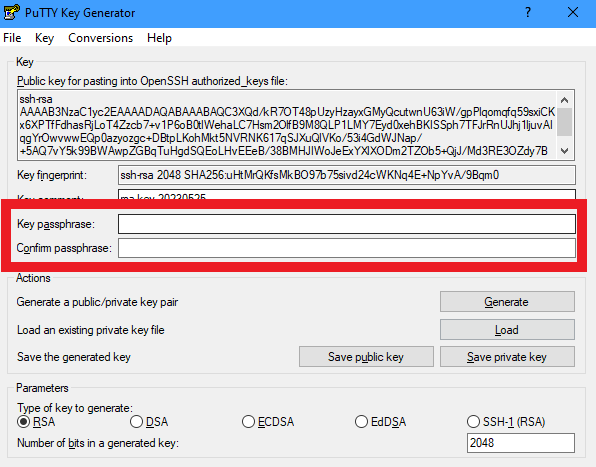
- Copy your public key.
Leave PuTTYgen open. Select all the text in the Public key for pasting box at the top of the window and press Ctrl+C to copy it. You will paste this into cPanel in the next section.
Your Windows key pair is now created. The private key is saved securely on your computer and the public key is ready to upload to your hosting account.
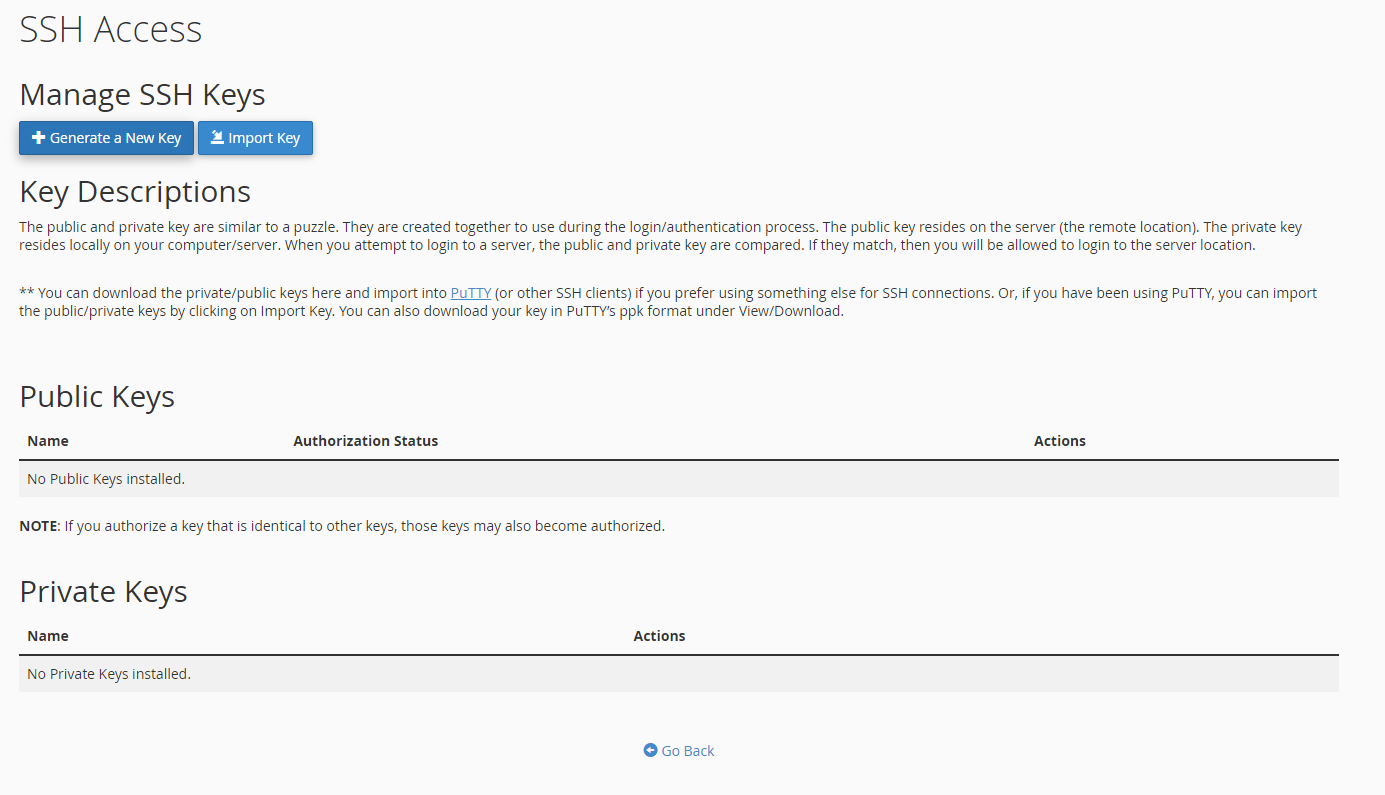
Upload your public key to cPanel
cPanel stores authorised public keys that can connect to your account. You need to import your public key and authorise it before you can establish an SSH connection.
- Log in to cPanel.
Access your cPanel account athttps://yourdomain.co.uk:2083using your cPanel username and password. - Open SSH Access.
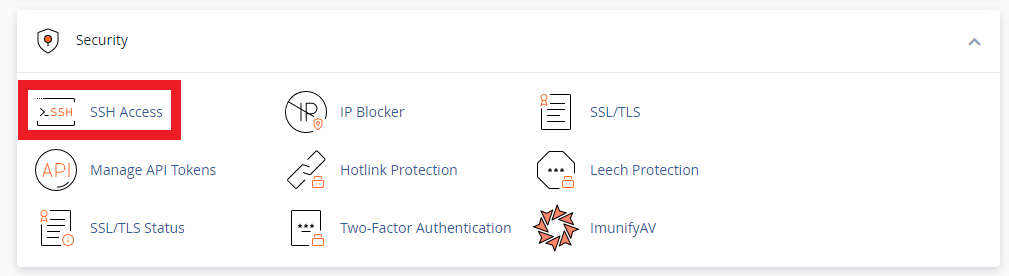
Scroll to the Security section and click SSH Access.
- Manage SSH keys.
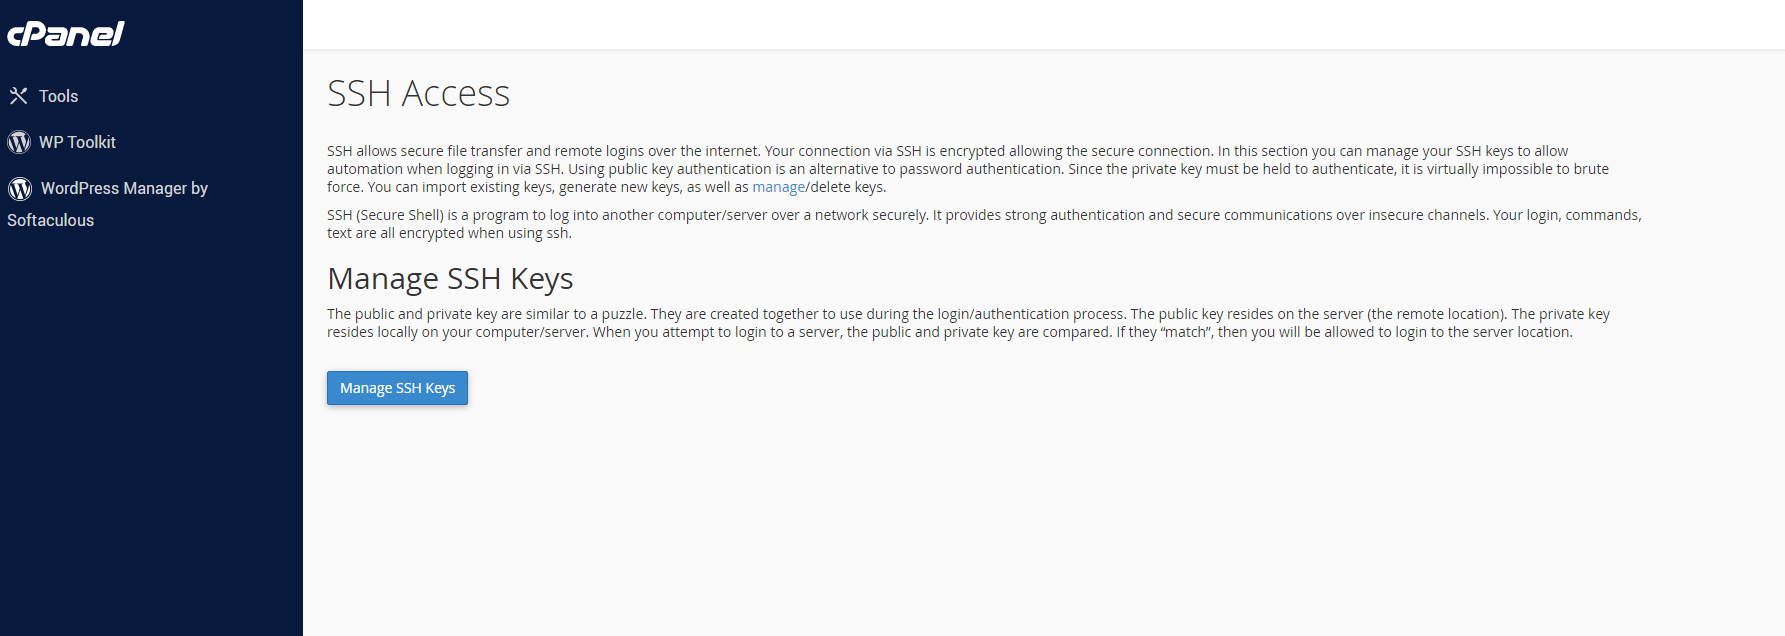
Click Manage SSH Keys to view your current keys and import new ones.
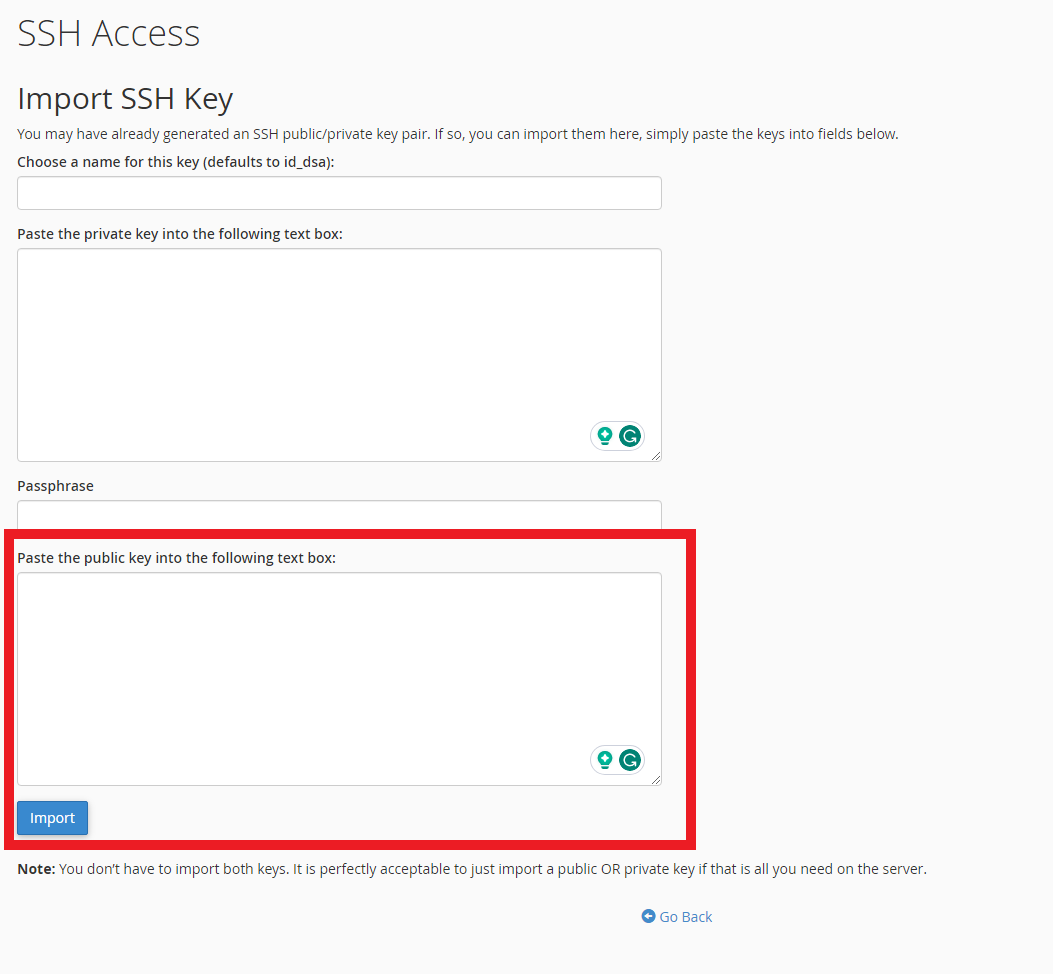
- Import your key.
Click Import Key to open the import form.
- Name your key.
Enter a descriptive name in the Key Name field, such aslaptop-ssh-key. This helps you identify which device the key belongs to if you manage multiple keys. - Paste your public key.
Click in the Public Key field and paste your public key. On Windows, paste the text you copied from PuTTYgen. On Linux or macOS, open~/.ssh/id_rsa.pubin a text editor, copy the contents and paste them here. Leave the Private Key field blank. - Complete the import.
Click Import at the bottom of the form. cPanel validates and stores your public key.
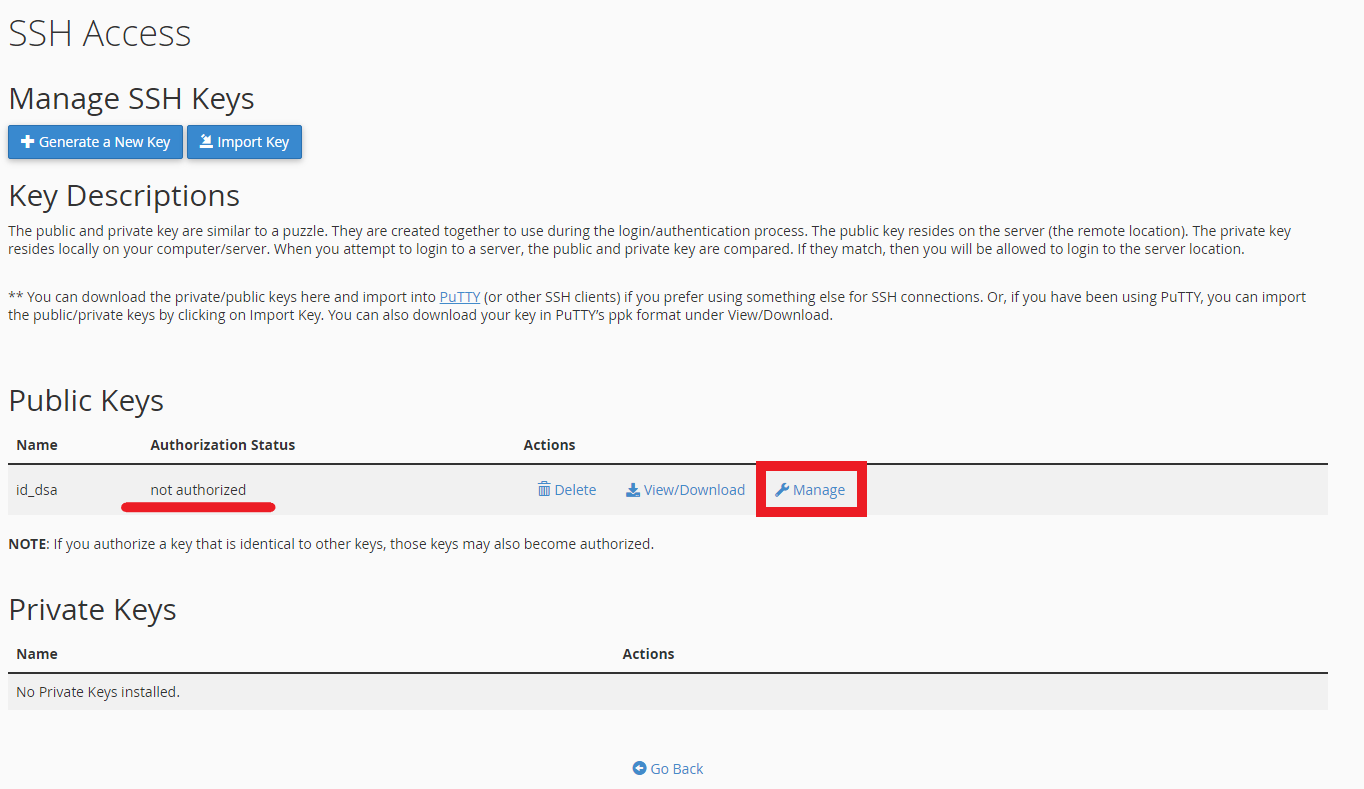
- Authorise the key.
Return to the Manage SSH Keys page. Find your newly imported key in the Public Keys section and click Manage next to it.
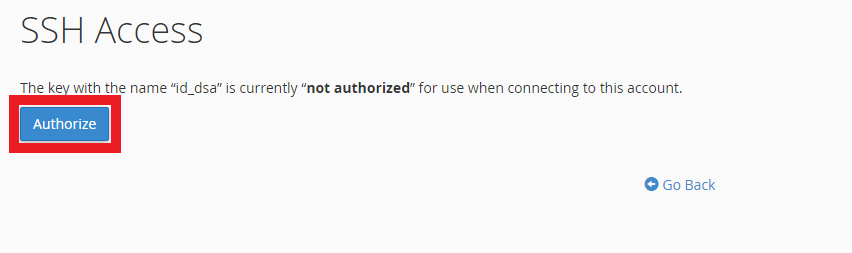
- Enable the key.
Click Authorize to activate the key for SSH connections. The key moves to the Authorized Keys section, confirming it is ready to use.
Your public key is now authorised on the server. You can connect via SSH using your private key for authentication.
Connect via SSH on Linux or macOS
The SSH client on Linux and macOS automatically uses your private key from ~/.ssh/id_rsa when connecting. You need to specify your username, server hostname and the correct port number.
- Open a terminal window.
Launch your terminal application. - Connect to your server.
Enter the following command, replacingyourusernamewith your cPanel username andserverhostnamewith your server’s hostname from your welcome email:
ssh -p 9284 yourusername@serverhostnameThe -p 9284 flag specifies the custom SSH port our servers use. Standard SSH connections use port 22, but we use port 9284 for additional security.
You may see a warning that your connection is not using a post-quantum key exchange algorithm. This is informational and does not affect your connection. Your session is still encrypted and your key-based authentication is working correctly. You can safely proceed.
- Accept the server fingerprint.
On your first connection, you will see a message asking if you want to continue connecting. Typeyesand press Enter. This adds the server to your list of known hosts. - Enter your passphrase.
If you set a passphrase when generating your key, enter it now. You are then connected to your hosting account via SSH.
You now have command line access to your hosting account, run commands, manage files and execute scripts directly on the server.
Connect via SSH on Windows
Windows SSH connections require two PuTTY tools: Pageant to manage your private key and PuTTY itself to establish the connection. Pageant runs in the background and provides your key to PuTTY when needed.
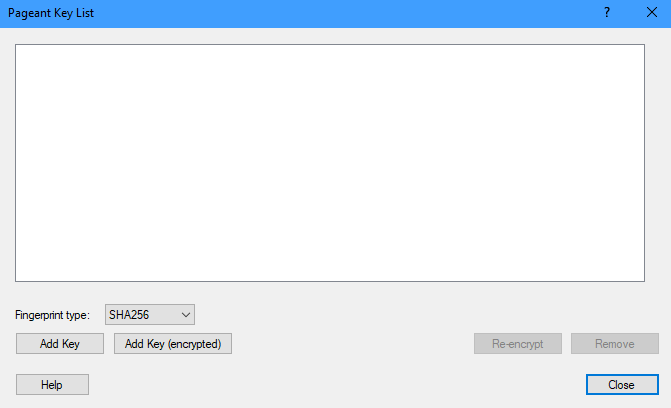
- Open Pageant.
Launch Pageant from your Start menu. It runs in your system tray (bottom right of your screen) and shows a small computer icon. - Load your private key.
Right-click the Pageant icon in your system tray and select Add Key. Navigate to your saved.ppkfile and open it. Enter your passphrase when prompted.
- Open PuTTY.
Launch PuTTY from your Start menu to open the configuration window. - Enter your server details.
In the Host Name field, enter your server’s hostname from your welcome email. In the Port field, change the default 22 to9284. Leave Connection type set to SSH.
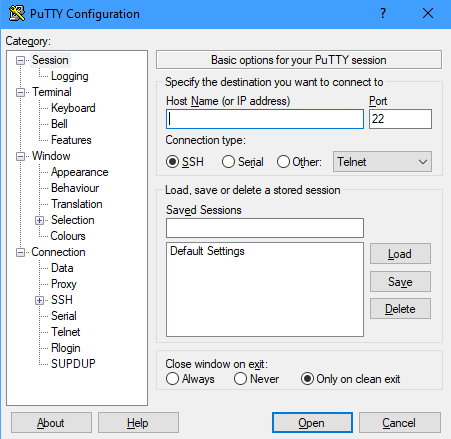
- Open the connection.
Click Open at the bottom of the PuTTY window. A terminal window appears. - Log in with your username.
When prompted forlogin as:, enter your cPanel username and press Enter. Pageant automatically provides your private key for authentication and you are logged in.
Your SSH connection is now active. You can execute commands and manage your hosting account through the terminal window.
Troubleshooting SSH connections
SSH connection problems usually relate to key configuration, port settings or authentication issues. These solutions address the most common problems.
Connection refused or timeout errors
These errors occur when your SSH client cannot reach the server. This is usually caused by incorrect port settings or firewall restrictions.
- Confirm you are using port 9284, not the standard port 22.
- Check your firewall allows outbound connections on port 9284.
- Verify you are using the correct server hostname from your welcome email.
- Try connecting from a different network to rule out ISP restrictions.
Permission denied errors
Permission denied messages indicate authentication failures. Your private key is not matching the public key stored on the server.
- Confirm your public key is authorised in cPanel’s SSH Access section.
- Check you are using the correct private key file that matches your uploaded public key.
- On Linux or macOS, verify your private key has correct permissions:
chmod 600 ~/.ssh/id_rsa - On Windows, confirm Pageant has loaded your private key before opening PuTTY.
Key not found or invalid format errors
These errors appear when your SSH client cannot read your private key file. The key may be corrupted, in the wrong format or stored in an unexpected location.
- Regenerate your key pair if the private key file is corrupted.
- On Linux or macOS, confirm your private key is in
~/.ssh/id_rsaor specify the path withssh -i /path/to/key - On Windows, verify your private key is in PPK format. If you have an OpenSSH format key, use PuTTYgen to convert it.
Shell access is not enabled on your account
This message means your SSH key authenticated correctly but shell access has not been activated for your account. Key authentication and shell access are separate. You can have a valid key uploaded and authorised but still be blocked at login if shell access is disabled.
- Confirm your hosting plan includes SSH access. It is available on Premium cPanel, Premium Reseller, Agency and VPS plans.
- Log in to cPanel and check that SSH access is enabled under Security > SSH Access.
- If shell access cannot be enabled from cPanel, contact support to have it activated on your account.
Further reading on SSH security
SSH key pairs use public-key cryptography to authenticate connections without transmitting passwords over the network. Your private key proves your identity by creating a digital signature that the server verifies using your public key. This prevents password interception and brute force attacks that target password-based authentication.
Adding a passphrase to your private key creates a second authentication layer. Even if someone copies your private key file, they cannot use it without the passphrase. This protects you if your computer is stolen or your backup storage is compromised. The SSH Academy provides detailed explanations of key generation options and security best practices.
Port 9284 reduces automated attacks that scan for SSH services on the standard port 22. Attackers typically target default ports with dictionary attacks and vulnerability scanners. Using a non-standard port does not prevent determined attackers but significantly reduces noise from automated scanning.
Wrapping up
You now have secure SSH access to your hosting account. You generated a key pair on your local machine, uploaded and authorised the public key in cPanel, and configured your SSH client to connect using your private key. This gives you command line access for managing files, running scripts and executing administrative tasks.
Test your connection regularly to confirm it remains active. Store your private key securely and never share it with anyone. If you manage multiple servers or devices, consider creating separate key pairs for each one.
Our Premium Hosting plans include SSH access with no additional configuration required. If you run into any trouble, get in touch and our team will be happy to help.

Ready to get started?
Launch your website with our reliable cPanel hosting with unlimited bandwidth and expert support.
Get cPanel Hosting