A LEMP stack combines Linux, NGINX, MariaDB and PHP to create a high-performance web server environment. NGINX handles HTTP requests more efficiently than Apache under heavy traffic, making LEMP ideal for busy WordPress sites, web applications and ecommerce platforms.
You will install and configure each component of the LEMP stack on AlmaLinux 8, open the necessary firewall ports and verify that all services work together correctly. This guide assumes you have a fresh AlmaLinux 8 installation on your VPS.
Before you begin
- You need SSH access to your AlmaLinux 8 VPS with root privileges.
- Your VPS must have at least 1GB RAM for optimal performance.
- We recommend noting your server’s IP address or hostname from your welcome email.
Prepare your VPS
You need to update system packages and configure the firewall before installing LEMP components. This prevents conflicts with outdated software and allows web traffic to reach your server.
- Connect to your VPS via SSH.
Use PuTTY on Windows or Terminal on macOS and Linux. Enterssh root@your-server-ipreplacing your-server-ip with your actual server address. Enter your root password when prompted. - Update installed packages.
Rundnf updateto check for available updates. Typeyand press Enter when prompted to confirm the installation. This brings all system packages to their latest versions. - Check current firewall rules.
Runfirewall-cmd --zone=public --list-servicesto see which services can receive traffic. By default, AlmaLinux blocks HTTP and HTTPS connections.

- Open HTTP and HTTPS ports.
Run these three commands in sequence to allow web traffic and apply the changes:firewall-cmd --permanent --zone=public --add-service=httpfirewall-cmd --permanent --zone=public --add-service=httpsfirewall-cmd --reload - Verify the firewall changes.
Runfirewall-cmd --zone=public --list-servicesagain. The output should now include http and https in the list of allowed services.

Your VPS is now ready to receive web traffic. Next, you will install NGINX to handle incoming HTTP requests.
Install and configure NGINX
NGINX serves as your web server, processing HTTP requests and delivering content to visitors. You will install the latest stable version and configure it to work with PHP.
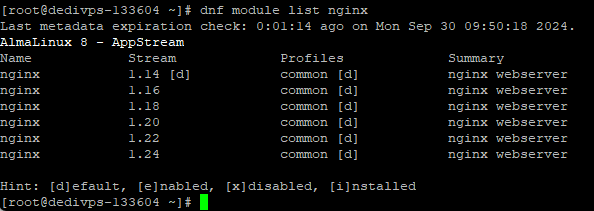
- Check available NGINX versions.
Rundnf module list nginxto see which versions are available. This displays all NGINX module streams in the AlmaLinux repository.
- Enable the latest NGINX version.
Rundnf module enable nginx:1.24to activate version 1.24. Replace 1.24 with a different version number if your application requires it. - Install NGINX and dependencies.
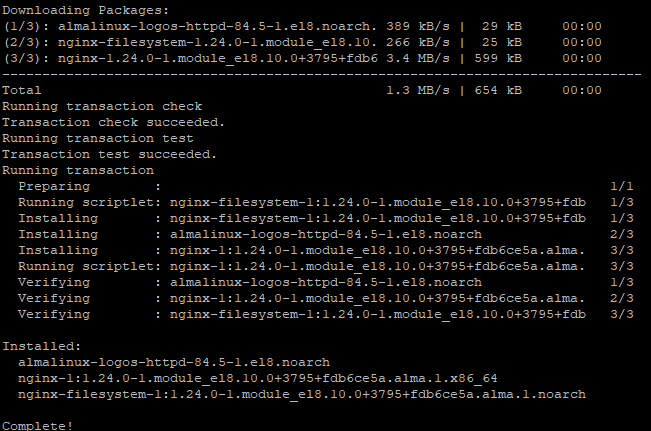
Rundnf install epel-release -yto add the EPEL repository, which provides additional packages. Then rundnf install nginx -yto install NGINX. The-yflag skips confirmation prompts.
- Start and enable NGINX.
Runsystemctl start nginxto start the web server immediately. Then runsystemctl enable nginxto configure NGINX to start automatically when your VPS boots. - Create the default server configuration.
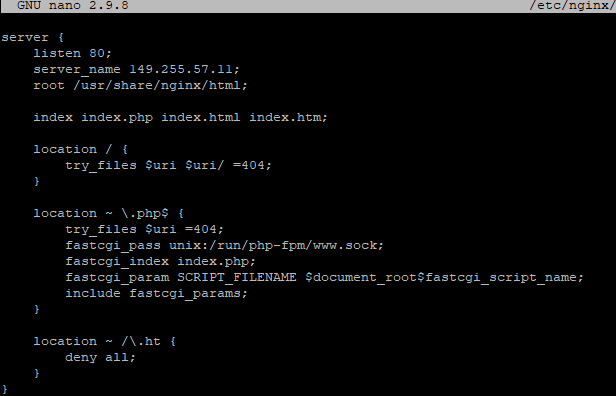
Runnano /etc/nginx/conf.d/default.confto create a new configuration file. Paste the following configuration, replacingyour-server-ipwith your actual server IP address or hostname:
server {
    listen 80;
    server_name your-server-ip;
    root /usr/share/nginx/html;

    index index.php index.html index.htm;

    location / {
        try_files $uri $uri/ =404;
    }

    location ~ \.php$ {
        try_files $uri =404;
        fastcgi_pass unix:/run/php-fpm/www.sock;
        fastcgi_index index.php;
        fastcgi_param SCRIPT_FILENAME $document_root$fastcgi_script_name;
        include fastcgi_params;
    }

    location ~ /\.ht {
        deny all;
    }
}
This configuration tells NGINX to listen on port 80, serve files from /usr/share/nginx/html and pass PHP requests to PHP-FPM. The final location block prevents access to Apache configuration files.
- Apply the configuration changes.
PressCtrl+X, thenY, thenEnterto save and close the file. Runsystemctl reload nginxto apply your changes without interrupting active connections.
NGINX is now installed and configured to handle web requests. Next, you will install MariaDB to store application data.
Install and configure MariaDB
MariaDB provides database functionality for your web applications. You will install the database server, secure it and verify that it accepts connections.
- Check available MariaDB versions.
Rundnf module list mariadbto see which versions are available in the repository. - Enable and install MariaDB.
Rundnf module enable mariadb:10.11to activate version 10.11. Then rundnf install mariadb mariadb-serverto install both the client and server packages.

- Start and enable MariaDB.
Runsystemctl start mariadbto start the database server. Then runsystemctl enable mariadbto configure it to start automatically on boot. - Secure your MariaDB installation.
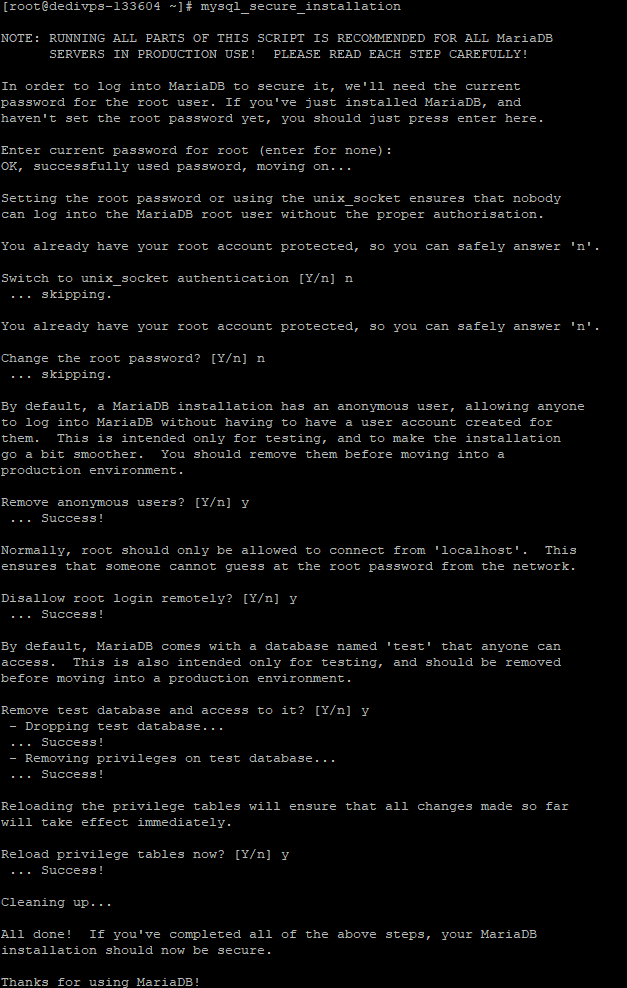
Runmysql_secure_installationto launch the security configuration wizard. PressEnterwhen prompted for the current root password (there is none yet). TypeYto set a root password and enter a strong password twice. AnswerYto all remaining prompts to remove anonymous users, disable remote root login, remove the test database and reload privileges.
- Test database connectivity.
Runmysql -u root -pand enter your root password when prompted. You should see the MariaDB prompt. Typeexitor pressCtrl+Dto close the connection.
MariaDB is now running and secured with a root password. Next, you will install PHP to process dynamic content.
Install and configure PHP
PHP processes server-side code and generates dynamic web pages. You will install PHP with necessary extensions and configure PHP-FPM to work with NGINX.
- Check available PHP versions.
Rundnf module list phpto see which PHP versions are available. This displays all PHP module streams in the repository.
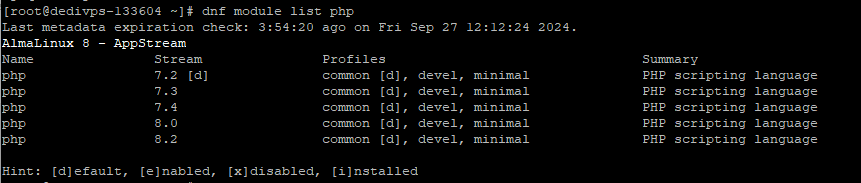
- Enable PHP 8.2.
Rundnf module enable php:8.2to activate PHP 8.2. This version provides modern language features and security improvements. - Install PHP and required extensions.
Run the following command to install PHP with commonly needed extensions:
dnf install php php-fpm php-zip php-intl php-opcache php-gd php-mbstring php-xml php-mysqlndThese extensions provide image processing, database connectivity, XML parsing and other functionality required by most web applications.
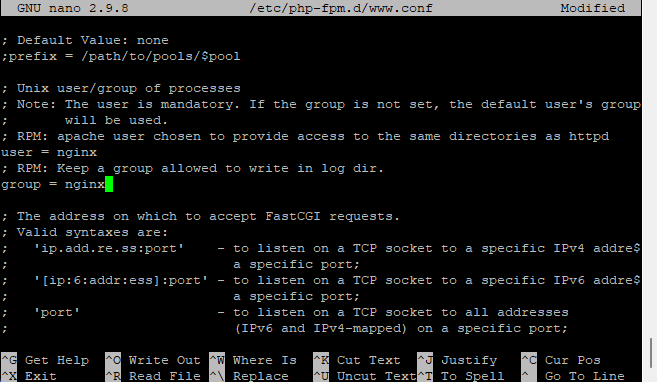
- Configure PHP-FPM for NGINX.
Runnano /etc/php-fpm.d/www.confto open the PHP-FPM configuration file. PressCtrl+Wto search, typeuser = apacheand pressEnter. Changeuser = apachetouser = nginx. Search again forgroup = apacheand change it togroup = nginx. PressCtrl+X, thenY, thenEnterto save.
- Start and enable PHP-FPM.
Runsystemctl start php-fpmto start the PHP processor. Then runsystemctl enable php-fpmto configure it to start automatically on boot. - Create a PHP test file.
Runnano /usr/share/nginx/html/index.phpto create a new file. Type the following PHP code:
<?php phpinfo(); ?>Press Ctrl+X, then Y, then Enter to save the file.
- Test PHP processing.
Open your web browser and navigate tohttp://your-server-ip/index.phpreplacing your-server-ip with your actual server address. You should see a page displaying PHP configuration information. This confirms that NGINX passes PHP requests to PHP-FPM correctly.
Your LEMP stack is now fully installed and functional. All components work together to serve dynamic web content.
Troubleshooting
NGINX fails to start
Configuration syntax errors prevent NGINX from starting. Run nginx -t to test your configuration files. The output identifies the file and line number of any errors. Common issues include missing semicolons, mismatched brackets or incorrect file paths.
PHP files download instead of executing
This occurs when NGINX cannot communicate with PHP-FPM. Check that PHP-FPM is running with systemctl status php-fpm. Verify that the socket path in your NGINX configuration matches the PHP-FPM socket location. The default socket is /run/php-fpm/www.sock.
Cannot connect to MariaDB
Connection failures usually indicate that MariaDB is not running or the password is incorrect. Run systemctl status mariadb to check the service status. If you forgot your root password, you can reset it by stopping MariaDB, starting it with mysqld_safe --skip-grant-tables &, connecting without a password and running ALTER USER 'root'@'localhost' IDENTIFIED BY 'new-password';
502 Bad Gateway errors
These errors appear when NGINX cannot reach PHP-FPM. Check that PHP-FPM is running and that the socket file exists at /run/php-fpm/www.sock. Verify that the nginx user has permission to access the socket. You can check PHP-FPM logs at /var/log/php-fpm/www-error.log for specific error messages.
Further reading on LEMP stack management
The LEMP stack requires ongoing maintenance to remain secure and performant. Regular updates patch security vulnerabilities in all components. You should monitor your server’s resource usage to identify bottlenecks before they affect performance. NGINX provides detailed access and error logs that help diagnose issues.
PHP-FPM offers several configuration options that affect performance. The pm.max_children setting controls how many PHP processes can run simultaneously. Setting this too low causes requests to queue, while setting it too high exhausts available memory. The PHP-FPM configuration documentation explains how to tune these settings for your workload.
MariaDB performance depends heavily on proper configuration. The innodb_buffer_pool_size setting determines how much memory MariaDB uses for caching. For dedicated database servers, set this to 70-80% of available RAM. The MariaDB knowledge base provides detailed guidance on optimising database performance.
Our guide on installing a LAMP stack on AlmaLinux covers Apache-based configurations if you need to compare approaches or migrate between web servers.
Wrapping up
Your AlmaLinux VPS now runs a complete LEMP stack. You installed NGINX as your web server, MariaDB for database storage and PHP for processing dynamic content. The firewall permits web traffic and all components communicate correctly through Unix sockets.
Test your stack thoroughly before deploying applications. Create a database, upload a simple PHP application and verify that all functionality works as expected. Our VPS hosting provides the resources and flexibility to run demanding web applications on your LEMP stack.

Need more power?
Get scalable resources with our VPS hosting with root access and optional software.
Get VPS Hosting
Starting something new?
Perfect for websites and small businesses unlimited bandwidth with cPanel hosting.
Get cPanel Hosting