Your device stores DNS information for recently visited sites in a temporary cache. This speeds up browsing by reducing queries to external DNS servers. When DNS records change, your cached information becomes outdated and causes loading problems.
You will clear your DNS cache to force your device to fetch current DNS records. This fixes loading issues during website development when DNS changes happen frequently.
Before you begin
- You need administrator access on Windows or sudo privileges on Linux.
- We recommend clearing your browser cache after flushing DNS to remove all outdated records.
Flush DNS cache on Windows 11
Windows stores DNS records in a resolver cache. You will use the command prompt to clear this cache and force Windows to query DNS servers for fresh records.
- Open the Start menu.
Press the Windows key on your keyboard or click the Start button in the taskbar. - Search for Command Prompt.
Typecommand promptin the search box. Click Command Prompt when it appears in the results.
- Run the flush command.
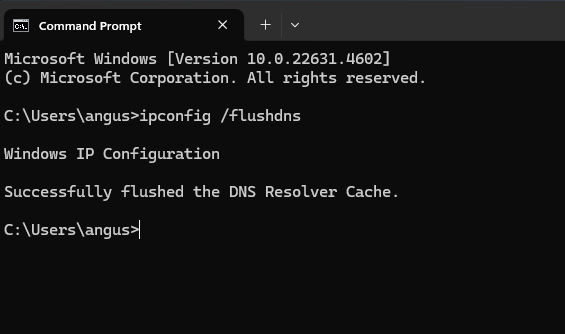
Typeipconfig /flushdnsin the command prompt window and press Enter. This clears all DNS records stored in your local cache. - Confirm the cache was cleared.
You will see the message “Successfully flushed the DNS Resolver Cache” confirming the operation completed.
Your Windows DNS cache is now empty. Your device will fetch current DNS records the next time you visit a website.
Flush DNS cache on Ubuntu 24.04
Ubuntu uses systemd-resolved to manage DNS caching. You will run a command in the terminal to clear cached records and verify the operation completed.
- Open a terminal window.
PressCtrl+Alt+Tor search for Terminal in your applications menu. - Run the flush command.
Typesudo systemd-resolve --flush-cachesand press Enter. This clears all DNS records stored by systemd-resolved. - Enter your password.
Type your account password when prompted and press Enter. The command runs with administrator privileges. - Verify the cache was cleared.
Runsudo systemd-resolve --statisticsto display cache statistics. The current cache size should show zero entries.
Your Ubuntu DNS cache is now cleared. The system will query DNS servers for fresh records on your next request.
Wrapping up
You cleared your DNS cache to remove outdated DNS records. Your device now fetches current information from DNS servers, fixing loading problems caused by stale cache entries.
Clear your browser cache after flushing DNS to remove all locally stored records. If your site still does not load correctly, check our guide on why you cannot access your site. Our cloud hosting platform handles DNS propagation automatically when you update records.

Ready to get started?
Launch your website with our reliable cPanel hosting with unlimited bandwidth and expert support.
Get cPanel Hosting