Website access failures prevent visitors from reaching your site, sometimes displaying error messages and sometimes showing nothing at all. These issues stem from firewall blocks, DNS misconfigurations, malware infections or domain problems.
You will diagnose the root cause by testing connectivity, checking DNS records and examining your site’s configuration. Once identified, most access issues resolve quickly using the appropriate fix for your specific problem.
Before you begin
- You need access to your hosting control panel (cPanel or Plesk).
- Keep your domain name and server hostname available for testing.
- We recommend testing from multiple devices or networks to rule out local issues.
Test for firewall blocks
The firewall protects shared hosting services against repeated failed login attempts and security threats. When your IP address triggers a block, your sites fail to load and display only a blank or black screen. Running a traceroute test confirms whether the firewall is blocking your connection.
- Open your command line interface.
On Windows, press Windows + R, typecmdand press Enter. On macOS, open Terminal from Applications > Utilities. On Linux, use your distribution’s terminal application. - Run the traceroute command.
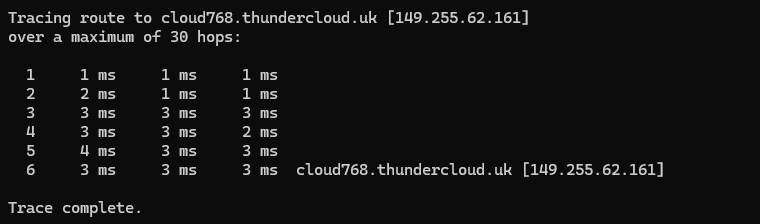
On Windows, typetracert hostname_or_ipreplacing hostname_or_ip with your server hostname or IP address. On macOS and Linux, usemtr hostname_or_ipinstead. This command traces the network path to your server. - Check if the trace reaches your server.
A successful traceroute shows multiple hops ending at your server’s IP address. If the trace stops before reaching your server or times out repeatedly, the firewall is likely blocking your connection.
If your traceroute fails to reach the server, contact support with the traceroute output. The team will check the firewall logs and remove any blocks on your IP address.
Check DNS propagation
DNS changes take up to 48 hours to propagate globally. During this period, some visitors reach your site while others see the old configuration or no site at all. This commonly occurs after registering a new domain, changing nameservers or updating DNS records.
- Open the DNS propagation checker.
Visit whatsmydns.net in your browser. This tool checks how your domain resolves across different global locations. - Enter your domain name.
Type your domain in the search field and select A from the record type dropdown. Click the search button to run the check. - Review the results.
Green ticks indicate locations where your DNS has updated. Red crosses show locations still using old records. Partial propagation is normal during the first 48 hours after making changes.

Wait for propagation to complete if you recently made DNS changes. Your site becomes accessible globally once all locations show green ticks. If propagation stalls after 48 hours, check your DNS records for configuration errors.
Verify DNS records
Incorrect DNS records send visitors to the wrong server or prevent your domain from resolving at all. You need to verify that your A records point to your hosting server’s IP address and that your domain registration remains active.
- Run a WHOIS lookup.
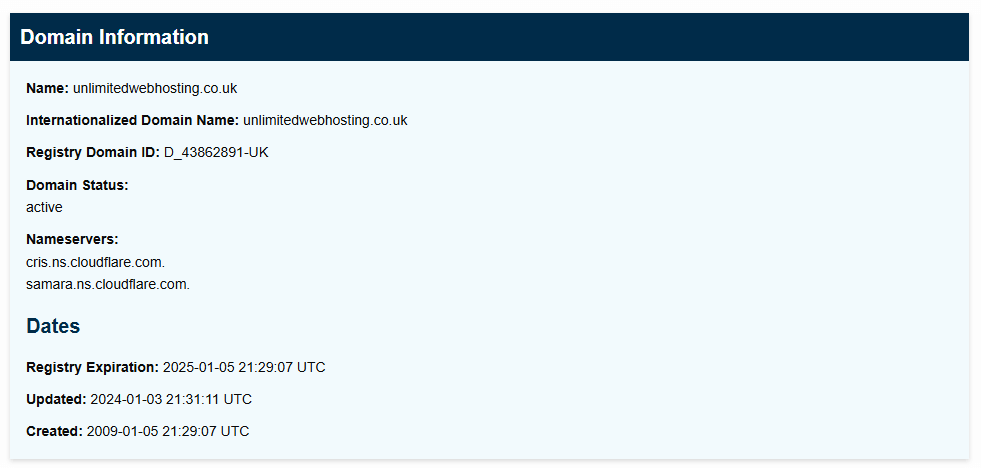
Visit lookup.icann.org and enter your domain name. This shows your domain’s registration status, expiry date and current nameservers. - Check the domain status.
Look for the Domain Status field in the results. Active domains show status codes likeclientTransferProhibited. If you seependingDeleteor an expiry date in the past, your domain registration has lapsed. - Verify the nameservers.
Scroll to the Name Server section. If you host with us, these should match our default nameservers. Different nameservers indicate your DNS is managed elsewhere.
Renew your domain immediately if it has expired. Update your nameservers if they point to a previous hosting provider. These changes take up to 48 hours to propagate globally.
Update DNS zone records
Your DNS zone contains the A records that direct traffic to your server. Incorrect A records send visitors to the wrong IP address, making your site inaccessible even when your domain and nameservers are configured correctly.
In cPanel
- Log in to cPanel.
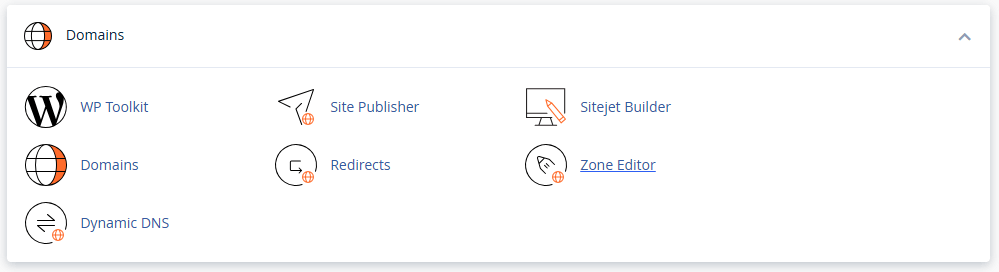
Access your hosting control panel atyourdomain.co.uk:2083using your cPanel username and password. - Open the Zone Editor.
Scroll to the Domains section and click Zone Editor. This displays all DNS records for your domains. - Locate your domain’s A record.
Find the row showing your domain name with Type: A. The Record column shows the IP address this domain points to. - Verify the IP address.
Compare the A record’s IP address against your server’s IP address (found in your welcome email or hosting dashboard). If they differ, click Edit next to the record. - Update the record.
Enter your correct server IP address in the Address field and click Save Record. The change takes up to 48 hours to propagate.
In Plesk
- Log in to Plesk.
Access your Plesk panel atyourdomain.co.uk:8443using your Plesk credentials. - Select your domain.
Click Websites & Domains in the left sidebar, then click your domain name from the list. - Open DNS Settings.
Click the DNS Settings button. This shows all DNS records configured for your domain. - Edit the A record.
Find the A record for your domain (the one with no subdomain prefix). Click the record to edit it. - Update the IP address.
Enter your correct server IP in the IP address field and click OK. DNS propagation begins immediately.

Your domain now points to the correct server. If you use custom nameservers, verify those are configured correctly as well. New customers should use our default nameservers after transferring a domain from another registrar.
Scan for malware
Malware infections alter critical files, redirect traffic or trigger account suspensions. Infected sites may fail to load, display unexpected content or redirect visitors to malicious domains. The .htaccess file commonly contains malicious rules that disable PHP or force redirects.
- Log in to cPanel.
Access your hosting control panel atyourdomain.co.uk:2083. - Open ImunifyAV+.
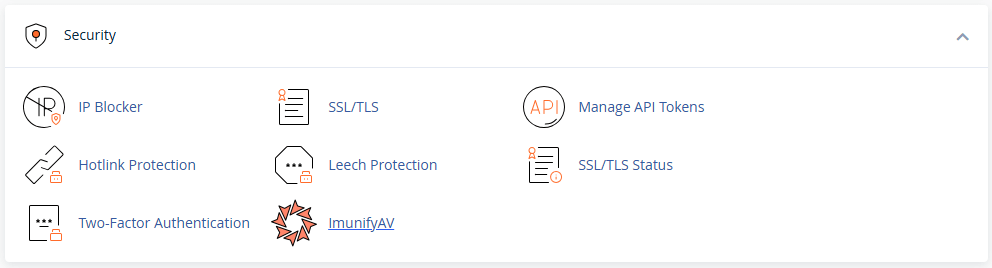
Scroll to the Security section and click ImunifyAV+. This opens the malware scanner interface. - Start a scan.
Click Scan in the top menu, then click Start. The scanner examines all files in your hosting account for known malware signatures. - Review detected threats.
Once the scan completes, click Files to see infected files. Each entry shows the file path and threat type. - Clean infected files.
Select the files you want to clean and click Cleanup. ImunifyAV+ attempts to remove malicious code while preserving legitimate file content.
ImunifyAV+ removes common malware infections but does not address the security vulnerabilities that allowed the infection. Follow our complete malware removal guide to secure your site properly. If your account was suspended for abuse, reply to the suspension notification ticket and the team will assist with reactivation.
Further reading on website connectivity
Website access issues often involve multiple interconnected systems. Understanding how DNS resolution works helps diagnose problems faster. The Cloudflare DNS learning centre explains the DNS lookup process in detail, covering how browsers translate domain names into IP addresses and why changes take time to propagate. Firewall blocks protect shared hosting environments from abuse but can occasionally block legitimate traffic.
For WordPress-specific access issues, our guide on fixing malware on WordPress addresses common causes including plugin conflicts and PHP errors.
Wrapping up
You have diagnosed and resolved common website access issues by testing firewall connectivity, verifying DNS configuration and scanning for malware. Your site now loads correctly for visitors, with DNS records pointing to the right server and no security blocks preventing access.
Monitor your site over the next few days to confirm stable access. Check that DNS propagation completes globally and that no new firewall blocks occur. Our managed WordPress hosting includes automatic malware scanning and firewall protection to prevent future access issues.

Ready to get started?
Launch your website with our reliable cPanel hosting with unlimited bandwidth and expert support.
Get cPanel Hosting