Mixed content warnings appear when your WordPress site loads resources over a mixture of HTTP and HTTPS at the same time. Active mixed content is the most common type on WordPress sites and triggers browser security warnings that can drive visitors away.
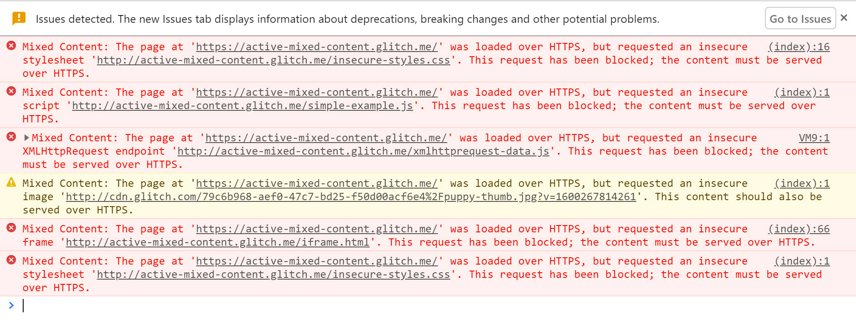
You will fix mixed content errors by updating WordPress settings, replacing HTTP URLs throughout your database and configuring server-level redirects. Once complete, your site loads securely with no browser warnings.
Before you begin
- An SSL certificate must be installed on your domain.
- You need access to your WordPress admin area at
yourdomain.co.uk/wp-admin - We recommend creating a backup before making database changes.
Update WordPress address settings
WordPress stores your site’s URL in two database fields. You need to change these from HTTP to HTTPS so WordPress knows to generate secure URLs.
- Log in to your WordPress admin area.
Access this by adding /wp-admin to your domain:https://yourdomain.co.uk/wp-adminreplacing yourdomain.co.uk with your actual domain name. - Open the General Settings page.
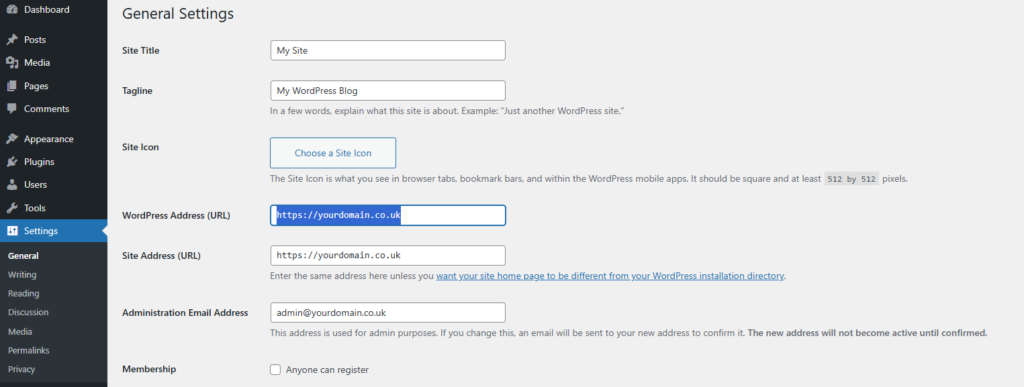
In the left sidebar, hover over Settings and click General. - Change the URL fields.
Find two fields near the top of the page: WordPress Address (URL) and Site Address (URL). If they currently display http://yourdomain.co.uk, change both to use https:// instead. - Save your changes.
Scroll to the bottom of the page and click Save Changes. You will be logged out, which confirms the change worked correctly. - Confirm the changes.
Log back into the WordPress admin area via https://yourdomain.co.uk/wp-admin. Your WordPress URLs are now configured for HTTPS.
These settings control how WordPress generates URLs throughout your site. Changing them updates new content automatically, but existing database entries still contain HTTP references.
Install the Better Search Replace plugin
Your WordPress database contains HTTP URLs in post content, custom fields and widget settings. Manually finding and replacing these would take hours. Better Search Replace automates the process and includes safety features like dry run testing.
- Open the plugin installer.
From your WordPress dashboard, hover over Plugins in the left sidebar and click Add New. - Search for the plugin.
In the search box at the top right, type Better Search Replace and press Enter. - Install the plugin.
Look for Better Search Replace by WP Engine. The plugin icon shows a magnifying glass. Click Install Now next to this plugin. - Activate the plugin.
Installation takes 10 to 15 seconds. Once complete, the button changes to Activate. Click Activate to enable the plugin. - Confirm activation.
WordPress redirects you to the Plugins page. You will see Better Search Replace in your active plugins list.

The plugin is now ready to scan your database. Next, you will configure it to find and replace HTTP URLs across all database tables.
Search and replace HTTP URLs
Better Search Replace finds every instance of http://yourdomain.co.uk in your database and replaces it with https://yourdomain.co.uk. The plugin searches across all database tables including posts, pages and options.
- Open the plugin interface.
In the left sidebar, hover over Tools and click Better Search Replace. - Enter your search term.
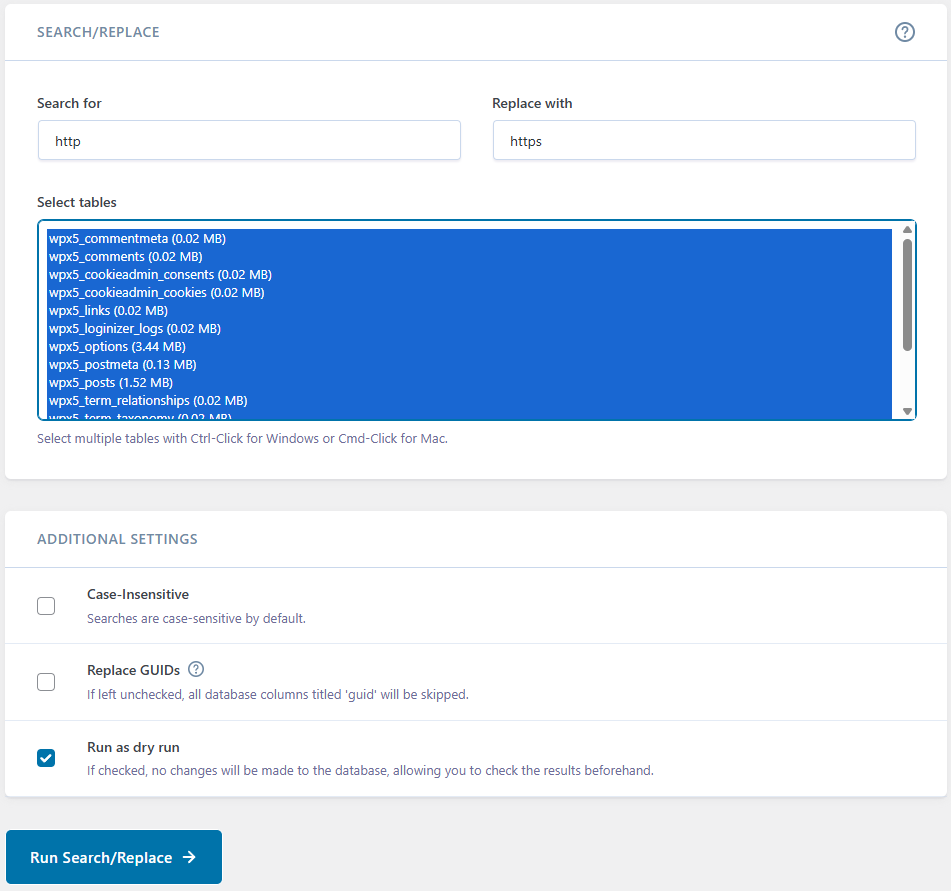
You will see two text fields at the top: Search for and Replace with. In the Search for field, enter your domain with HTTP:http://yourdomain.co.uk - Enter your replacement term.
In the Replace with field, enter your domain with HTTPS:https://yourdomain.co.ukreplacing yourdomain.co.uk with your actual domain name. Double-check the spelling carefully. - Select all database tables.
Below these fields, you will see Select tables. Hold Ctrl (Windows) or Cmd (Mac) and click each table name to select all tables. The plugin needs to search every table because HTTP URLs can exist anywhere in your database. - Run a dry run test.
The Run as dry run? checkbox appears checked by default. Click Run Search/Replace to test. The plugin scans your database and displays results showing how many replacements it would make. - Perform the actual replacement.
Review the results. If the numbers seem reasonable for your site size, uncheck Run as dry run? and click Run Search/Replace again. The plugin processes your database and confirms completion.
Your database now contains HTTPS URLs throughout. However, visitors can still access your site over HTTP if they type the address directly. Server-level redirects prevent this.
Force HTTPS at the server level
WordPress now serves URLs over HTTPS but visitors can still access your site over HTTP if they type http://yourdomain.co.uk directly. Server-level redirects automatically send all HTTP requests to HTTPS.
cPanel users
If you use cPanel hosting, force HTTPS through the Domains interface. cPanel includes a built-in HTTPS redirect option that requires no manual file editing.
Manual .htaccess redirect
Add redirect rules to your .htaccess file. This file controls Apache web server behaviour for your WordPress site.
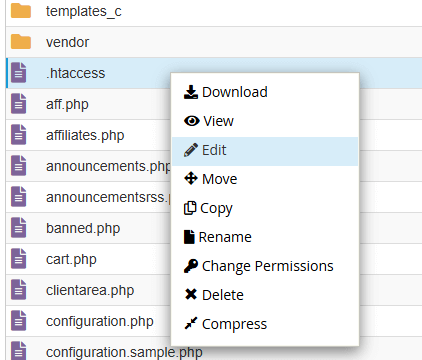
- Locate the .htaccess file.
Access your site files via FTP or your hosting file manager. Enable viewing of hidden files if you cannot see .htaccess. The file sits in your WordPress root directory, the same folder containing wp-config.php. - Create a backup.
Download a copy of .htaccess before editing. If something goes wrong, you can restore the original file. - Add the redirect rules.
Open .htaccess in a text editor and add these lines at the very top of the file, before any existing WordPress rules:
.htaccess
RewriteEngine On
RewriteCond %{HTTPS} off
RewriteRule ^(.*)$ https://%{HTTP_HOST}%{REQUEST_URI} [L,R=301]- Upload and test.
Save .htaccess and upload it back to your server. Test by visiting http://yourdomain.co.uk. Your browser should redirect to HTTPS automatically.
All HTTP requests now redirect to HTTPS before WordPress loads. This prevents mixed content warnings and protects visitor data from the moment they connect.
Troubleshooting common issues
Infinite redirect loop
Your browser keeps loading and never reaches the page. This indicates a redirect conflict between the server and your WordPress configuration.
- Check your .htaccess file for duplicate rewrite rules.
- Remove unused redirect rules.
- Verify your WordPress Address and Site Address using phpMyAdmin by viewing the options table in your site’s database.
For a detailed walkthrough, see how to fix too many redirects.
Mixed content warnings persist
If mixed content warnings remain after completing the steps above, HTTP URLs may be hardcoded in your theme files or plugin settings.
- Check your theme’s header.php and footer.php for HTTP URLs.
- Review API connection configurations in plugins for HTTP references.
- Clear all caches from caching plugins that might have stored HTTP URLs before your changes.
Further reading on HTTPS
HTTPS (Hypertext Transfer Protocol Secure) encrypts data between your visitor’s browser and your web server. When someone logs into your WordPress admin area or submits a contact form, HTTPS prevents attackers from intercepting that information. Without HTTPS, login credentials and personal data travel across the internet in plain text.
According to Google’s Transparency Report, over 95% of web traffic in the UK now uses HTTPS. Modern browsers like Chrome and Firefox actively warn visitors when they land on sites without SSL certificates. Google has confirmed that HTTPS is a ranking signal in search results, meaning sites without HTTPS may rank lower than equivalent sites with proper encryption.
Wrapping up
Your WordPress site now forces HTTPS connections and loads all resources securely. You updated WordPress core settings, replaced HTTP URLs throughout the database and configured server-level redirects. Visitors see the padlock icon in their browser, confirming their connection is encrypted.
Review your site over the next few days. Check that all pages load correctly, embedded videos play and forms submit without errors. If you encounter issues, consult our WordPress FAQs for solutions to common problems. Our managed WordPress hosting handles SSL certificates and HTTPS configuration automatically.
If you run into any trouble, get in touch and our team will be happy to help.

Running a WordPress site?
Get fast, secure and reliable WordPress Hosting with optimised for performance with AccelerateWP.
Get WordPress Hosting
Need multiple accounts?
Create fully isolated individual accounts for your clients and manage them all from one dashboard.
Get Reseller Hosting