Remote MySQL connections expose your database to brute-force attacks, SQL injection attempts and compliance violations when port 3306 is left open to the internet. An SSH tunnel encrypts your connection and routes database traffic through a secure channel without opening vulnerable ports.
You will create an SSH tunnel using PuTTY, configure port forwarding and connect to your MySQL database as if it were running locally. Your data remains encrypted throughout the connection.
Before you begin
- You need PuTTY installed on your local machine.
- You must have SSH key access configured on your VPS.
- You need your MySQL username, password and database name.
Understanding remote MySQL security risks
Remote MySQL connections are disabled by default because port 3306 presents multiple security vulnerabilities when exposed to the internet. Opening this port makes your database a target for automated attacks that scan for open MySQL ports across IP ranges.
Brute-force attacks attempt thousands of login combinations per minute against exposed MySQL ports. SQL injection exploits can compromise your entire database through a single vulnerable connection. Denial-of-service attacks flood the port with requests, making your database unavailable to legitimate users.
Payment card industry data security standards (PCI-DSS) require encryption for all data in transit. MySQL connections over port 3306 do not encrypt traffic by default, which creates compliance violations if you process card payments through Visa, Mastercard or American Express. An SSH tunnel solves this by wrapping all MySQL traffic in encrypted SSH protocol.
How SSH tunnelling secures database connections
An SSH tunnel creates an encrypted channel between your local machine and the remote server. You establish an SSH connection first using your key pair or password. This connection remains open and forwards traffic from a local port on your machine to the MySQL port on the remote server.
Your database client connects to localhost:3307 on your local machine. SSH intercepts this traffic, encrypts it and forwards it through the tunnel to port 3306 on the remote server. The remote MySQL server receives the connection as if it came from localhost, which bypasses firewall restrictions whilst maintaining security.
Port 3306 never opens to the internet. All traffic flows through the encrypted SSH connection on port 22 or 9284, which is already secured by key-based authentication. If you encounter connection issues in automated environments, you may need to disable strict host key checking for dynamic IP addresses.
Create an SSH tunnel using PuTTY
You will configure PuTTY to forward a local port to the remote MySQL server through an SSH connection. This creates the encrypted tunnel that your database client will use.
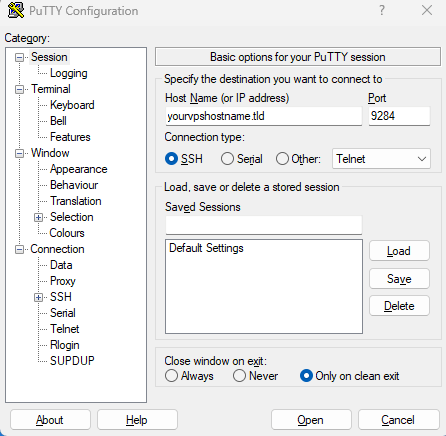
- Open PuTTY and enter your server details.
Launch PuTTY and enter your VPS IP address or hostname in the Host Name field. Set the Port to 9284 or 22 depending on your SSH configuration.
- Navigate to the Tunnels configuration.
In the Category panel on the left, expand SSH by clicking the plus icon. Click Tunnels to open the port forwarding settings.
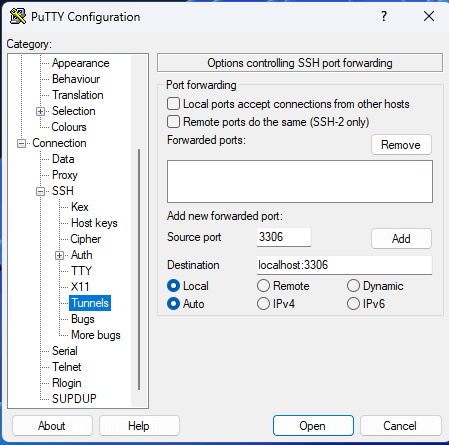
- Configure the port forwarding.
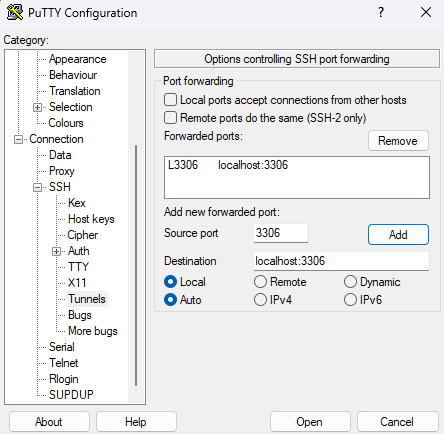
Enter3307in the Source port field. This is the local port your database client will connect to. Enterlocalhost:3306in the Destination field. This forwards traffic to MySQL on the remote server. - Add the tunnel configuration.
Click the Add button. The forwarded port appears in the list above asL3307 localhost:3306. This confirms the tunnel is configured.
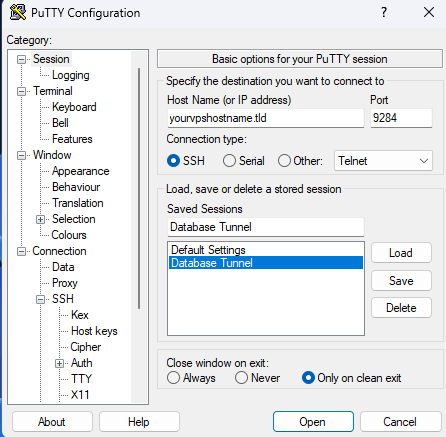
- Save the session profile.
Click Session in the Category panel to return to the main screen. Enter a name in the Saved Sessions field, such as “VPS MySQL Tunnel”. Click Save to store this configuration for future use.
- Open the SSH connection.
Click Open to establish the connection. A terminal window opens and prompts for your SSH key passphrase if you configured one. The tunnel remains active whilst this window stays open.
Your SSH tunnel is now active and forwarding traffic from local port 3307 to the remote MySQL server. You can now connect your database client through this tunnel.
Connect to MySQL through the tunnel
You will configure your database client to connect through the local port that PuTTY is forwarding. The client treats the connection as local whilst SSH handles the secure routing.
Use these connection parameters in your database client:
- Host:
localhostor127.0.0.1 - Port:
3307 - Username: Your MySQL username
- Password: Your MySQL password
- Database: Your database name (optional for initial connection)
Popular MySQL clients that work with SSH tunnels include MySQL Workbench, DBeaver, DataGrip, HeidiSQL and the command-line MySQL client. Each client connects to localhost:3307 whilst the tunnel forwards traffic to the remote server. You can import SQL files through this connection using your preferred method.
The PuTTY terminal window must remain open whilst you work with the database. Closing it terminates the tunnel and disconnects your database client. We recommend keeping the terminal minimised during your session.
Further reading on SSH tunnelling
SSH tunnelling applies to any service that requires secure remote access. The same technique works for PostgreSQL, Redis, MongoDB and other database systems that listen on specific ports. You can also tunnel web traffic, email protocols and custom applications through SSH connections.
The OpenSSH manual documents advanced tunnelling options including reverse tunnels and dynamic port forwarding. If you run PostgreSQL instead of MySQL, the PostgreSQL connection guide shows how to adapt this approach for PostgreSQL databases.
Dynamic port forwarding creates a SOCKS proxy that routes all traffic through SSH without configuring individual ports. This proves useful when you need to access multiple services through a single tunnel. The SSH Academy tunnelling examples demonstrate SOCKS proxies and other advanced configurations.
Wrapping up
Your MySQL database now accepts remote connections through an encrypted SSH tunnel without exposing port 3306 to the internet. You configured PuTTY to forward local port 3307 to the remote MySQL server and connected your database client through this secure channel.
Test your connection by running a few queries through your database client. Verify that the PuTTY terminal remains open during your session. Save your PuTTY session profile so you can reconnect quickly without reconfiguring the tunnel settings. Our VPS hosting includes SSH access and supports secure database connections through tunnelling.

Need more power?
Get scalable resources with our VPS hosting with root access and optional software.
Get VPS Hosting
Starting something new?
Perfect for websites and small businesses unlimited bandwidth with cPanel hosting.
Get cPanel Hosting