Your Linux server’s hostname identifies it on a network and appears in shell prompts, logs and system tools. Without a persistent hostname, any name you set is lost after a reboot, which causes confusion in multi-server environments and breaks tools that rely on a consistent identity.
This article covers how to view your current hostname, set a new one permanently using hostnamectl, and update /etc/hosts so local name resolution reflects the change.
Before you begin
- You need SSH access to your Linux server. See our guide on how to connect via SSH if you have not done this before.
- Commands in this guide require root or sudo privileges.
- This guide uses Ubuntu Server. The
hostnamectlcommand works on any systemd-based distribution, including AlmaLinux and Debian.
Check your current hostname
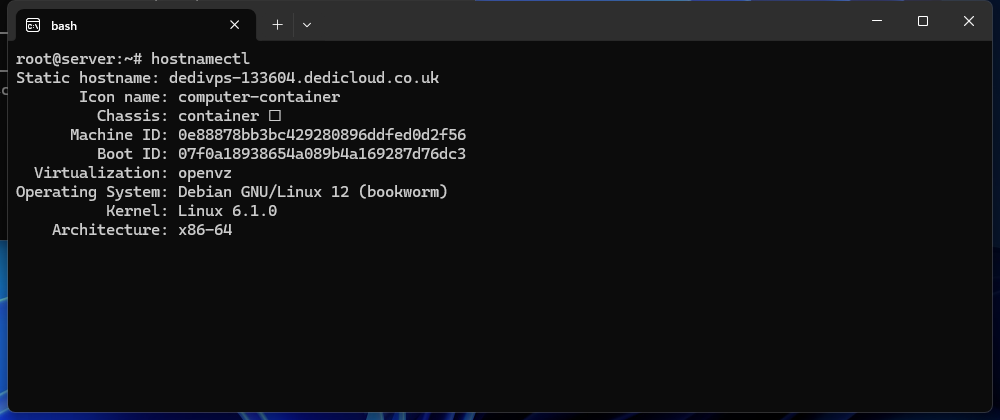
Before making changes, confirm what hostname your server is currently using. The hostnamectl command displays the static hostname alongside other system identity information, so you can verify the starting state.
Run the following command over SSH:
hostnamectlThe output includes a Static hostname line showing the name currently assigned to the server. Note this down before proceeding.
Set a persistent static hostname
Setting the hostname with hostnamectl writes the name to /etc/hostname and applies it immediately without requiring a reboot. This makes the change persistent across restarts, unlike the older hostname command which only affects the current session.
- Set the new hostname.
Replaceyour-new-hostnamewith the name you want to assign. For a server that will be identified by a fully qualified domain name, use the formatserver1.example.com.
sudo hostnamectl set-hostname your-new-hostname- Confirm the change.
Runhostnamectlagain to verify theStatic hostnamefield now shows your new name.
hostnamectlThe new hostname is now active and will persist after a reboot. The next step updates /etc/hosts so the system can resolve the new name locally.
Update /etc/hosts
The /etc/hosts file maps hostnames to IP addresses locally. If your new hostname is not listed here, some applications and services may fail to resolve it, even though the system name has changed. Entries in /etc/hosts take precedence over DNS by default, as controlled by the Name Service Switch configuration in /etc/nsswitch.conf.
- Open /etc/hosts in a text editor.
Usenanoor your preferred editor.
sudo nano /etc/hosts- Locate the line for your server’s IP address.
You will see a line beginning with127.0.1.1followed by the old hostname. Update it to reflect the new name. If you are using a static LAN or VPS IP address, add or update a line for that address too.
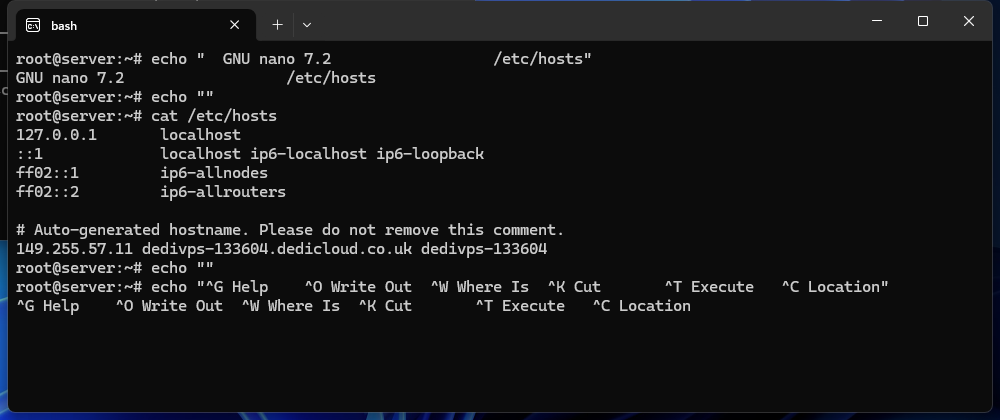
A correctly formatted /etc/hosts file looks like this, where each line maps an IP address to a hostname, optional aliases and an FQDN:
127.0.0.1   localhost
127.0.1.1   your-new-hostname
10.0.0.11 server1 server1.example.com- Save and close the file.
In nano, press Ctrl+O to save, then Ctrl+X to exit. - Verify local resolution.
Confirm the system resolves the new hostname correctly by running the following, replacingyour-new-hostnamewith the name you set.
getent hosts your-new-hostnameThe command returns the IP address mapped to that name in /etc/hosts, confirming local resolution is working.
Troubleshooting
Hostname reverts after reboot
If your hostname changes back after restarting, the name was likely set with the older hostname command rather than hostnamectl. The hostname command only applies to the current session and does not write to /etc/hostname.
- Confirm the contents of
/etc/hostnamewithcat /etc/hostname. It should contain only your new hostname. - Re-run
sudo hostnamectl set-hostname your-new-hostnameto write the name persistently. - On some cloud instances, a cloud-init configuration may override the hostname on boot. Check for a
preserve_hostnamesetting in/etc/cloud/cloud.cfgand set it totrue.
Applications cannot resolve the hostname
Some services fail to start or log errors if they cannot resolve the server’s own hostname. This usually means /etc/hosts has not been updated to include the new name.
- Run
getent hosts your-new-hostnameto test local resolution. No output means the name is not in/etc/hosts. - Add the missing entry to
/etc/hostsas shown in the step above. - Check
/etc/nsswitch.confand confirm thehosts:line includesfilesbeforedns, so local entries are checked first.
Wrapping up
You have set a persistent static hostname on your Linux server using hostnamectl and updated /etc/hosts so the system resolves the name locally. The hostname will now remain consistent across reboots.
From here, you may want to review how your server handles DNS and network identity more broadly. Our guides on how to find your server’s hostname, what an FQDN is and securing your VPS cover related topics worth reviewing after this change.
If you are running your own server and need more control over your environment, take a look at our VPS hosting plans.
Plans and tools mentioned in this guide
Did this guide solve your problem?
Still stuck?
Our UK support team answers tickets and live chat every day. Send us the guide you were following and where it stopped working.
Keep learning
Find a guide
Related guides

Need more power?
Get scalable resources with our VPS hosting with root access and optional software.
Get VPS Hosting
Starting something new?
Perfect for websites and small businesses unlimited bandwidth with cPanel hosting.
Get cPanel Hosting