SSH agent is a background process that holds your decrypted private keys in memory for the duration of a session. Loaded into an SSH agent, connect to remote servers or push to Git repositories without entering your passphrase each time.
This guide covers generating an SSH key pair, loading it into SSH agent and testing the connection. The steps apply to Linux, macOS and Windows (via PowerShell or Git Bash).
Before you begin
- OpenSSH must be installed. On Linux and macOS it is included by default. On Windows, enable the OpenSSH Client optional feature in Settings > System > Optional features.
- You need a terminal with SSH access. See our guide on connecting via SSH if you have not done this before.
- We recommend having a remote host or Git provider (such as GitHub or GitLab) ready to test your connection against.
Generate an SSH key pair
SSH agent works by holding a private key that corresponds to a public key registered on a remote host. You need to generate this pair before you can load anything into the agent. The ed25519 algorithm is the current recommended choice as it produces shorter keys with strong security properties.
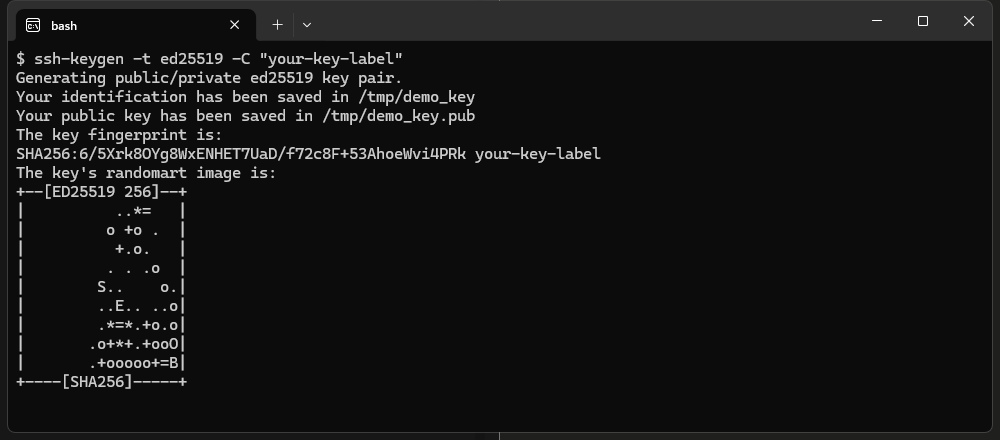
Run the following command, replacing the comment with something that identifies the key’s purpose:
ssh-keygen -t ed25519 -C "your-key-label"When prompted, choose a file path or press Enter to accept the default (~/.ssh/id_ed25519). You will then be asked for a passphrase. Setting one is strongly recommended as it protects the private key file if it is ever accessed by someone else. SSH agent removes the need to type this passphrase repeatedly after the initial load.
The command produces two files: a private key (for example ~/.ssh/id_ed25519) and a public key (~/.ssh/id_ed25519.pub). Never share the private key file.
Start SSH agent and add your key
SSH agent must be running before you can load keys into it. On Linux and macOS, start it with eval so the agent’s environment variables are available in your current shell session. On Windows, the agent runs as a system service.
Linux and macOS – start the agent in your current shell:
eval "$(ssh-agent -s)"Windows (PowerShell, run as administrator) – set the service to start automatically and start it now:
Get-Service ssh-agent | Set-Service -StartupType Automatic -PassThru | Start-ServiceOnce the agent is running, add your private key. Replace the path if you saved your key to a non-default location:
ssh-add ~/.ssh/id_ed25519You will be prompted for your passphrase once. After that, the agent holds the decrypted key in memory and supplies it automatically for the rest of the session.
To confirm the key has been loaded, list the keys currently held by the agent:
ssh-add -l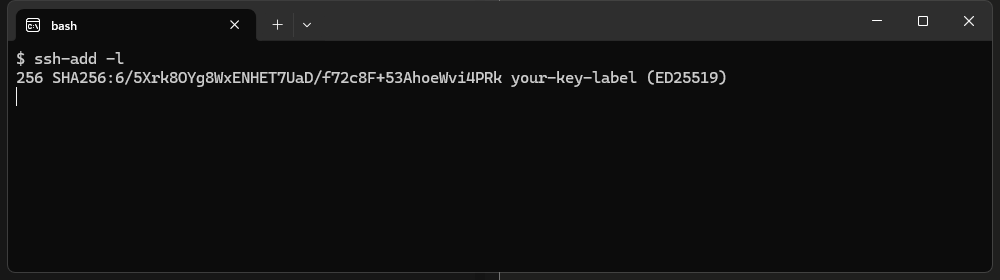
Add your public key to the remote host
The remote server or Git provider needs your public key before it can authenticate you. Print the public key so you can copy it:
cat ~/.ssh/id_ed25519.pub- For a remote Linux server.
Append the public key to~/.ssh/authorized_keyson the server. You can do this in one step withssh-copy-id: runssh-copy-id -i ~/.ssh/id_ed25519.pub user@your-server-ip, replacinguserandyour-server-ipwith your login details. - For a Git provider (GitHub, GitLab or similar).
Copy the full output of thecatcommand above. In your Git provider’s account settings, locate the SSH Keys section and paste the public key there.
Test the connection
With the agent running and your public key registered on the remote, test that authentication works without specifying a key file directly. For a remote server:
ssh user@your-server-ipIn Git, use the provider’s test command. This would appear in GitHub as:
ssh -T git@github.comA successful response confirms the agent is supplying your key automatically. You will not be prompted for a passphrase.
Troubleshooting
Permission denied (publickey)
This error means the remote host did not accept your key. The most common causes are a missing or incorrectly pasted public key on the remote, or the wrong user account being specified in the connection command.
- Run
ssh-add -lto confirm your key is loaded in the agent. - Check the public key on the remote matches the output of
cat ~/.ssh/id_ed25519.pubexactly, with no line breaks introduced during pasting. - On Linux servers, confirm
~/.ssh/authorized_keyshas permissions set to600and the~/.sshdirectory is set to700. - Add
-vto your SSH command for verbose output that shows which keys are being offered.
Could not open a connection to your authentication agent
This error means the agent is not running in your current shell session. On Linux and macOS, the agent process started with ssh-agent -s does not persist across new terminal windows unless you add the eval command to your shell profile.
- Run
eval "$(ssh-agent -s)"again in the current terminal, then re-add your key withssh-add. - To start the agent automatically on login, add the
eval "$(ssh-agent -s)"line to your~/.bashrcor~/.zshrcfile. See our guide on the .bash file for more on shell profile configuration. - On Windows, confirm the
ssh-agentservice is set to Automatic in the Services panel.
Agent has no identities
The agent is running but no keys have been loaded. This happens when the agent starts fresh, for example after a reboot, and ssh-add has not been run again.
- Run
ssh-add ~/.ssh/id_ed25519to reload your key. - On macOS, add
--apple-use-keychainto thessh-addcommand and setUseKeychain yesin~/.ssh/configto have macOS Keychain supply the passphrase automatically after each login.
Wrapping up
You have generated an SSH key pair, started SSH agent, loaded your private key and registered the public key on a remote host. Your connections now authenticate automatically without requiring a passphrase each time.
To go further, consider adding your SSH key to a remote Git repository for version-controlled deployments, or review how to add your SSH key to your VPS and how to add an SSH key to GitHub. If you manage a VPS, our guide on securing your VPS covers additional steps to protect your server.
If you are working with a VPS where SSH access is central to your workflow, take a look at our VPS hosting plans.
Plans and tools mentioned in this guide
Did this guide solve your problem?
Still stuck?
Our UK support team answers tickets and live chat every day. Send us the guide you were following and where it stopped working.
Keep learning
Find a guide
Related guides

Need more power?
Get scalable resources with our VPS hosting with root access and optional software.
Get VPS Hosting
Starting something new?
Perfect for websites and small businesses unlimited bandwidth with cPanel hosting.
Get cPanel Hosting