File ownership determines who can read, modify or execute files on your Linux system. When ownership is configured incorrectly, applications fail to access the files they need or unauthorised users gain access to sensitive data.
The chown command changes file and directory ownership on Linux systems. You will use it to assign files to specific users and groups, control application permissions and maintain security on your VPS. This guide covers the syntax, common use cases and recursive operations that apply ownership changes to entire directory structures.
Before you begin
- You need root or sudo access to change file ownership.
- We recommend checking current file ownership before making changes.
- Create backups before running recursive ownership changes on production systems.
- Incorrect ownership changes can prevent applications from functioning. Test changes on non-critical files first.
Understanding chown syntax
The chown command follows a consistent structure that specifies what to change and where to apply the change. Understanding this syntax prevents errors and helps you construct commands that target exactly the files you need to modify.
Basic syntax structure:
chown [OPTIONS] OWNER:GROUP TARGETOPTIONS: Flags that modify command behaviour, such as-Rfor recursive changes or-fto suppress error messages.OWNER: The username or numeric user ID that will own the file.:: Separator between owner and group. You can omit the group to change only the owner.GROUP: The group name or numeric group ID. Some control panels require specific groups likepsaclnfor Plesk.TARGET: The file, directory or path where you want to apply the ownership change.
Example command:
chown -f root:root /public_html/index.phpThis changes the owner and group of index.php to root whilst suppressing error messages with the -f flag. The file now belongs to the root user and root group.
Checking current file ownership
You should verify current ownership before making changes. This confirms which files need modification and helps you avoid changing ownership on files that are already configured correctly.
- Navigate to the target directory.
Usecdto move into the directory containing the files you want to check. For a cPanel user’s home directory, runcd /home/cpanelusernamereplacing cpanelusername with the actual username. - List files with ownership details.
Runls -lto display files with their ownership information. The third column shows the owner and the fourth column shows the group.
root@cloudserver:~# cd /home/cpanelusername/
root@cloudserver:/home/cpanelusername# ls -l
drwxr-xr-x 4 cpanelusername cpanelusername 4.0K Nov 26 12:58 cpanel3-skel
drwxr-x--- 4 cpanelusername mail 4.0K Feb 7 08:00 etc
drwx------ 3 cpanelusername cpanelusername 4.0K Feb 10 12:14 logs
drwxr-x--x 12 cpanelusername cpanelusername 4.0K Feb 7 10:27 mail
drwxr-xr-x 3 cpanelusername cpanelusername 4.0K May 21 2024 perl
lrwxrwxrwx 1 cpanelusername cpanelusername 8 May 21 2024 perl5 -> perl/usr
drwxr-x--- 3 cpanelusername cpanelusername 4.0K May 21 2024 public_ftp
drwxr-xr-x 3 cpanelusername cpanelusername 4.0K Nov 25 21:31 public_html
drwxr-xr-x 5 cpanelusername cpanelusername 4.0K Jan 20 15:14 ssl
drwxr-xr-x 7 cpanelusername cpanelusername 4.0K Dec 20 10:03 tmp
lrwxrwxrwx 1 cpanelusername cpanelusername 11 May 21 2024 www -> public_html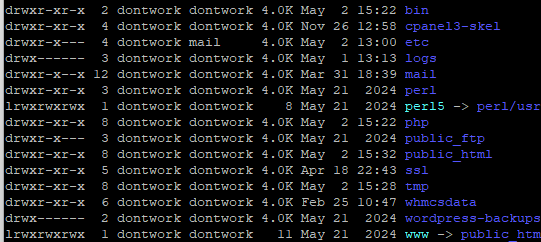
The output shows each file’s owner and group. In this example, most files belong to cpanelusername for both owner and group. The etc directory shows a different group (mail), which is typical for mail-related directories. You now know which files need ownership changes.
Changing file ownership
You can change ownership for individual files, multiple files at once or entire directories. Each approach uses the same basic syntax with variations in how you specify the target files.
Change owner of a single file
To change only the owner whilst leaving the group unchanged, specify the new owner followed by the filename:
chown username file.txtThe file file.txt now belongs to username. The group remains whatever it was before.
Change group ownership
To change only the group whilst leaving the owner unchanged, use a colon before the group name:
chown :username file.txtThe group for file.txt changes to username. The owner stays the same.
Change both owner and group
To change both owner and group in one command, separate them with a colon:
chown username:groupname file.txtThe file now belongs to username as owner and groupname as group.
Change multiple files at once
You can list multiple files in a single command by separating them with spaces:
chown username:username file.txt file2.txt /public_html/index.phpAll three files now have username as both owner and group. This saves time when you need to change ownership for several related files.
Changing directory ownership
Directory ownership works differently from file ownership because directories can contain other files and subdirectories. You need to decide whether to change only the directory itself or everything inside it as well.
Change directory only
To change ownership of a directory without affecting its contents, specify the directory path:
chown username:groupname /public_html/websiteThe website directory now belongs to username:groupname, but files and subdirectories inside it keep their original ownership.
Change files and directories together
You can mix files and directories in one command:
chown username:groupname file.txt /public_html/website /public_html/website/file3.txtThis changes ownership for file.txt, the website directory and file3.txt inside that directory. Each target changes independently.
Using recursive ownership changes
The recursive flag (-R) applies ownership changes to a directory and everything inside it, including all subdirectories and files. This is useful for fixing ownership across entire website directories or application folders, but requires caution because it affects every file in the target path.
To change ownership recursively:
chown -R username:username /home/public_html/Every file and directory inside /home/public_html/ now belongs to username for both owner and group. This includes all subdirectories, hidden files and nested content.
The recursive flag saves time when you need to fix ownership for an entire website after migration or when setting up a new application. However, incorrect recursive changes can break applications that expect specific ownership patterns. Always verify the target path before running recursive commands and test on a staging environment when possible.
Common use cases
Different scenarios require different ownership configurations. Understanding these common patterns helps you apply the right ownership settings for your specific needs.
Web server files
Web servers need to read website files to serve them to visitors. On cPanel systems, files typically belong to the cPanel username with the same group:
chown -R cpanelusername:cpanelusername /home/cpanelusername/public_html/This allows the web server to read files whilst preventing other users from accessing them.
Application uploads
Applications that accept file uploads need write access to specific directories. You might need to change ownership of upload directories to match the web server user:
chown -R www-data:www-data /var/www/html/uploads/This allows the web server to write uploaded files to the directory. The specific username varies by system (www-data on Ubuntu/Debian, apache on CentOS/RHEL, nobody on some cPanel systems).
Database files
Database systems require specific ownership to function securely. MySQL files typically belong to the mysql user:
chown -R mysql:mysql /var/lib/mysql/This prevents other users from accessing database files directly whilst allowing the MySQL service to read and write data.
Troubleshooting ownership issues
Ownership problems typically appear as permission denied errors or applications failing to read or write files. These issues often occur after file transfers, system migrations or manual file operations.
Permission denied errors
When applications cannot access files they need, you see “permission denied” errors in logs or on screen. This usually means the file owner does not match the user trying to access it.
- Check current ownership with
ls -l filenameto see who owns the file. - Identify which user needs access by checking application documentation or error logs.
- Change ownership to match the required user with
chown username:groupname filename.
Web server cannot read files
If your website displays errors about missing files or shows blank pages, the web server might not have permission to read your website files.
- Verify web server user by checking your hosting control panel or running
ps aux | grep httpdorps aux | grep apache. - Change ownership of web files to match the web server user.
- On cPanel systems, files should typically belong to the cPanel username, not the web server user directly.
Application cannot write files
Applications that need to create or modify files (such as WordPress uploading media or caching systems writing temporary files) fail when ownership prevents write access.
- Identify which directories need write access by checking application documentation.
- Change ownership of those specific directories to the web server user.
- Consider using group ownership instead of changing the owner, which maintains better security by limiting write access to specific directories.
Recursive changes broke the system
Running chown -R on system directories can prevent services from starting or cause widespread permission problems.
- Restore from backup if available. This is the fastest solution for critical systems.
- Check system logs in
/var/log/to identify which services are affected. - Research correct ownership for affected directories using your distribution’s documentation.
- Apply ownership changes to specific directories rather than entire system paths.
Further reading on Linux file permissions
File ownership works alongside file permissions to control access on Linux systems. Whilst chown determines who owns a file, permissions determine what actions the owner, group and others can perform. Understanding both concepts together gives you complete control over file security.
The chmod command changes file permissions independently of ownership. You might change ownership with chown and then adjust permissions with chmod to give the new owner appropriate access levels. Our guide on switching users in Linux explains how user context affects file access, which relates directly to how ownership and permissions work together.
Linux file permissions use a three-tier system: owner, group and others. Each tier can have read, write and execute permissions. When you change ownership, you are moving a file between these tiers, which is why understanding the permission structure matters. The Red Hat guide to Linux file permissions provides detailed coverage of how permissions interact with ownership.
Wrapping up
You now know how to use chown to control file and directory ownership on Linux systems. You can change owners and groups for individual files, apply changes to multiple targets at once and use recursive operations to modify entire directory structures. These skills help you maintain proper access control and fix permission problems on your VPS.
Check file ownership before making changes and test commands on non-critical files first. When working with web applications, verify which user needs access before changing ownership. Our VPS management guide covers additional system administration tasks that complement file ownership management.

Need more power?
Get scalable resources with our VPS hosting with root access and optional software.
Get VPS Hosting
Starting something new?
Perfect for websites and small businesses unlimited bandwidth with cPanel hosting.
Get cPanel Hosting