n8n is an open-source workflow automation platform you host yourself, giving you full control over your data and workflows without per-task pricing. Installing it on cPanel shared hosting is possible, but the environment has real constraints: CloudLinux process limits, no root access and no native process supervision. This guide covers what works, what doesn’t and how to get a functional installation running.
If you need n8n running reliably around the clock for webhook-driven workflows, a VPS is the more appropriate environment. The steps below produce a working installation, but shared hosting imposes limits that a VPS does not.
Before you begin
- You need SSH access enabled on your cPanel account. See our guide on connecting via SSH.
- Create a subdomain to serve the n8n interface, for example
n8n.yourdomain.com. - Node.js 20.x is required. You will install this via NVM in Step 1, not from the system installation.
- We recommend n8n v1.x for shared hosting. Version 2.x requires additional workarounds and disables the Code node.
Why you cannot use the system Node.js
When you SSH into a cPanel account, a system-wide Node.js installation is already present. You do not have write access to it, so running npm install -g against it fails with a permissions error. The solution is to install your own Node.js inside your home directory using NVM (Node Version Manager). NVM installs entirely into ~/.nvm and requires no root access.
On some servers, CageFS configuration can block PATH resolution after login. If node --version returns “command not found” after completing Step 1, your host’s CageFS setup is preventing NVM from working. At that point, a VPS is the practical path forward.
Step 1: Install NVM and Node.js 20
NVM lets you install and manage Node.js versions inside your home directory. Once installed, you will use it to install Node.js 20, which meets n8n’s requirement for a version between 20.19 and 24.x.
Run the NVM installer:
curl -o- https://raw.githubusercontent.com/nvm-sh/nvm/v0.39.7/install.sh | bashLoad NVM into your current session without opening a new terminal:
source ~/.bashrcInstall Node.js 20 and set it as the default:
nvm install 20
nvm use 20
nvm alias default 20
Confirm tools are available:
node --version
npm --version
You should see v20.x.x and a corresponding npm version. Node.js and npm are now ready for the n8n installation.
Step 2: Install n8n
The --foreground-scripts flag reduces subprocess spawning during native module compilation. Without it, the install process can hit CloudLinux’s process limits and be terminated partway through.
Install n8n v1.x, which is the recommended version for shared hosting:
npm install -g n8n@1 --foreground-scripts --no-fund --no-auditYou may see build errors for optional native modules such as @sentry/profiling-node and cpu-features. These are non-fatal. n8n will install and run without them.
If you need n8n v2.x instead, replace n8n@1 with n8n in the command above. You will also need to add N8N_RUNNERS_ENABLED=false to your environment file in the next step, as the v2.x task runner is killed by CloudLinux process limits. This disables the Code node.
Step 3: Configure the n8n environment
n8n reads configuration from a .env file in its data directory. These variables tell n8n which port to listen on, which hostname to use for generated URLs and where webhooks should point.
Create the directory and write the environment file:
mkdir -p ~/.n8n
cat > ~/.n8n/.env << 'EOF'
N8N_PORT=5678
N8N_LISTEN_ADDRESS=127.0.0.1
N8N_PROTOCOL=https
N8N_HOST=n8n.yourdomain.com
N8N_EDITOR_BASE_URL=https://n8n.yourdomain.com
WEBHOOK_URL=https://n8n.yourdomain.com/
EOF
Replace n8n.yourdomain.com throughout with your actual subdomain.
Step 4: Install PM2 and start n8n
PM2 is a process manager that keeps n8n running and restarts it automatically if it crashes. Install it using the same NVM-managed npm:
npm install -g pm2 --foreground-scripts --no-fund --no-auditStart n8n under PM2 and save the process list:
pm2 start $(which n8n) --name n8n -- start
pm2 save
The pm2 startup command, which normally configures PM2 to survive server reboots, requires root access and will not work on shared hosting. Step 6 covers a cron-based workaround for this.
Step 5: Create the Passenger proxy app
cPanel’s Node.js app feature uses Phusion Passenger to manage processes. n8n is not directly Passenger-compatible, so you need a lightweight proxy wrapper that Passenger can manage. The proxy forwards requests from Passenger to n8n’s port.
Create the app directory and proxy file:
mkdir ~/n8n-app
cat > ~/n8n-app/app.js << 'EOF'
const http = require('http');
const httpProxy = require('http-proxy');
const fs = require('fs');

const PASSENGER_BIND = process.env.PORT || 3000;
const N8N_PORT = 5678;

const proxy = httpProxy.createProxyServer({
  target: `http://127.0.0.1:${N8N_PORT}`,
  ws: true,
  changeOrigin: true,
  proxyTimeout: 120000,
  timeout: 120000,
});

proxy.on('error', (err, req, res) => {
  if (res && res.writeHead) {
    res.writeHead(502);
    res.end('n8n is unavailable. It may be starting up - try again in a moment.');
  }
});

const server = http.createServer((req, res) => proxy.web(req, res));
server.on('upgrade', (req, socket, head) => proxy.ws(req, socket, head));

const isSocket = isNaN(PASSENGER_BIND);
if (isSocket) {
  if (fs.existsSync(PASSENGER_BIND)) fs.unlinkSync(PASSENGER_BIND);
  server.listen(PASSENGER_BIND, () => {
    fs.chmodSync(PASSENGER_BIND, '777');
    console.log('[proxy] Listening on socket:', PASSENGER_BIND);
  });
} else {
  server.listen(parseInt(PASSENGER_BIND), () => {
    console.log('[proxy] Listening on port:', PASSENGER_BIND);
  });
}
EOF
Install the proxy dependency:
cd ~/n8n-app && npm install http-proxy --no-fund --no-auditThe proxy app is now ready to register in cPanel.
Step 6: Register the app in cPanel and configure .htaccess
Registering the app tells Passenger where to find the proxy and which subdomain to serve it from. You then configure .htaccess to pass the correct headers through to n8n.
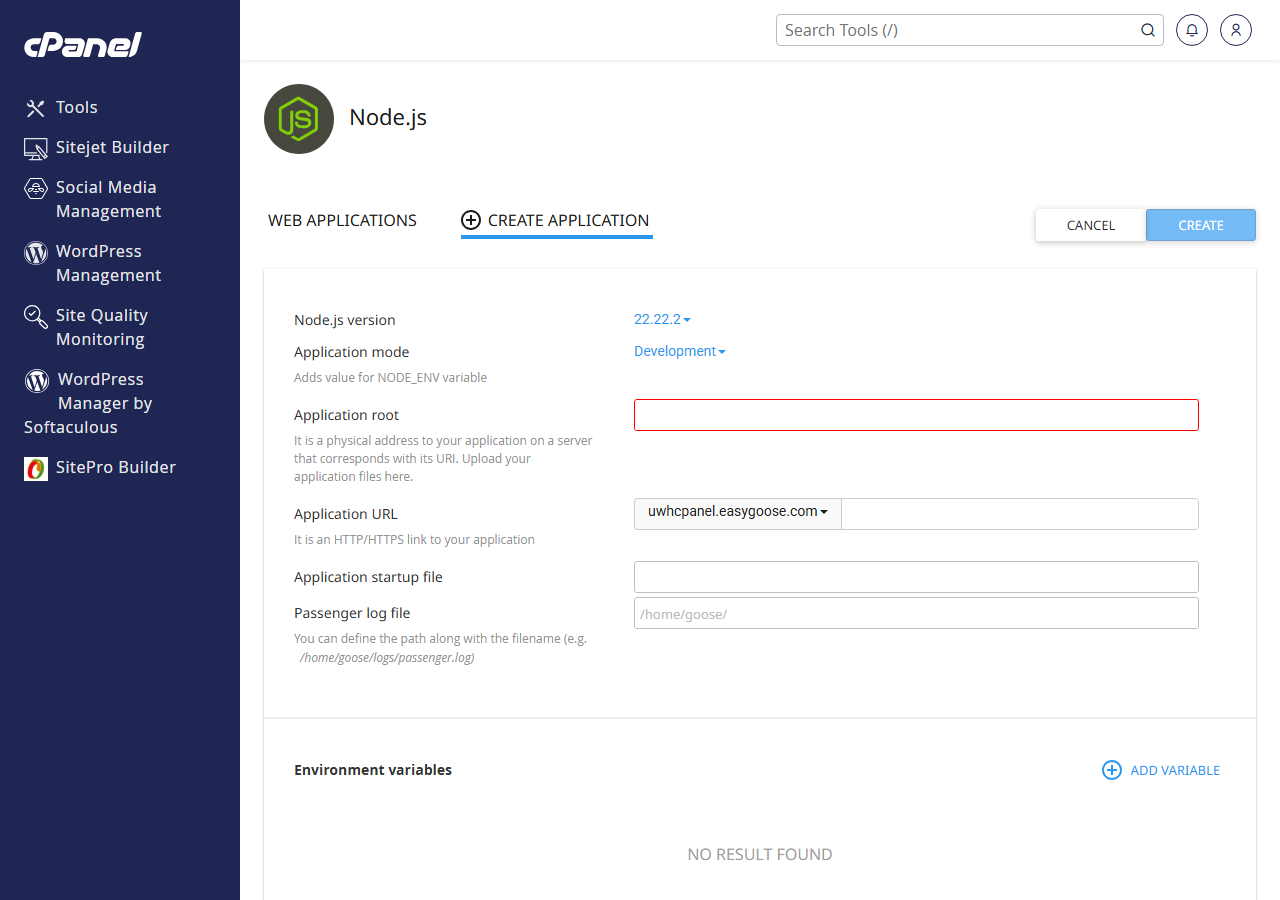
- Open the Node.js app manager.
In cPanel, go to Software and click Setup Node.js App. - Create a new application.
Click Create Application and fill in the fields as follows: Node.js version20.x, Application modeProduction, Application rootn8n-app, Application URLn8n.yourdomain.com, Application startup fileapp.js. - Save and start the app.
Click Create. Passenger will start the proxy process. - Edit the .htaccess file.
Open the.htaccessfile in your subdomain’s document root and add the following directives. These disable response buffering and pass the correct protocol headers to n8n:
PassengerResponseBuffering off
PassengerProxyBuffering off
RequestHeader set X-Forwarded-Proto "https"
RequestHeader set X-Forwarded-Port "443"
Header set X-Accel-Buffering "no"
If your server runs LiteSpeed rather than Apache, the PassengerResponseBuffering directive has no effect. LiteSpeed handles buffering at the server level, and the n8n v2.x “starting up” screen may appear intermittently as a result.
Step 7: Add cron jobs for resilience
Because pm2 startup is unavailable on shared hosting, you need two cron jobs to keep n8n running after crashes or server reboots. Add these in cPanel under Advanced > Cron Jobs.
First, find the exact path to your PM2 binary while NVM is active:
which pm2Use that path in cron entries below, replacing /home/yourusername/.nvm/versions/node/v20.x.x/bin/pm2 with the output of which pm2 and yourusername with your actual cPanel username.
Nightly resurrect, which restores the saved PM2 process list after a server restart:
0 0 * * * /home/yourusername/.nvm/versions/node/v20.x.x/bin/pm2 resurrectFive-minute watchdog, which restarts n8n if PM2 reports it as stopped:
*/5 * * * * /home/yourusername/.nvm/versions/node/v20.x.x/bin/pm2 describe n8n > /dev/null 2>&1 || /home/yourusername/.nvm/versions/node/v20.x.x/bin/pm2 start $(which n8n) --name n8n -- startWith cron jobs in place, n8n will recover from crashes within five minutes and restore after server reboots overnight.
Troubleshooting
node –version returns “command not found” after NVM install
NVM completed successfully but the node command is not found in your PATH. This is most commonly caused by CageFS configuration on the server restricting PATH resolution after login.
- Run
source ~/.bashrcand try again in the same session. - Open a new SSH session and test again before assuming CageFS is the cause.
- If the problem persists across new sessions, your host’s CageFS setup is blocking NVM. A VPS removes this restriction entirely.
npm install is killed partway through
CloudLinux’s LVE (Lightweight Virtual Environment) limits the number of processes a shared hosting account can spawn. A standard npm install -g n8n without flags can exceed this limit during native module compilation.
- Confirm you are using the
--foreground-scripts --no-fund --no-auditflags as shown in Step 2. - If the install is still killed, wait a few minutes and retry. LVE limits reset between attempts.
- Persistent failures indicate the account’s process limit is too low for n8n’s build requirements. See our guide on how LVE works for more context.
n8n interface shows “n8n is starting up…” indefinitely
On n8n v2.x, the frontend uses Server-Sent Events to confirm the application is ready. Response buffering at the server level prevents this signal from reaching the browser.
- Confirm the
PassengerResponseBuffering offdirective is present in your.htaccessfile. - If your server runs LiteSpeed, this directive has no effect. The issue may occur intermittently and cannot be resolved at the
.htaccesslevel. - Switching to n8n v1.x avoids this issue entirely.
Wrapping up
You have installed n8n on cPanel shared hosting using NVM-managed Node.js, PM2 for process management and a Passenger proxy wrapper. Basic HTTP and webhook workflows will run, and the cron jobs provide a recovery mechanism for crashes and reboots.
Test your installation by visiting https://n8n.yourdomain.com and completing the initial setup. For related reading, see our guides on connecting to your account via SSH, managing Node.js versions with NVM and understanding LVE resource limits. If you need the Code node, persistent uptime or heavier workflow execution, the constraints on shared hosting will affect you.
Plans and tools mentioned in this guide
Did this guide solve your problem?
Still stuck?
Our UK support team answers tickets and live chat every day. Send us the guide you were following and where it stopped working.
Keep learning
Find a guide
Related guides

Hosting that keeps up
cPanel hosting with the tools these guides use, backed by UK support.
Get cPanel Hosting
Keep your site secure
Protect your visitors with SSL certificates – from budget DV to premium EV certificates.
Get SSL Certificate