WordPress powers over 40% of websites worldwide because it combines powerful features with manageable content management. Installing WordPress on cPanel hosting gives you access to two installation methods: WordPress Toolkit for managing multiple sites and Softaculous for quick single-site deployments.
You will install WordPress through either WordPress Toolkit or Softaculous, configure database connections and set up your admin credentials. Both methods create a fully functional WordPress site ready for content and customisation.
Before you begin
- You need access to your cPanel account.
- Your domain must be pointed to your hosting account.
- We recommend having an SSL certificate installed before installation.
Choose your installation method
cPanel provides two tools for installing WordPress. WordPress Toolkit offers advanced management features for multiple sites, making it ideal for developers and resellers. Softaculous provides a streamlined installation process suited to single-site deployments.
WordPress Toolkit automatically fills blank configuration fields with secure random values, preventing installation errors. Softaculous guides you through each setting with clear prompts. Both methods create the same WordPress installation, differing only in their management interfaces.
Install WordPress with WordPress Toolkit
WordPress Toolkit creates and manages WordPress installations without requiring separate admin logins for each site. This centralised approach saves time when maintaining multiple WordPress sites from a single cPanel account.
- Access WordPress Toolkit.
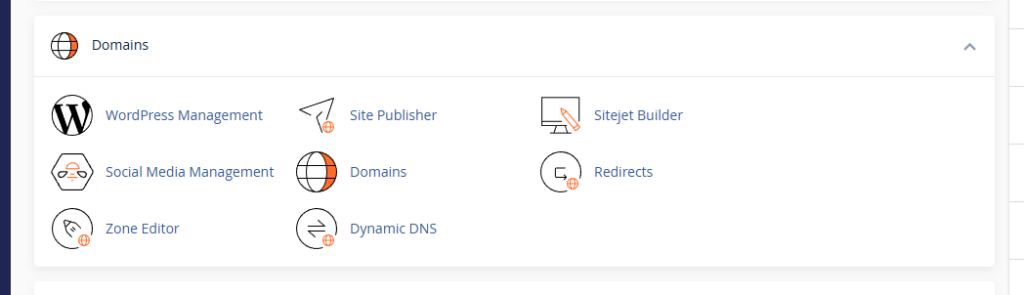
Log in to cPanel and locate the Domains section. Click WordPress Management to open WordPress Toolkit. - Scan for existing installations.
Click the Scan button to check for any WordPress installations already present on your account. This prevents duplicate installations in the same location. - Start the installation wizard.
Click Install to open the installation wizard. The wizard slides out from the left side of your browser and displays configuration options in sections.
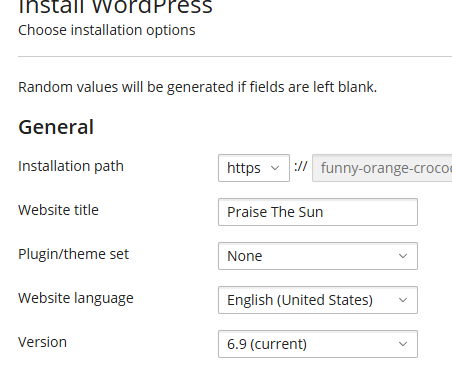
The installation wizard organises settings into four sections: general options, administrator credentials, database configuration and automatic updates. Complete each section to build your WordPress installation.
Configure general installation options
General options determine where WordPress installs and which language and version it uses. These settings establish the foundation for your site’s structure and accessibility.
- Set the installation path.
Leave the Installation Path field blank to install WordPress in your domain’s root directory atpublic_html. Enter a subdirectory name likeblogto install WordPress atyourdomain.co.uk/bloginstead. - Enter your site title.
Type your website name in the Website Title field. This appears in browser tabs, search results and your site header. You can change this later in WordPress settings. - Select a plugin or theme set.
Choose a pre-configured set of plugins and themes from the dropdown menu if you want to start with specific functionality. Leave this set to None for a clean WordPress installation. - Choose your site language.
Select your content language from the Language dropdown. This sets the WordPress admin interface language and helps search engines understand your content’s target audience. - Select the WordPress version.
Use the Version dropdown to choose which WordPress release to install. We recommend selecting the latest version to ensure you have current security patches and features.
Set administrator credentials
Administrator credentials control access to your WordPress dashboard. Strong credentials protect your site from unauthorised access and brute force attacks.
- Create an admin username.
Enter a unique username in the Username field. Avoid common usernames likeadminoradministratoras these are frequently targeted in attacks. - Generate a strong password.
Click the Generate button to create a secure random password, or enter your own password in the Password field. Strong passwords combine uppercase letters, lowercase letters, numbers and symbols. - Add your email address.
Enter your email address in the Email field. WordPress sends password reset links, update notifications and security alerts to this address.
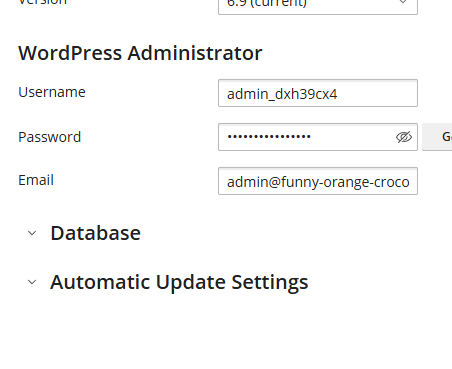
Store these credentials securely. You need them to access your WordPress admin area at yourdomain.co.uk/wp-admin. If you forget your password later, you can reset your WordPress admin password.
Review database configuration
WordPress stores all content, settings and user data in a MySQL database. WordPress Toolkit creates this database automatically with secure random credentials, eliminating manual database setup.
The automatic database configuration includes a unique database name, username and password. These credentials are stored in your wp-config.php file, which WordPress uses to connect to the database. We recommend leaving these settings at their automatic values unless you have specific requirements for database naming or user permissions.
Configure automatic updates
Automatic updates keep WordPress core, plugins and themes current with security patches and bug fixes. WordPress Toolkit applies these updates without manual intervention, reducing your site’s exposure to known vulnerabilities.
We recommend keeping all automatic update options enabled. WordPress releases security updates regularly, and outdated software is the primary cause of WordPress site compromises. The default settings update WordPress core, plugins and themes as new versions become available.
Complete the installation
Review all configuration sections to confirm your settings are correct. Click Install at the bottom of the wizard to begin the installation process.
WordPress Toolkit creates the database, copies WordPress files to your chosen directory and configures your installation. This process takes 30 to 60 seconds. Once complete, you can access your WordPress admin area and begin building your site.
Install WordPress with Softaculous
Softaculous provides a step-by-step installation wizard that guides you through each configuration option. This method suits users who prefer a linear installation process with clear prompts at each stage.
- Open Softaculous Apps Installer.
Log in to cPanel and locate the Software section. Click Softaculous Apps Installer to open the application library. - Find WordPress.
WordPress appears in the featured applications section on the main page. If you cannot see it, use the search box to find WordPress, then click the WordPress icon. - Start the installation.
Click Install Now to open the Softaculous installation wizard. The wizard displays all configuration options on a single page. - Select your protocol and domain.
Choosehttps://from the Choose Protocol dropdown if you have an SSL certificate installed. Select your domain from the Choose Domain dropdown. - Set the installation directory.
Leave the In Directory field blank to install WordPress in your domain’s root directory. Enter a subdirectory name to install WordPress in a subfolder instead. - Configure site details.
Enter your site name in the Site Name field and a brief description in the Site Description field. Ensure the Enable Multisite option remains disabled unless you specifically need a WordPress network. - Create admin credentials.
Enter a unique username in the Admin Username field, create a strong password in the Admin Password field and add your email address in the Admin Email field. - Enable automatic updates.
Scroll to the Advanced Options section and ensure all automatic upgrade options are enabled. This keeps your WordPress installation secure with minimal maintenance. - Complete the installation.
Scroll to the bottom of the page and click Install. Softaculous displays a progress bar and confirms when installation completes.
Softaculous provides your WordPress admin URL and credentials on the completion page. Save these details before closing the page. You can now log in to your WordPress dashboard and begin customising your site.
Troubleshooting common installation issues
Most WordPress installations complete without errors. If you encounter problems, these solutions address the most common installation issues.
Installation fails with database connection error
Database connection errors occur when WordPress cannot communicate with the MySQL database. This typically happens when database credentials are incorrect or the database server is temporarily unavailable.
- Verify your hosting account has available database quota in cPanel under Databases > MySQL Databases.
- Wait five minutes and retry the installation, as temporary server issues can cause connection failures.
- Contact support if the error persists, as this may indicate a server configuration issue.
Installation completes but site shows blank page
A blank white page after installation usually indicates a PHP error or file permission problem. WordPress cannot display error messages when PHP error reporting is disabled.
- Check your error logs in cPanel under Metrics > Errors to identify the specific error.
- Verify file permissions are set correctly: directories should be 755 and files should be 644.
- Increase PHP memory limit to 256MB if error logs show memory exhaustion errors.
Cannot access WordPress admin area after installation
Admin access problems typically result from incorrect URLs, cached redirects or .htaccess configuration issues. WordPress requires specific URL structures to route admin requests correctly.
- Clear your browser cache and cookies, then try accessing the admin area again.
- Verify you are using the correct admin URL:
yourdomain.co.uk/wp-adminfor root installations oryourdomain.co.uk/subdirectory/wp-adminfor subdirectory installations. - Check that your .htaccess file exists in the WordPress installation directory and contains the default WordPress rewrite rules.
Further reading on WordPress security
A fresh WordPress installation provides basic security, but additional configuration strengthens protection against common attacks. Implementing these security measures immediately after installation reduces your site’s vulnerability to automated threats.
Start by forcing HTTPS on your WordPress site to encrypt all traffic between visitors and your server. This prevents credential theft and protects sensitive data. Next, add reCAPTCHA to your login page to block automated brute force attacks that attempt to guess admin passwords.
Regular backups protect against data loss from security incidents, plugin conflicts or accidental deletions. Learn how to create WordPress backups and establish a backup schedule that matches your content update frequency. The WordPress Codex hardening guide provides complete security recommendations including file permission settings, database security and two-factor authentication.
Security plugins like Wordfence and Sucuri add real-time threat detection, firewall protection and malware scanning. These tools monitor your site continuously and alert you to suspicious activity. The OWASP Top Ten explains the most critical web application security risks and how they apply to WordPress installations.
Wrapping up
Your WordPress site is now installed and ready for content. You configured database connections, set administrator credentials and enabled automatic updates through either WordPress Toolkit or Softaculous. Both installation methods created a fully functional WordPress installation with secure default settings.
Log in to your WordPress admin area and explore the dashboard. Install a theme that matches your site’s purpose, add important plugins for functionality and create your first pages. Our WordPress frequently asked questions guide answers common questions about managing your new site.
Our managed WordPress hosting includes automatic updates, daily backups and performance optimisation to keep your site running smoothly.
If you run into any trouble, get in touch and our team will be happy to help.

Running a WordPress site?
Get fast, secure and reliable WordPress Hosting with optimised for performance with AccelerateWP.
Get WordPress Hosting
Need multiple accounts?
Create fully isolated individual accounts for your clients and manage them all from one dashboard.
Get Reseller Hosting