MX (Mail Exchange) records tell the internet which mail servers handle email for your domain. If you are switching to a third-party email provider or setting up custom mail routing, you will need to update these records in cPanel’s Zone Editor.
This article covers how to change MX records in cPanel using the Zone Editor, including setting the correct priority value so mail is delivered to the right server.
Before you begin
- You need access to your cPanel account. See our guide on accessing your control panel if you are unsure how to log in.
- You will need the mail server address (as a fully-qualified domain name) and priority value from your email provider before making changes.
- DNS changes can take up to 24-48 hours to propagate. See our guide on checking DNS propagation to monitor the update.
Change MX records in cPanel
The Zone Editor in cPanel lets you add, edit and delete DNS records for your domain, including MX records. You will set a destination (the mail server address) and a priority value, which controls the order in which mail servers are tried. Lower numbers indicate higher priority, with 0 being the highest.
- Log in to cPanel.
Access your account through the cPanel login page. - Open the Zone Editor.
In the Domains section, click Zone Editor. - Locate your domain.
Find the domain you want to update in the list and click Manage next to it.
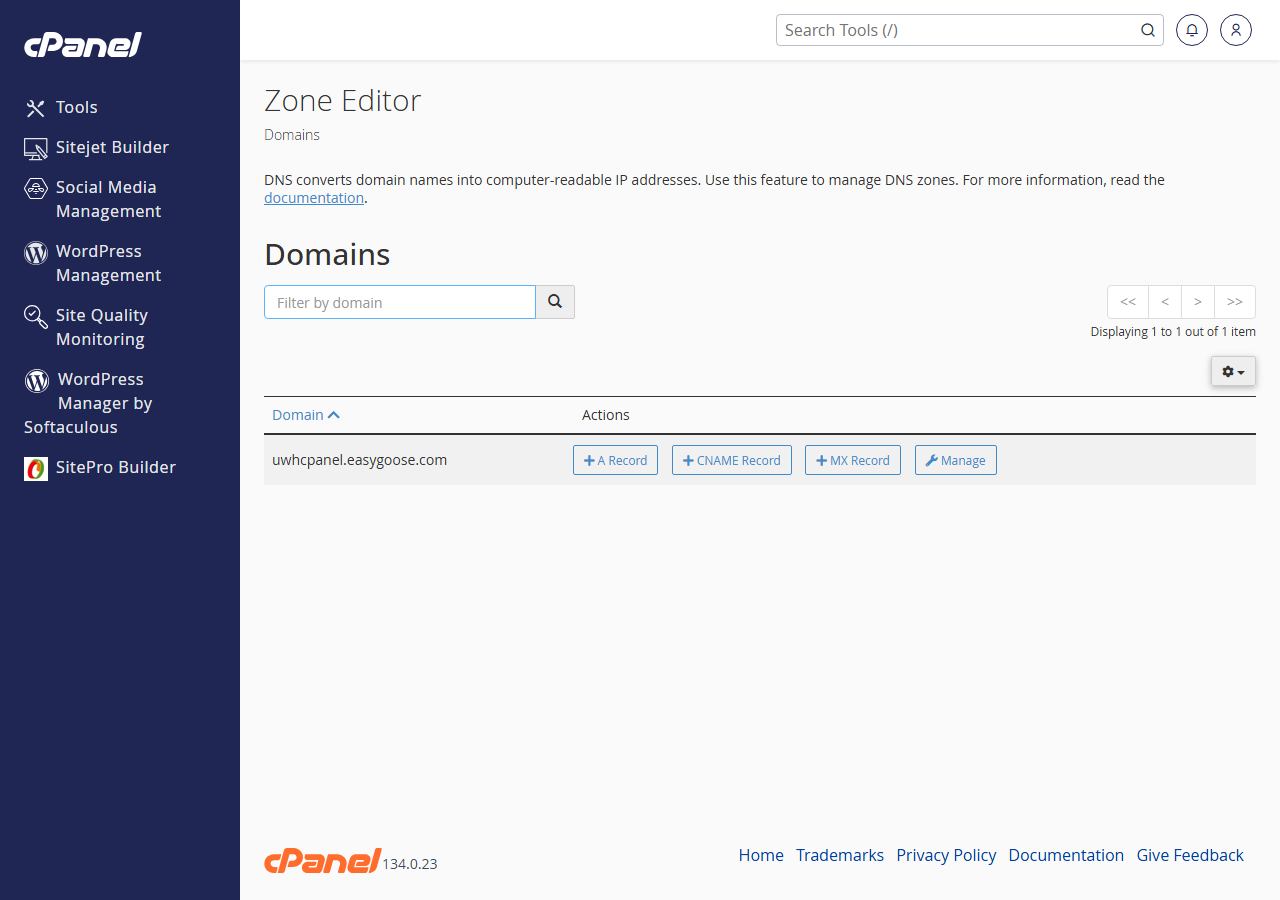
- Filter by MX record type.
Use the Type filter dropdown and select MX to display only your existing MX records. - Edit or add an MX record.
To update an existing record, click Edit next to it. To add a new one, click Add Record and select MX from the record type dropdown. - Enter the priority and destination.
In the Priority field, enter the value supplied by your email provider. In the Destination field, enter the mail server address as a fully-qualified domain name (FQDN), for examplemail.example.com. Do not enter an IP address here.
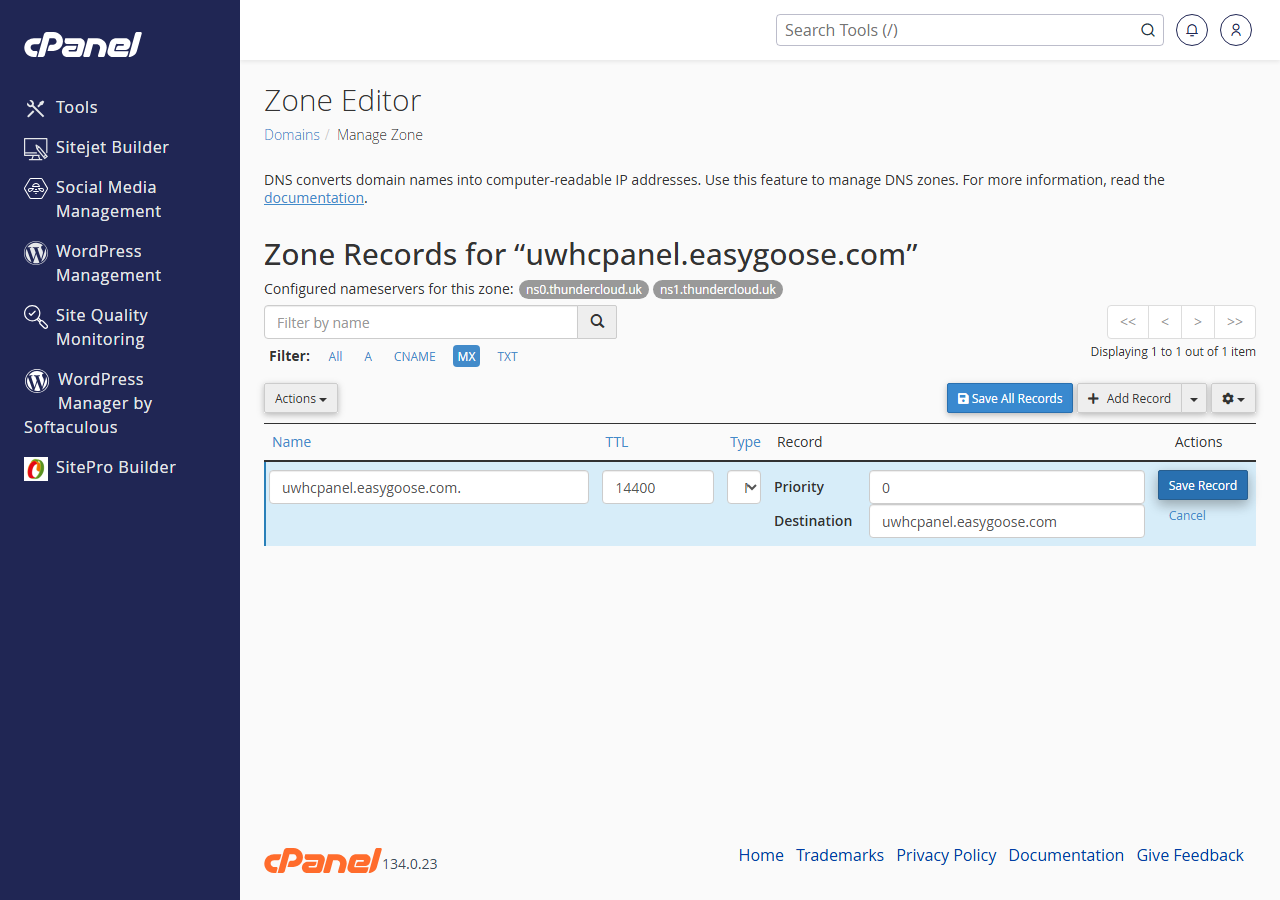
- Save the record.
Click Save Record (or Add Record if creating a new entry). The zone file updates immediately. - Remove outdated MX records.
If you are replacing an existing mail provider, delete any old MX records that still point to the previous mail server. Click Delete next to each one and confirm the removal. Leaving conflicting records in place can cause mail delivery failures. - Verify the changes.
Use a DNS lookup tool to confirm your new MX records are returning the correct values. See our guide on checking DNS propagation for instructions.
Your MX records are now updated. Mail sent to your domain will be routed to the new mail server once the DNS change has propagated.
Troubleshooting
Email is not arriving after the change
DNS changes do not take effect instantly. After saving your MX records, allow up to 48 hours for propagation to complete across all DNS resolvers worldwide.
- Check the current MX records using a DNS lookup tool to confirm the new values are visible.
- Confirm the destination value is a valid FQDN and not an IP address.
- Check that old MX records pointing to a previous mail server have been removed.
The Zone Editor does not show MX records
If no MX records appear in the Zone Editor, your domain may be using external nameservers. In that case, the DNS zone is managed outside cPanel and you will need to update the records with your DNS provider directly.
- Check which nameservers your domain is using. See our guide on managing nameservers for instructions.
- If your domain uses Cloudflare, update MX records from the Cloudflare dashboard. See our guide on migrating your DNS zone to Cloudflare for context.
Mail is being delivered to the wrong server
If you have multiple MX records and mail is routing incorrectly, the priority values may be misconfigured. Lower numbers take precedence, so a record with priority 0 is tried before one with priority 10.
- Review all MX records in the Zone Editor and confirm the priority values match your email provider’s instructions.
- Remove any duplicate or conflicting records from previous configurations.
Wrapping up
You have updated the MX records for your domain using cPanel’s Zone Editor. Your domain’s email will now route to the mail server you specified once the DNS change has propagated.
To keep your email configuration complete, consider setting up SPF and DMARC records to help prevent spoofing. See our guides on adding or editing SPF records and setting up a DMARC record in cPanel for next steps.
Did this guide solve your problem?
Still stuck?
Our UK support team answers tickets and live chat every day. Send us the guide you were following and where it stopped working.
Keep learning
Find a guide
Related guides

Email on your own domain
Every cPanel hosting plan includes mailboxes you manage yourself.
Get cPanel Hosting
Need the domain first?
Register the domain your mailboxes will sit on, with hundreds of extensions available.
Search Domains