npm (Node Package Manager) is the default package manager for Node.js, giving you access to hundreds of thousands of open-source libraries and tools. Whether you are running a bare Linux VPS or a cPanel-managed server, you need Node.js and npm installed before you can add packages to your project.
This article covers installing Node.js and npm on a standard Linux VPS, then walks through the same process on a VPS running cPanel. By the end, you will be able to install packages locally for a specific project or globally across your server.
Before you begin
- You need SSH access to your VPS. See our guide on connecting to your server via SSH.
- Your user account needs
sudoprivileges, or you must be logged in as root. - For cPanel installs, you need WHM root access or a terminal session via SSH.
- We recommend running a system update before installing new software.
Install npm on a Linux VPS
The most reliable way to install Node.js and npm on a Linux VPS is via nvm (Node Version Manager). This lets you install specific Node.js versions and switch between them without affecting system packages. The steps below work on Debian, Ubuntu, AlmaLinux and most other common distributions.
- Connect to your VPS via SSH.
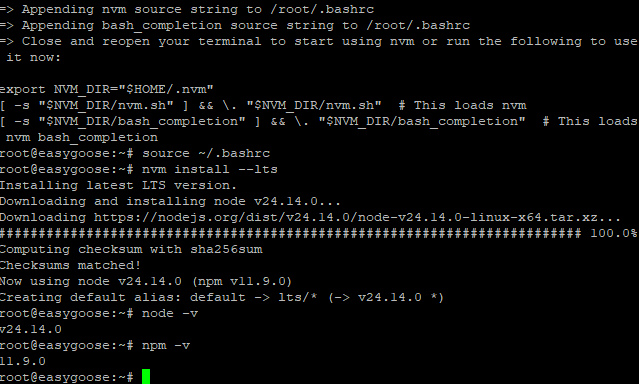
Open a terminal and log in to your server. See our guide on connecting via SSH if you need help with this step. - Install nvm.
Run the following command to download and run the nvm install script. This installs nvm into your home directory under~/.nvm.
curl -o- curl -o- https://raw.githubusercontent.com/nvm-sh/nvm/v0.40.4/install.sh | bash- Reload your shell.
The installer adds nvm to your shell profile automatically. Reload it so thenvmcommand becomes available in your current session.
source ~/.bashrc- Install Node.js.
Use nvm to install the current LTS release of Node.js. npm is bundled with Node.js and installs automatically alongside it.
nvm install --lts- Confirm the installation.
Check that Node.js and npm are available by printing their version numbers.
node -v
npm -v
Both commands should return a version number. Node.js and npm are now ready to use on your VPS.
Install an npm package
With npm available, you can install packages either locally (scoped to a single project) or globally (available system-wide). Local installs are the default and are recommended for project dependencies. Global installs are suited to CLI tools you want to run from anywhere on the server.
To install a package locally, navigate to your project directory first, then run:
npm install <package-name>Replace <package-name> with the name of the package you want to install, for example express or lodash. npm downloads the package into a node_modules folder inside your project and records it as a dependency in package.json.
To install a package globally so it is accessible from any directory on the server, add the -g flag:
npm install -g <package-name>To install all dependencies listed in an existing package.json file, run the following from the project root:
npm installnpm reads the package.json file and downloads every listed dependency into node_modules. This is the standard way to set up a project you have cloned from a repository.
Installing npm packages on a VPS with cPanel
cPanel servers run a managed environment where system-level package changes go through WHM. The recommended approach is to install Node.js via cPanel’s built-in Node.js Selector, which isolates Node.js versions per application without touching system packages. You can then use npm normally within that application environment.
- Log in to cPanel.
Access your cPanel account. See our guide on accessing your control panel if you need help. - Open Node.js Selector.
In the Software section, click Node.js Selector. This tool lets you create isolated Node.js application environments. - Create a new application.
Click Create Application. Set the Node.js version, the Application root (the directory containing your project files) and the Application URL. Click Create to save. - Open a terminal session for the application.
Once the application is created, click the terminal icon next to it. This opens a shell session with the correct Node.js version and npm already active for that environment. - Install your packages.
From within the application terminal, run your npm install commands as normal. To install all dependencies from an existingpackage.json, run:
npm install- Confirm the install.
Check that the packages are present by listing the contents of yournode_modulesdirectory, or runnpm listto see installed packages and their versions.
npm list
Your packages are now installed within the cPanel application environment and are ready to use.
Wrapping up
You have installed Node.js and npm on your VPS and used npm to install packages locally and globally. On a cPanel server, the Node.js Selector provides an isolated environment that keeps your application dependencies separate from system packages.
From here, you may want to add an SSH key to your server for more secure access, or explore setting up a full application stack. See our guides on adding your SSH key to your VPS, installing the MERN stack on AlmaLinux and securing your VPS for related tasks.
Our Node.js hosting plans are configured for Node.js applications from the start.

Need more power?
Get scalable resources with our VPS hosting with root access and optional software.
Get VPS Hosting
Starting something new?
Perfect for websites and small businesses unlimited bandwidth with cPanel hosting.
Get cPanel Hosting