Password-based SSH logins are vulnerable to brute-force attacks. Key pair authentication replaces your password with two cryptographic files: a private key that stays on your Mac and a public key that you upload to your cPanel account. Only someone holding the matching private key can connect, even if your hosting credentials are exposed elsewhere.
You will generate a key pair using macOS Terminal, upload the public key to cPanel’s SSH Access manager and then connect to your server without entering your hosting password.
Before you begin
- You need access to your cPanel account. See our guide on accessing your control panel if you are unsure how to log in.
- You need to know your cPanel username, your server hostname and the SSH port number. These are available in your hosting welcome email or client area.
- SSH access must be enabled on your account. Contact support if you are unsure whether it is active.
- We recommend setting a strong login password on your Mac. Once you are logged in, your Mac’s Keychain can expose your private key passphrase to anyone with local access.
Generate an SSH key pair on macOS
macOS includes OpenSSH in Terminal, so no additional software is needed. You will create a key pair directly in your ~/.ssh directory, which is where SSH looks for keys by default. Ed25519 is the recommended key type: it produces shorter keys than RSA while offering stronger security.
- Open Terminal.
Go to Applications > Utilities > Terminal, or press Command + Space and search for Terminal. - Navigate to your SSH directory.
Run the following command to move into the hidden.sshfolder in your home directory. If the directory does not exist yet, SSH will create it automatically during key generation.
cd ~/.ssh- Generate the key pair.
Run the command below, replacingyour@email.comwith your own email address. The-Cflag adds a comment to help you identify the key later.
ssh-keygen -t ed25519 -C "your@email.com"- Accept the default file location.
When prompted for a file path, press Enter to accept the default (~/.ssh/id_ed25519). If you manage multiple keys for different servers, specify a custom filename instead, for example~/.ssh/id_ed25519_cpanel. - Set a passphrase.
Enter a strong passphrase when prompted. This passphrase encrypts your private key file. If your private key is ever copied from your machine, the passphrase is the only thing preventing unauthorised use. Use a mix of uppercase and lowercase letters, numbers and symbols, and store it in a password manager.
Two files are created: id_ed25519 (your private key, never share this) and id_ed25519.pub (your public key, safe to share). Print your public key to the terminal so you can copy it in the next step.
cat ~/.ssh/id_ed25519.pubSelect the entire output line starting with ssh-ed25519 and copy it to your clipboard.
Add your public key to cPanel
cPanel stores authorised public keys in your account’s SSH Access manager. Uploading your public key here tells the server to accept connections from the matching private key on your Mac.
- Log in to cPanel.
Access your account through your hosting control panel login page. - Open SSH Access.
In the Security section, click SSH Access. - Open the key manager.
Click Manage SSH Keys.
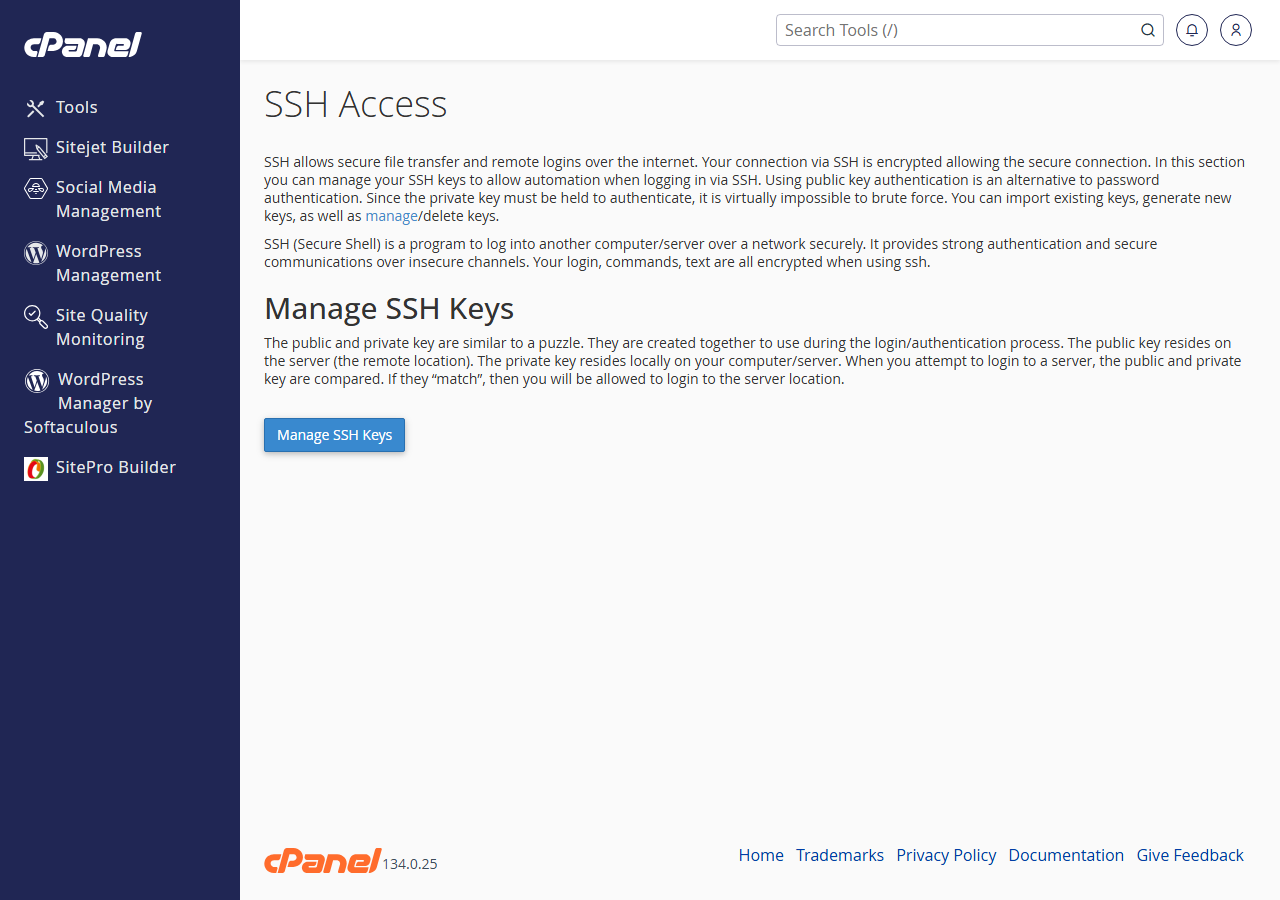
- Import your public key.
Click Import Key. Paste the public key you copied from Terminal into the Public Key field. Give the key a recognisable name, for examplemacbook-ed25519. Click Import to save it.
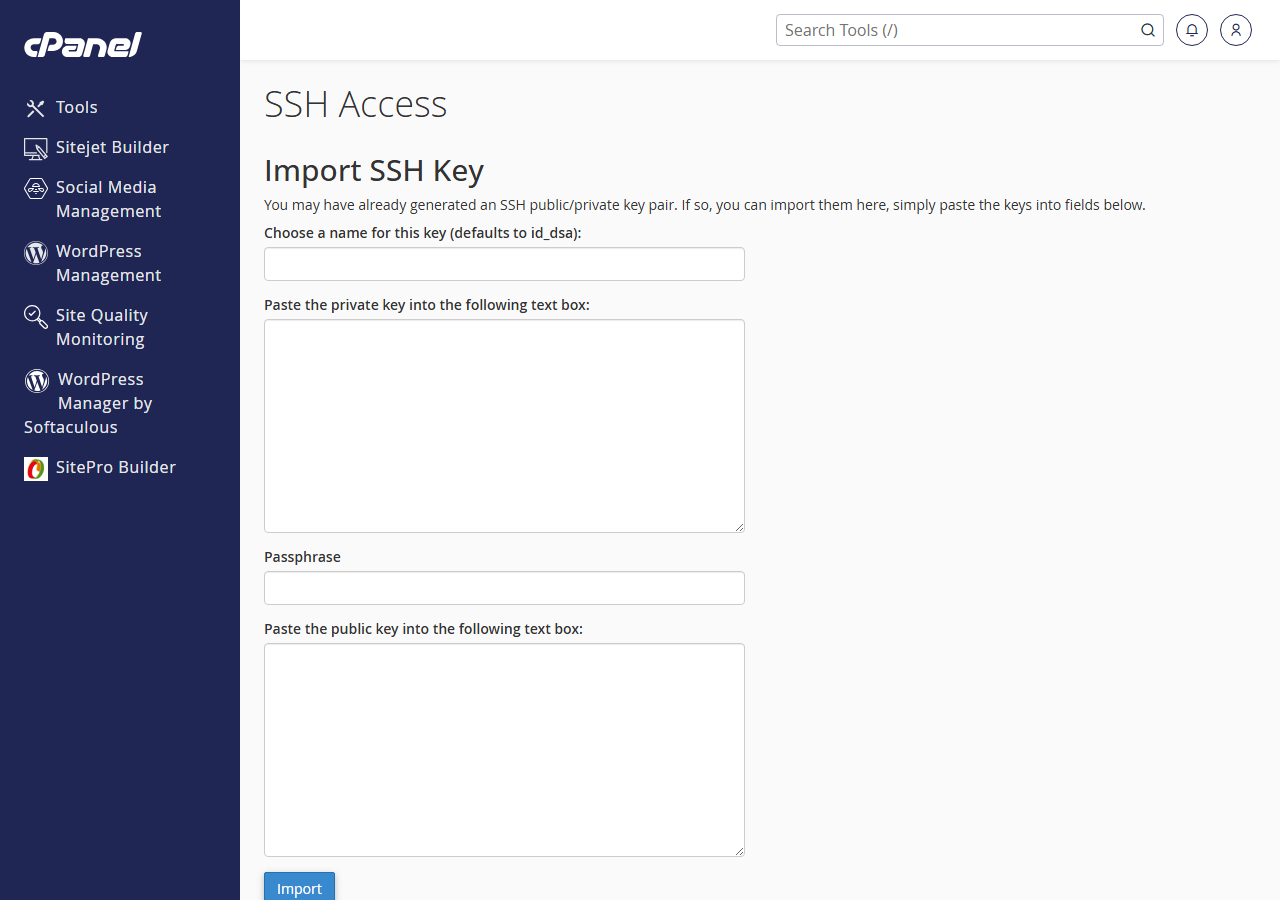
- Authorise the key.
Back on the Manage SSH Keys screen, find your newly imported key and click Manage next to it. On the authorisation screen, click Authorise. You will see a confirmation message. Your public key is now active on the server.
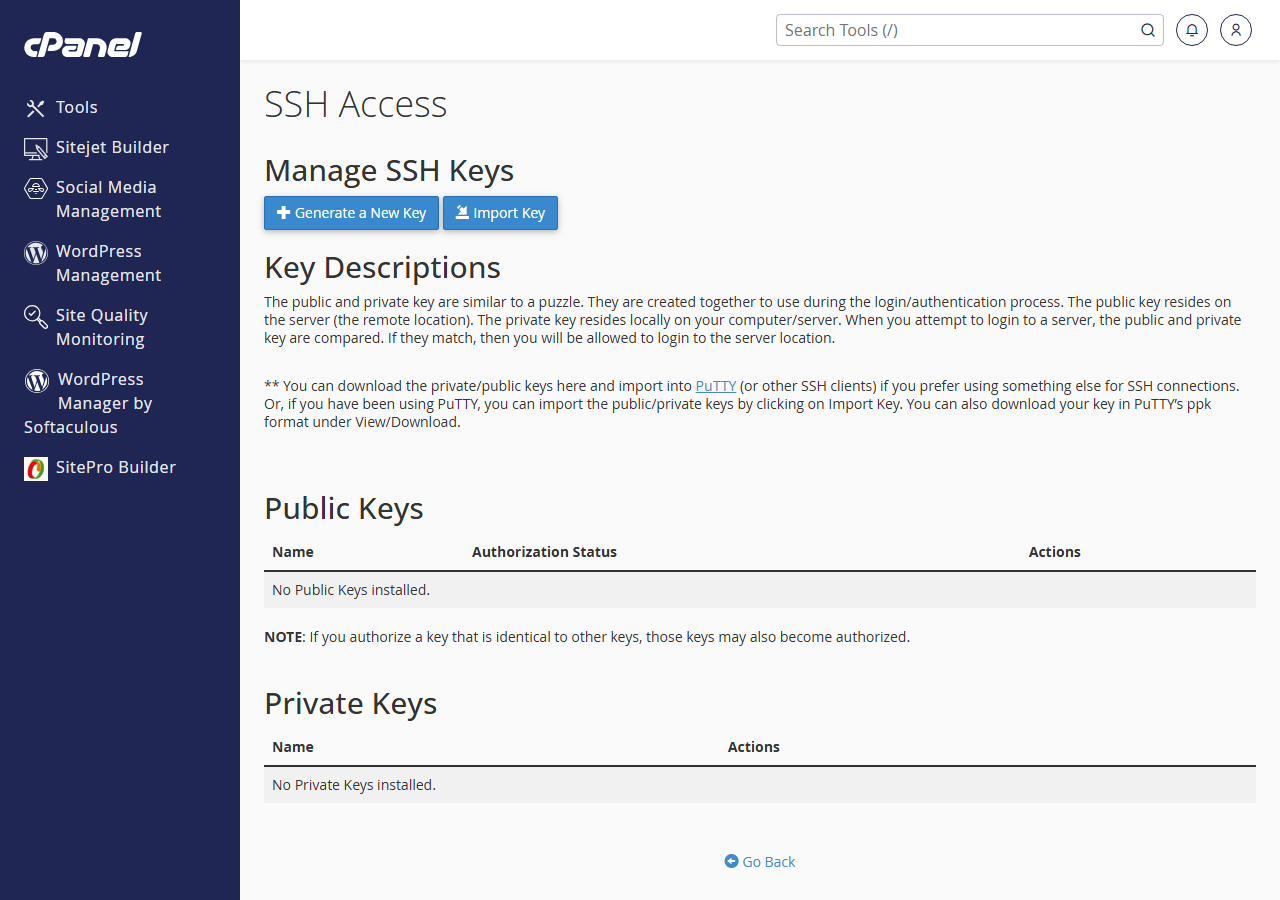
Connect to your server using your SSH key
With the public key authorised in cPanel, you can now connect from Terminal using your private key. SSH will match your private key against the public key on the server and, after you enter your passphrase once, macOS Keychain can store it so you are not prompted again.
- Return to your home directory.
Run the following to leave the.sshdirectory before connecting.
cd ~/- Connect with your private key.
Run the command below, replacingcpanelusernamewith your cPanel username,yourdomain.co.ukwith your server hostname or primary domain,21098with your actual SSH port number, and~/.ssh/id_ed25519with your key path if you used a custom filename.
ssh -p 21098 -i ~/.ssh/id_ed25519 cpanelusername@yourdomain.co.uk- Enter your passphrase and save it to Keychain.
macOS will prompt you for your private key passphrase. Enter it, then tick Remember password in my keychain. On future connections from the same Mac, you will not be prompted again.
You are now connected to your server. On subsequent logins from the same Mac, SSH will use the key automatically and you can omit the -i flag if your key is stored at the default path.
Troubleshooting
Permission denied (publickey)
This error means the server did not accept your key. The most common causes are that the key was not authorised in cPanel, the wrong username was used in the SSH command, or the private key file permissions are too open.
- Confirm the key is listed and authorised under Manage SSH Keys in cPanel.
- Check your cPanel username matches exactly what you entered in the SSH command.
- Run
chmod 600 ~/.ssh/id_ed25519to set correct permissions on your private key file. SSH refuses to use key files that are readable by other users. - Run
chmod 700 ~/.sshto set correct permissions on the.sshdirectory itself.
Connection refused or timeout
If the connection does not reach the server at all, the SSH port number is likely incorrect or your IP address may be blocked by the server’s firewall.
- Confirm the correct SSH port with your hosting welcome email or the client area. cPanel hosting commonly uses a non-standard port.
- Check whether your IP has been blocked. See our guide on why you cannot access your site for steps to diagnose connectivity issues.
- Try connecting with verbose output to see where the handshake fails:
ssh -v -p 21098 cpanelusername@yourdomain.co.uk
Key passphrase not saved to Keychain
On macOS Ventura and later, the Keychain integration for SSH passphrases requires an additional configuration step. If you are prompted for your passphrase every time, add the following to your SSH config file.
Open or create the file at ~/.ssh/config and add these lines:
Host *
  AddKeysToAgent yes
  UseKeychain yes
  IdentityFile ~/.ssh/id_ed25519
Save the file and reconnect. macOS will add your key to the agent and store the passphrase in Keychain automatically.
Wrapping up
You have generated an Ed25519 key pair on macOS, uploaded and authorised the public key in cPanel and connected to your server without using your hosting password. Your private key, protected by a strong passphrase, is the only credential needed for future logins.
To get more from your SSH setup, see our guides on connecting and using SSH, adding an SSH key to GitHub and managing host key checking. If you transfer files over SFTP, your SSH key works with any SFTP client that supports key-based authentication, including FileZilla’s site manager.
Our cPanel hosting plans include SSH access so you can manage your account securely from the command line.
Plans and tools mentioned in this guide
Did this guide solve your problem?
Still stuck?
Our UK support team answers tickets and live chat every day. Send us the guide you were following and where it stopped working.
Keep learning
Find a guide
Related guides

Hosting that keeps up
cPanel hosting with the tools these guides use, backed by UK support.
Get cPanel Hosting
Keep your site secure
Protect your visitors with SSL certificates – from budget DV to premium EV certificates.
Get SSL Certificate