Ghost is a Node.js-based publishing platform that runs on shared hosting through cPanel’s Node.js App selector. This guide walks you through creating a Node.js application environment, installing Ghost via the command line and configuring it to serve your blog from a chosen URL.
Before you begin
- You need access to your cPanel account. See our guide on accessing your control panel.
- SSH access must be enabled on your hosting account. See our guide on connecting via SSH.
- Your domain must be pointed to your hosting account before you begin.
- Ghost requires a supported Node.js version. Check the Ghost Node.js version requirements before selecting a version in cPanel.
Create a Node.js application in cPanel
cPanel’s Node.js App selector creates an isolated virtual environment for your application. This environment controls which Node.js version your app uses and where files are served from, keeping it separate from other accounts on the server.
- Open the Node.js App selector.
Log in to cPanel and scroll to the Software section. Click Setup Node.js App. - Create a new application.
Click Create Application. You will see a form with several fields to complete. - Set the Node.js version.
Select the Node.js version recommended for your target Ghost release. Check the Ghost documentation for the current supported version before choosing. - Set the application root.
Enter the directory where Ghost files will be stored, for examplemyghostblog. cPanel will create this under your home directory automatically. - Set the application URL.
Choose the domain and optional subdirectory path where your blog will be accessible, for exampleyourdomain.co.uk/blog. - Save the application.
Click Create. cPanel generates the virtual environment and displays the application in your list.
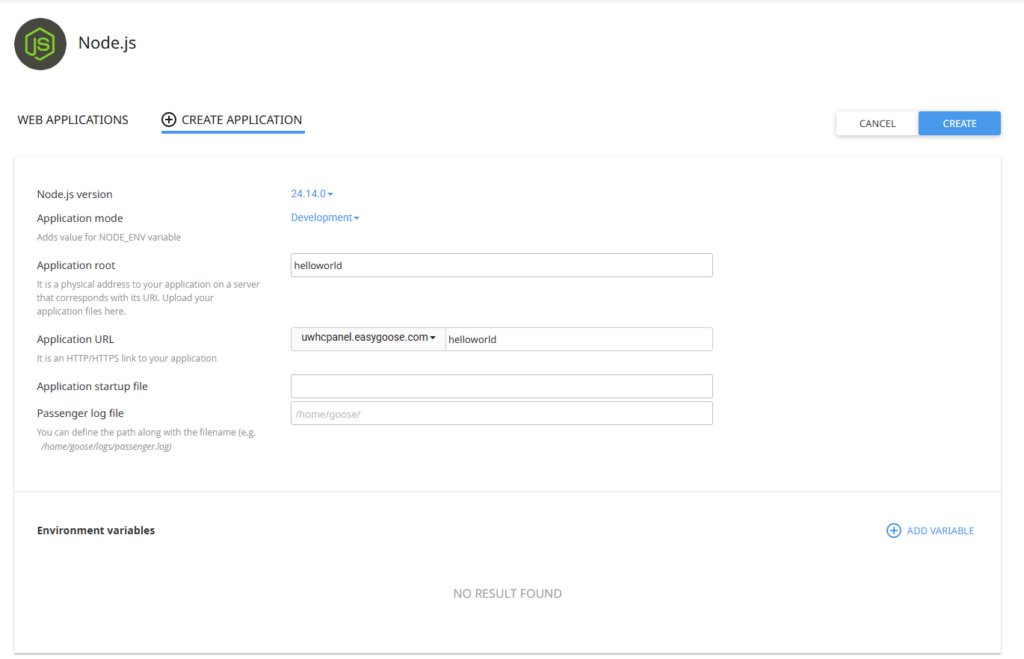
Your Node.js environment is now ready. The next step is to connect via SSH and install Ghost into it.
Install Ghost via SSH
Ghost must be installed from the command line. You will activate the Node.js virtual environment cPanel created, install the Ghost CLI tool and then run the Ghost installer. The virtual environment ensures the correct Node.js version is used throughout.
- Connect to your account via SSH.
Open a terminal and connect using your cPanel username and server hostname. See our guide on connecting via SSH if you need help with this step. - Activate the virtual environment.
Run the activation command shown in your cPanel Node.js App screen. It follows this pattern, replacingusername,approotandnodeversionwith your own values:
source /home/username/nodevenv/approot/nodeversion/bin/activate && cd /home/username/approot- Confirm your working directory.
Runpwdto verify you are inside the application root before proceeding. The output should match the path you set in cPanel. - Install Ghost CLI.
Ghost CLI is the command-line tool used to install and manage Ghost. Install it globally within your virtual environment:
npm install ghost-cli@latest -g- Clear the application root directory.
Ghost will not install into a directory that already contains files. Runpwdonce more to confirm your location, then remove all files from the directory. Take care to confirm the correct path before running this command:
pwd
rm -rf *- Run the Ghost installer.
Install Ghost without triggering its built-in nginx or MySQL setup, as your hosting environment manages these separately:
ghost install local --no-setupThe installation takes two to three minutes. Once complete, you will see a list of checked steps confirming Ghost downloaded and installed successfully.
- Create the public directory.
The server software that connects your Node.js app to the web requires apublicdirectory in the application root. Create it and set the correct permissions:
mkdir public
chmod 755 public- Configure Ghost.
Run the configuration command below, replacingyourdomain.co.uk/blogwith the URL you set in cPanel:
ghost config --url http://yourdomain.co.uk/blog --db sqlite3 --dbpath content/data/ghost_dev.db --mail DirectIf the command succeeds, no output is printed and you are returned to the prompt. A config.production.json file will now appear in your application root.
Start the application in cPanel
With Ghost installed and configured, you need to tell cPanel where to find the application’s startup file and then start the application. This connects your Ghost installation to the URL you configured earlier.
- Return to the Node.js App screen in cPanel.
Locate your application in the list and click Edit. - Update the startup file path.
In the Application startup file field, enter the path to Ghost’s startup file. This is typicallycurrent/index.jsrelative to your application root. - Save and start the application.
Click Save, then click Start App. The application may take a few moments to start. If you see a temporary holding page, wait a moment and refresh.
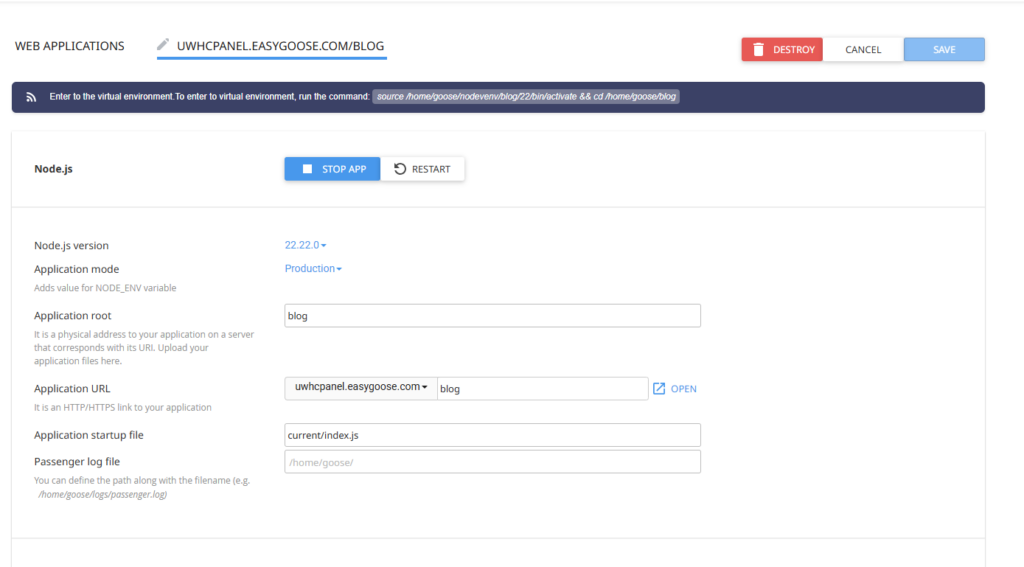
Once the application starts, browse to your blog URL to confirm Ghost is running. To access the Ghost admin area, append /ghost to your blog URL, for example http://yourdomain.co.uk/blog/ghost. Complete the setup wizard to create your admin account.
Troubleshooting
The application will not start
If the application fails to start or remains in a stopped state after clicking Start App, the startup file path is the most common cause. An incorrect path means the server cannot locate Ghost’s entry point.
- Confirm the startup file path in cPanel matches the actual file location inside your application root.
- Run
ls -lainside your application root via SSH to verify thecurrentsymlink andindex.jsfile exist. - Check that the
publicdirectory exists and has permissions set to755.
Ghost install fails with a directory not empty error
Ghost requires a completely empty directory before installation. If cPanel placed any files in the application root when you created the environment, the installer will refuse to continue.
- Run
pwdto confirm you are in the correct directory, then runls -lato see what files remain. - Remove all files with
rm -rf *and re-run the Ghost installer. - Do not run
rm -rf *from your home directory. Always confirm the path withpwdfirst.
The blog URL returns a 404 or blank page
A 404 or blank response after starting the application usually means the URL configured in Ghost does not match the URL set in cPanel, or the application has not fully started yet.
- Compare the URL in
config.production.jsonwith the application URL shown in cPanel. They must match exactly. - Wait 60 seconds after clicking Start App and then refresh the page.
- Check that your domain’s DNS is pointing to your hosting account. See our guide on checking DNS propagation.
Wrapping up
You have created a Node.js application environment in cPanel, installed Ghost and its CLI tool via SSH, configured the database and URL settings and started the application. Your Ghost blog is now accessible at the URL you chose, with the admin area available at /ghost.
After completing your admin setup, review your domain’s SSL configuration to serve your blog over HTTPS. See our guides on installing a Let’s Encrypt SSL certificate and forcing HTTPS for the next steps. If you need to manage SSH keys or work with Git for theme development, our guide on adding an SSH key to GitHub may also be useful.
Our Node.js hosting plans are built to run Node.js applications with cPanel access included.

