Running a reseller hosting business requires managing multiple client websites under one hosting account. WHM (Web Host Manager) and cPanel provide the tools you need to create hosting packages, provision client accounts and automate billing without manual intervention.
You will configure hosting packages, create client accounts, set up automated billing through WHMCS and apply white-label branding. Once complete, you can offer professional hosting services under your own brand with minimal ongoing administration.
Before you begin
- You need access to WHM using the credentials provided when you signed up for reseller hosting.
- We recommend familiarising yourself with the WHM dashboard layout before creating client accounts.
Log in to WHM
WHM is the administrative interface where you manage all client accounts and server-level settings. You need to access it before you can create hosting packages or provision accounts.
- Navigate to the WHM login page.
Access WHM by visitinghttps://yourdomain.co.uk:2087orhttps://your-server-ip:2087, replacing yourdomain.co.uk with your actual domain name or your-server-ip with your server’s IP address. - Enter your credentials.
Use the reseller username and password provided by your hosting provider. These credentials are separate from any cPanel accounts you create later. - Review the dashboard.
Once logged in, take a moment to explore the left sidebar navigation. This is where you will access account creation, package management and branding settings throughout this guide.
You are now logged into WHM and ready to configure hosting packages for your clients.
Configure hosting packages
Hosting packages define the resource limits and features available to each client account. You create these packages before provisioning any client accounts so you can assign the appropriate tier during account creation.
- Open the package creation page.
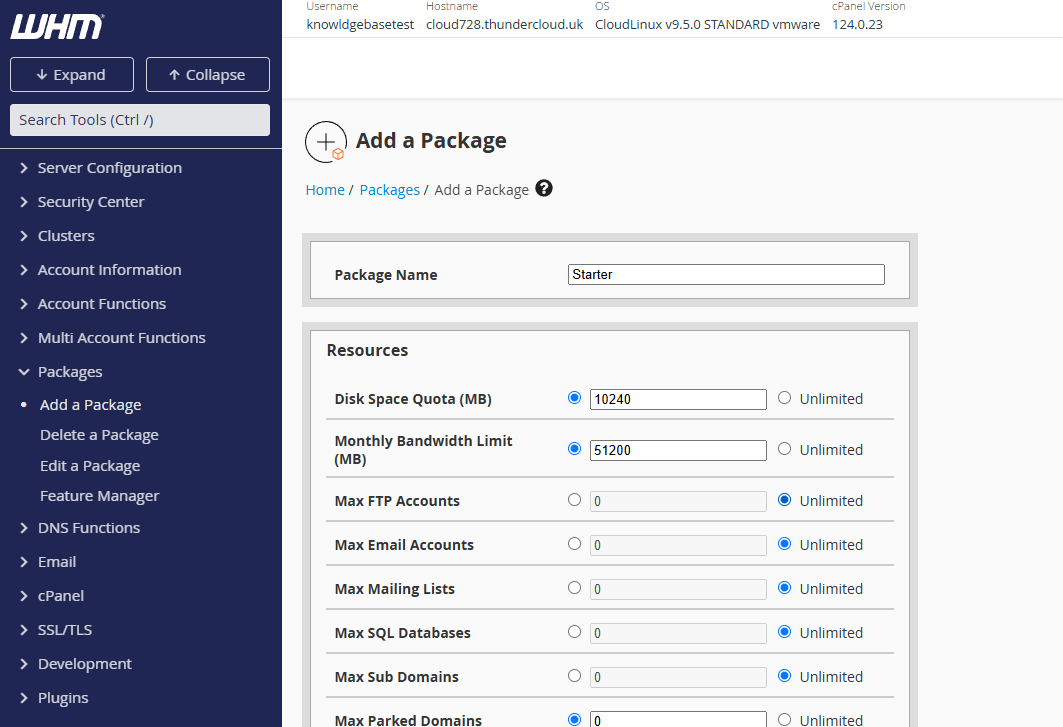
In the WHM sidebar, search for Add a Package or navigate to Packages and select Add a Package. - Name your package.
Enter a descriptive name that reflects the tier level, such as Starter, Premium or Enterprise. This name appears when you assign packages to client accounts. - Set resource limits.
Configure the following limits based on your target market: disk space quota, monthly bandwidth allowance, number of email accounts, FTP accounts, MySQL databases and addon domains. These limits prevent individual clients from consuming excessive resources. - Save the package.
Click Add at the bottom of the page. Your package is now available for assignment when creating client accounts. - Create additional packages.
Repeat this process to create multiple tiers. Most resellers offer three to five packages with progressively higher limits.
Your hosting packages are configured. You can now create client accounts and assign them to the appropriate tier. For more control over package features, read our guide on using the feature manager in WHM.
Create client accounts
Each client needs a separate cPanel account to manage their website, databases and email independently. You create these accounts in WHM and assign them to one of your hosting packages.
- Navigate to account creation.
In the WHM sidebar, search for Create a New Account or find it under Account Functions. - Enter the domain name.
Type the client’s primary domain in the Domain field. This domain becomes the cPanel login URL and determines the default DNS records. - Set account credentials.
Create a unique username (typically 8 characters or fewer) and a strong password. The client uses these credentials to access their cPanel account atyourdomain.co.uk/cpanel. - Add contact information.
Enter the client’s email address in the Email field. WHM sends account details and notifications to this address. - Assign a hosting package.
Select one of the packages you created earlier from the Choose a Package dropdown. This applies the resource limits and features you configured. - Create the account.
Click Create at the bottom of the page. WHM provisions the account and generates the cPanel login details.
The client account is now active. You can provide the cPanel login URL and credentials to your client so they can begin managing their hosting. For detailed instructions, see our guide on creating cPanel accounts in WHM.
Set up automated billing with WHMCS
Manual invoicing becomes impractical once you manage more than a handful of clients. WHMCS automates account provisioning, invoice generation, payment processing and account suspension for non-payment.
- Purchase a WHMCS licence.
Visit the WHMCS website and select a licence tier based on the number of clients you plan to manage. You need an active licence before installation. - Install WHMCS via Softaculous.
Log into your cPanel account (not WHM) and open Softaculous Apps Installer. Search for WHMCS, click Install and follow the prompts. For step-by-step instructions, read our guide on installing WHMCS with Softaculous. - Connect WHMCS to WHM.
In the WHMCS admin area, navigate to Setup then Products/Services and Servers. Add your WHM server details including hostname, username and API token. This allows WHMCS to create and manage cPanel accounts automatically. - Configure products and pricing.
Create product groups that match your hosting packages. Set pricing for monthly, quarterly and annual billing cycles. WHMCS generates invoices based on these settings. - Set up payment gateways.
Enable payment processors such as PayPal, Stripe or bank transfer under Setup then Payments and Payment Gateways. Clients can then pay invoices directly through WHMCS. - Configure automation settings.
Under Setup then Automation Settings, enable automatic invoice generation, payment reminders and account suspension for overdue invoices. This removes the need for manual intervention.
WHMCS now handles billing, provisioning and client communication automatically. New orders create cPanel accounts without manual intervention, and unpaid accounts suspend themselves after your configured grace period.
Migrate existing client websites
If you are moving clients from another hosting provider, you need to transfer their websites, databases and email accounts to your reseller hosting. You can use automated migration tools or perform manual transfers depending on the source hosting environment.
- Choose a migration method.
For full cPanel account transfers, use our serviced migration centre which handles the entire process. For non-cPanel hosting or selective transfers, perform a manual migration. - Request serviced migration.
If migrating from another cPanel host, submit a migration request through our migration centre. Our team transfers the complete account including files, databases, email accounts and DNS records. Read our guide on migrating from cPanel for detailed instructions. - Perform manual migration.
For non-cPanel sources, download website files via FTP, export databases through phpMyAdmin and back up email accounts. Then upload files to the new cPanel account, import databases and recreate email accounts. See our guide on manual cPanel migration for step-by-step instructions. - Update DNS records.
After migration, point the domain’s nameservers to your reseller hosting or update A records to the new server IP address. DNS changes take up to 48 hours to propagate globally. - Verify the migration.
Once DNS propagates, test the website, check database connections and send test emails to confirm everything transferred correctly.
Your client websites are now hosted on your reseller account. Monitor them over the next few days to catch any issues that emerge after DNS propagation completes.
Apply white-label branding
White-label branding replaces default WHM and cPanel branding with your own logo, colours and support links. This creates a professional appearance and reinforces your brand identity when clients log into their hosting accounts.
- Access branding settings.
In WHM, search for Basic cPanel/WHM Setup or navigate to Server Configuration and select Basic cPanel/WHM Setup. - Upload your logo.
Scroll to the Branding section and upload your company logo. Use a PNG file with a transparent background for best results. The logo appears in the top-left corner of cPanel and WHM. - Customise the login theme.
Select a colour scheme that matches your brand or upload custom CSS to modify the login page appearance. This affects what clients see before logging into cPanel. - Set support contact details.
Replace default support links with your own contact page URL, support email address and phone number. Clients see these details when they need assistance. - Configure footer text.
Update the footer text to display your company name and copyright notice instead of the default cPanel branding. - Save your changes.
Click Save at the bottom of the page. Your branding now appears across all client cPanel accounts.
Clients now see your branding throughout their hosting experience. For additional customisation options, read our guide on customising reseller branding.
Secure client websites with SSL certificates
SSL certificates encrypt data transmitted between websites and visitors. All client websites need SSL certificates to display the padlock icon in browsers and avoid security warnings that drive visitors away.
- Enable AutoSSL.
AutoSSL automatically provisions free Let’s Encrypt certificates for all domains on your reseller account. In WHM, search for Manage AutoSSL and ensure it is enabled. This runs daily and installs certificates for any domains that need them. - Verify certificate installation.
Check that AutoSSL installed certificates by visiting client websites withhttps://in the URL. The browser should display a padlock icon without warnings. - Force HTTPS redirects.
Once certificates are installed, configure automatic redirects from HTTP to HTTPS. In each cPanel account, use the Force HTTPS Redirect option or add redirect rules to.htaccessfiles. - Offer premium certificates.
For clients who need extended validation or wildcard certificates, purchase premium SSL certificates through your hosting provider. These provide additional trust indicators and cover multiple subdomains.
All client websites now load over HTTPS with valid SSL certificates. For detailed AutoSSL configuration, see our guide on using AutoSSL.
Configure security features
As a reseller, you can enable security features within your own WHM account and across the cPanel accounts you manage. Server-level security such as firewall configuration and brute-force protection is handled by the hosting provider on shared hosting plans.
- Enable two-factor authentication for your WHM login.
In WHM, click your username in the top-right corner and select Two-Factor Authentication. Scan the QR code with an authenticator app and enter the verification code to activate it. This protects your WHM account if your password is ever compromised. - Enforce strong passwords for client accounts.
When creating cPanel accounts, set the Password Strength Slider to at least 65 (Strong). You can also configure package-level password requirements to ensure clients change their initial password on first login. - Enable spam filtering on client email accounts.
Log into each client’s cPanel account and navigate to Email then Apache SpamAssassin. Enable SpamAssassin and set the spam score threshold. This reduces the volume of spam reaching client inboxes without requiring server-level configuration. - Set up email authentication records.
In each client’s cPanel, navigate to Email then Email Deliverability and ensure SPF and DKIM records are configured. These DNS records reduce the chance of legitimate emails being marked as spam by recipient mail servers.
Your client accounts now have the security features available at the reseller level configured. For questions about server-level security settings or firewall configuration, contact your hosting provider’s support team.
Further reading on reseller hosting
Understanding the business aspects of reseller hosting helps you price services competitively and provide better client support. The WHMCS blog publishes regular articles on billing automation, client management and hosting business growth strategies. For technical deep dives into WHM features, the cPanel WHM documentation covers every configuration option in detail.
Pricing strategy significantly impacts your success as a reseller. Research competitor pricing in your target market and calculate your costs including hosting fees, WHMCS licensing and support time. Most successful resellers price packages 30-50% above their wholesale costs to cover overhead and generate profit. Consider offering annual discounts to improve cash flow and reduce client churn.
Client support distinguishes professional resellers from those who struggle to retain customers. Set clear response time expectations in your terms of service and stick to them. Many resellers offer tiered support with faster response times for higher-tier packages. Document common issues and solutions in a knowledge base to reduce support ticket volume. WHMCS includes a built-in support ticket system and knowledge base module that integrates with your billing platform.
Wrapping up
Your reseller hosting business is now configured and ready to accept clients. You created hosting packages, set up automated billing through WHMCS, applied white-label branding and configured security features. Clients can now sign up, receive instant account provisioning and manage their hosting through a professional interface displaying your brand.
Review the reseller hosting FAQs for answers to common questions about managing your business. For guidance on pricing strategy, client acquisition and support workflows, read our detailed guide on setting up a reseller hosting business. Our reseller hosting plans include WHM access, WHMCS licensing and white-label options.

Need multiple accounts?
Create isolated individual accounts for your clients and manage them all from one dashboard.
Get Reseller Hosting
Need more control?
Upgrade to VPS hosting for scalable resources and root access to your server.
Get VPS Hosting